Soil moisture sensor(YL-69)
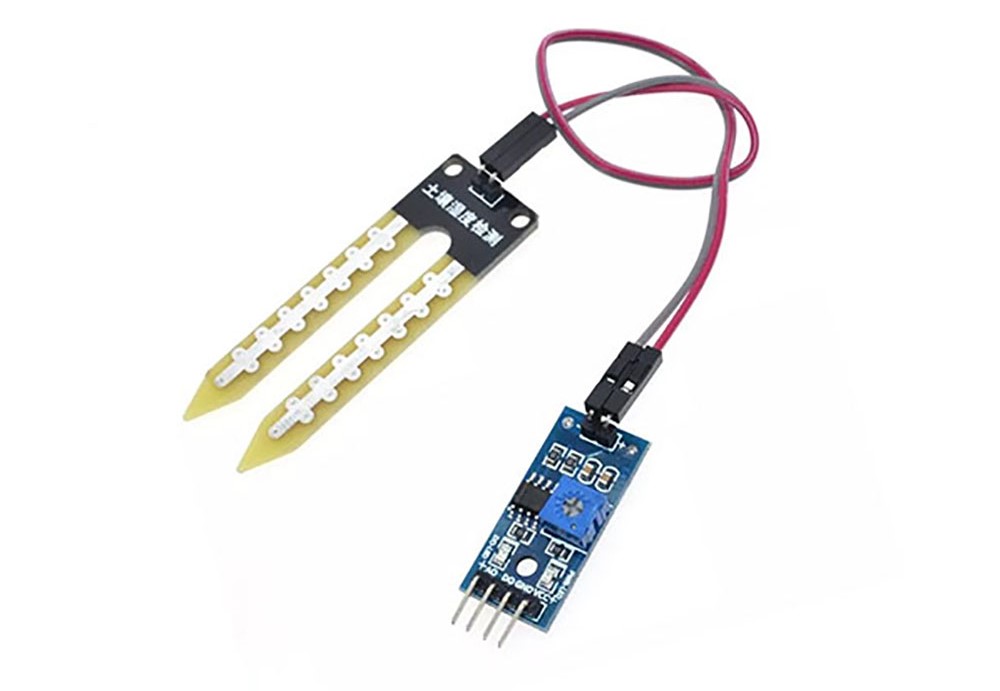
Overview
The soil moisture sensor (YL-69) is a sensor used to measure the moisture content of the soil. It is utilized in various fields such as agriculture, horticulture, and environmental monitoring, playing an important role in maintaining crop health and productivity. It can be used with microcontrollers like Arduino to monitor moisture levels in real-time.
Operating Principle
The YL-69 sensor uses two electrodes to measure the electrical conductivity of the soil. As the moisture content of the soil increases, the resistance value decreases, leading to an increase in electrical conductivity, which is converted into an analog signal and transmitted to the microcontroller.
Specifications
| List | Explanation |
|---|---|
| Sensitivity Adjustment | The sensitivity can be adjusted by turning the variable resistor attached to the PCB. |
| Voltage | 3.3V - 5V |
| Output Mode | Supports both digital and analog outputs
Digital Output: Outputs LOW when the threshold is exceeded, and HIGH otherwise. Analog Output: Outputs a value between 0 and 1023. |
| 'Ease of Installation | Equipped with fixed bolt holes for easy installation. |
| Size | PCB: 3cm x 1.6cm
Probe: Approximately 2cm x 6cm |
| Power and Output Indicators | Power indicator (red) and digital switch output indicator (green) |
| Chip | LM393 |
Usage Example
1. Checking Soil Moisture Sensor Output Values via Serial Monitor
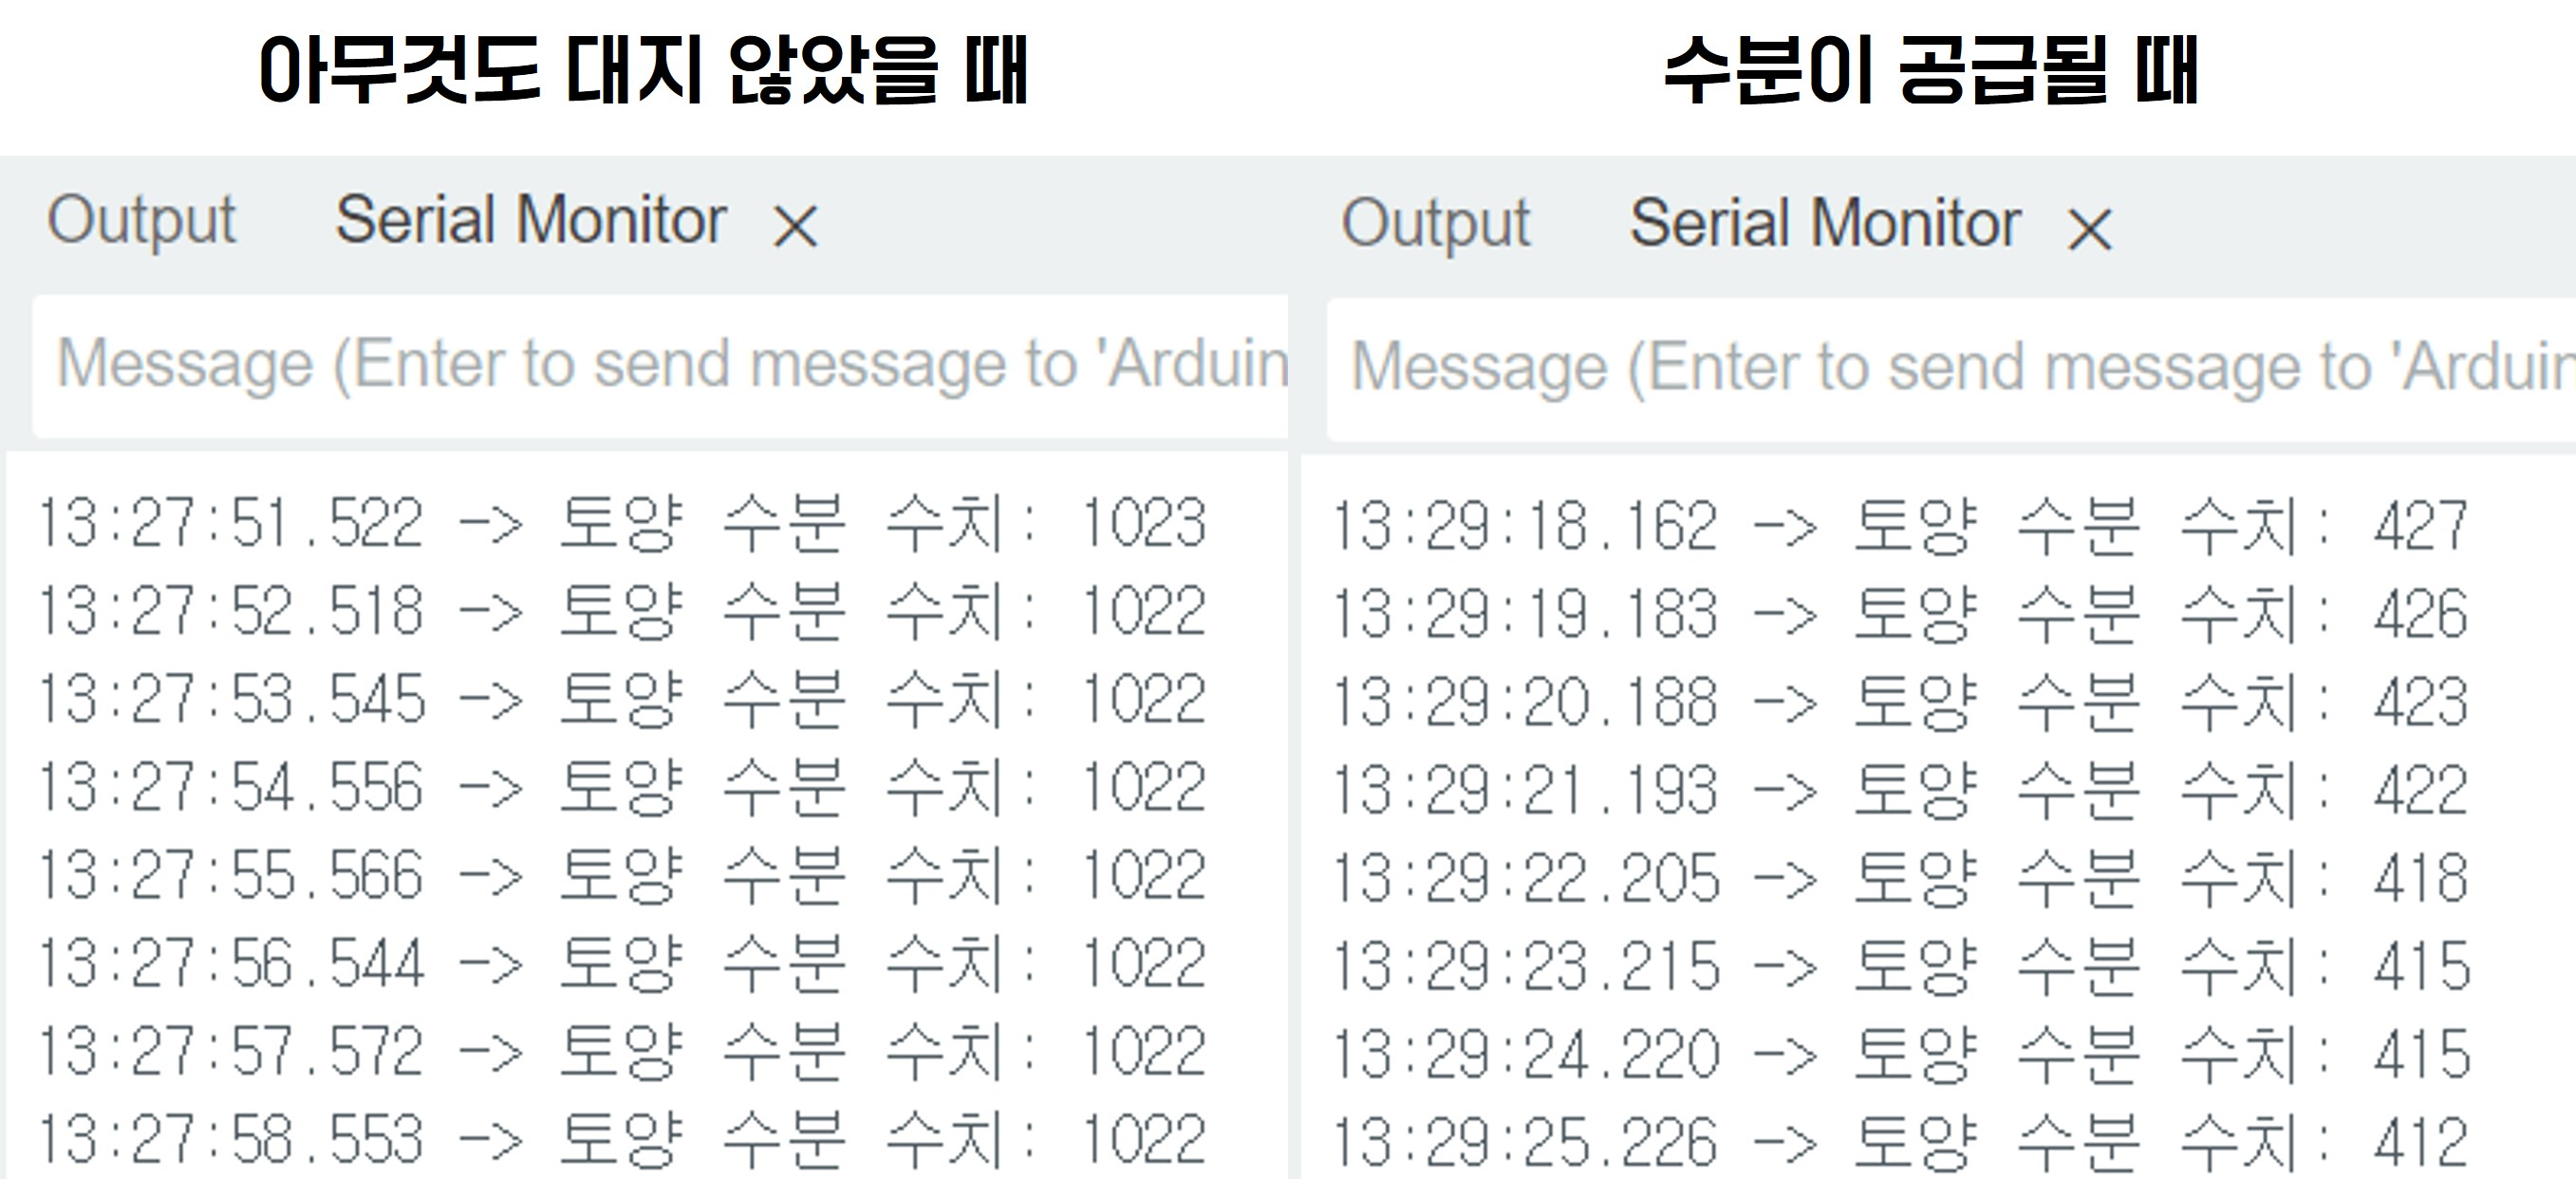
You can check the analog output values through the serial monitor.
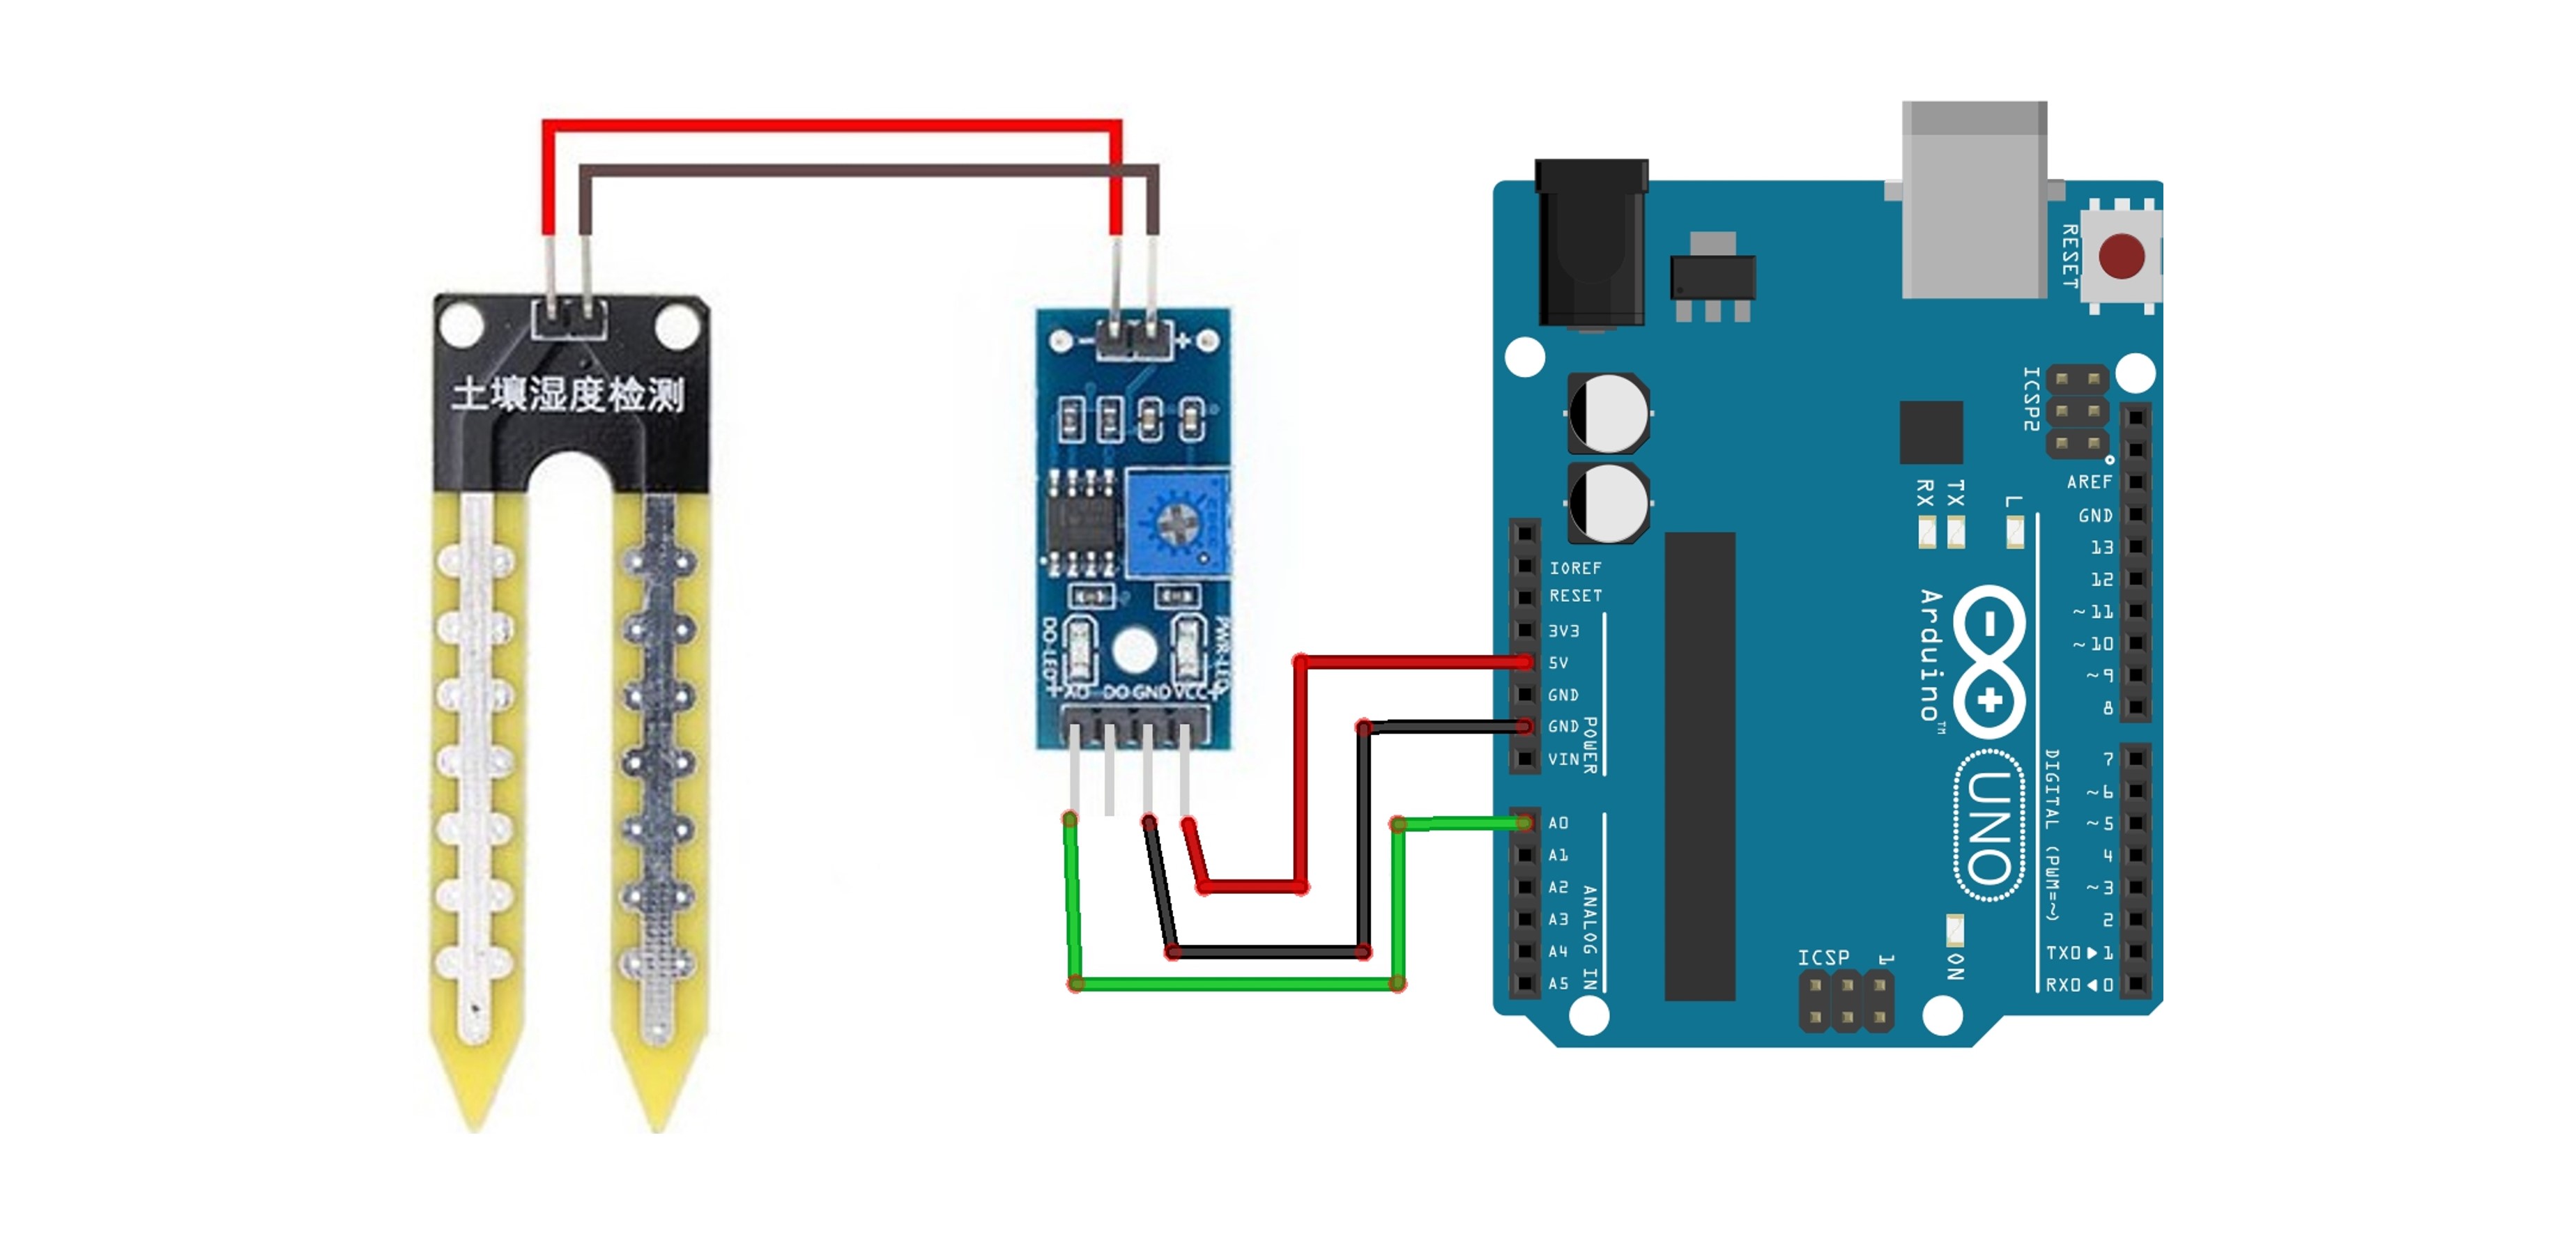
1-1. Circuit Configuration
The YL-69 soil moisture sensor supports both digital and analog outputs, consisting of a total of 4 pins: VCC, GND, DO, and AO.
In the circuit diagram, if digital output is needed, connect the DO pin; if analog output is needed, connect the AO pin to the Arduino.
In this example, we require an analog output, so the AO pin is connected to the A0 pin of the Arduino.
| YL-69 Pin | Arduino |
|---|---|
| VCC | 5V |
| GND | GND |
| AO | A0 |
1-2. Arduino Code
const int sensorPin = A0;

void setup() {
    Serial.begin(9600); // Start serial communication
}

void loop() {
    int sensorValue = analogRead(sensorPin); // Read sensor value
    Serial.print("Soil moisture level : ");
    Serial.println(sensorValue); // Print sensor value
    delay(1000); // Wait a second
}
1-3. Execution Result
2. Displaying Soil Moisture Sensor Value and Water Supply Necessity on LCD
This example displays the analog output value of the soil moisture sensor on an LCD and indicates whether water supply is necessary based on that value.
For more detailed information about the LCD, please refer to the LCD(Liquid Crystal Display)_EN document.
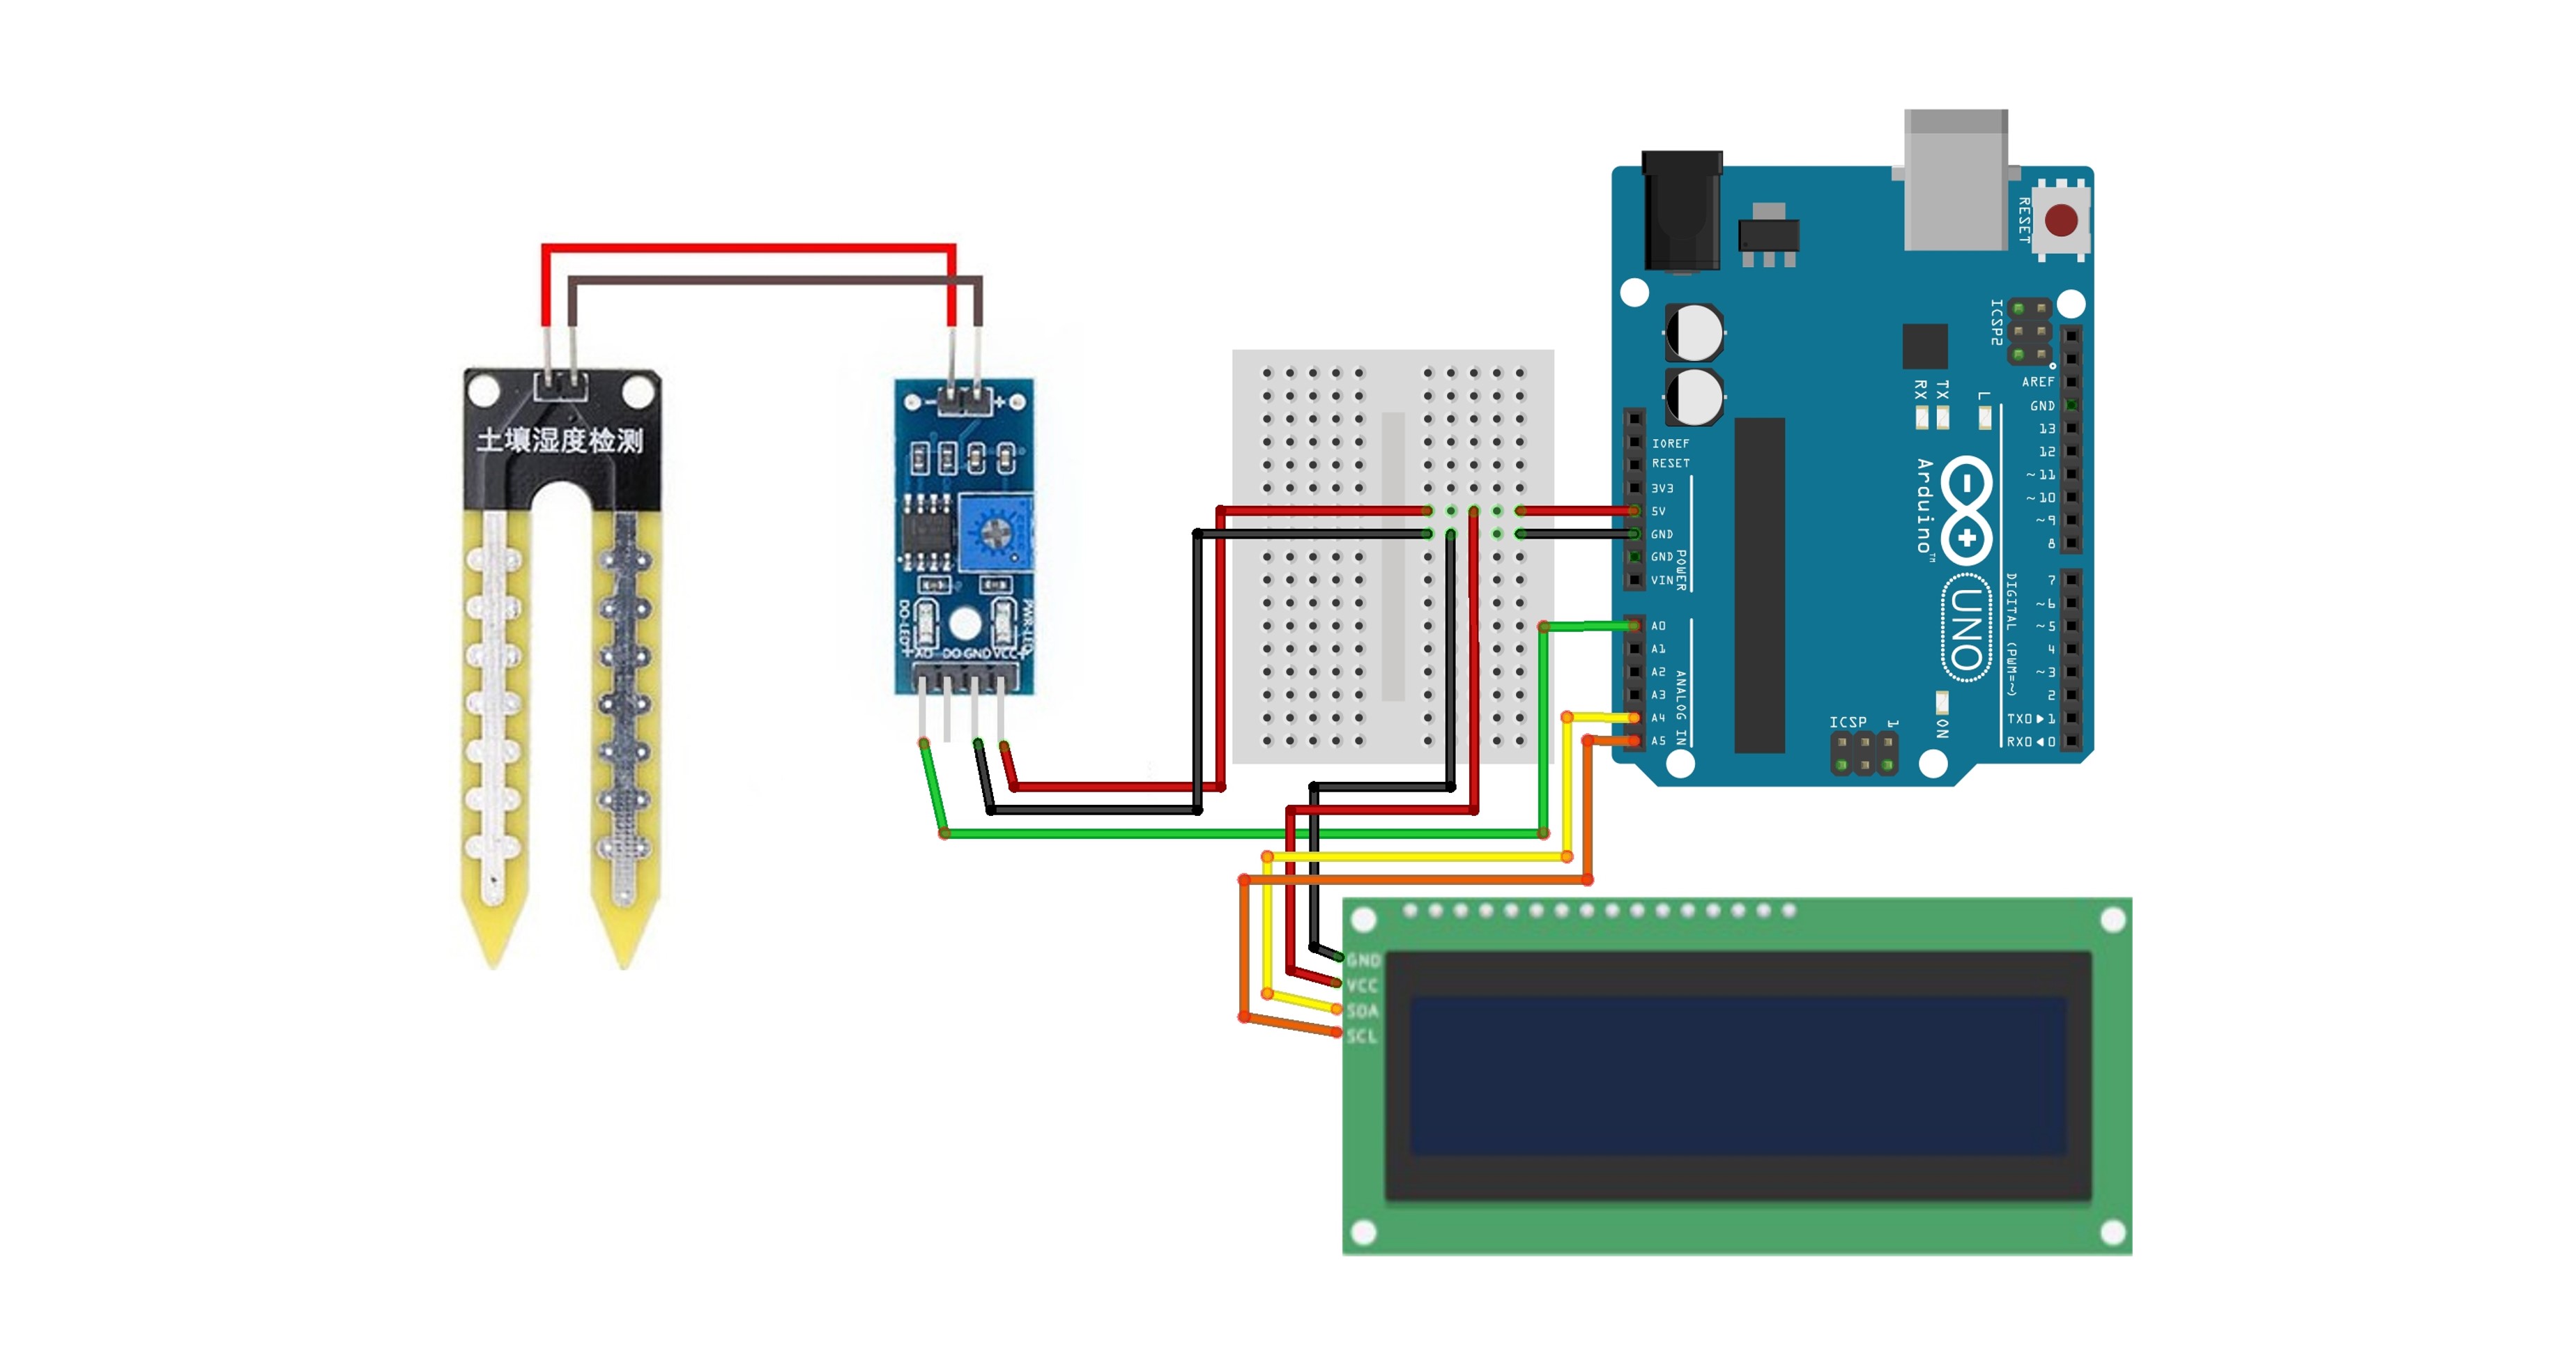
2-1. Circuit Configuration
| YL-69 Pin | Arduino | LCD Pin | Arduino | |
|---|---|---|---|---|
| VCC | 5V | VCC | 5V | |
| GND | GND | GND | GND | |
| AO | A0 | SCA | A4(Uno) / 20(Mega) | |
| SCL | A5(Uno) / 21(Mega) |
2-2. Arduino Code
#include <Wire.h>
#include <LiquidCrystal_I2C.h>

// I2C LCD initialization: address 0x27, columns 16, rows 2
LiquidCrystal_I2C lcd(0x27, 16, 2);

// YL-69 sensor pin definition
const int sensorPin = A0;

void setup() {
    lcd.init();
    lcd.clear();
    lcd.backlight(); // Turn on backlight
    Serial.begin(9600); // Start serial communication
}

void loop() {
    int sensorValue = analogRead(sensorPin); // Read sensor value
    Serial.print("Soil moisture level: ");
    Serial.println(sensorValue); // Output to serial monitor

    // Display value on LCD
    lcd.clear(); // Clear LCD screen
    lcd.setCursor(0, 0); // Move cursor to the first column of the first row
    lcd.print("water : ");
    lcd.print(sensorValue); // Output sensor value
    lcd.setCursor(0, 1); // Move cursor to the first column of the second row
    if (sensorValue > 500)
      lcd.print("Please Water");
    else
      lcd.print("Enough Water");

     delay(1000); // Wait for 1 second
}
2-3. Execution Result
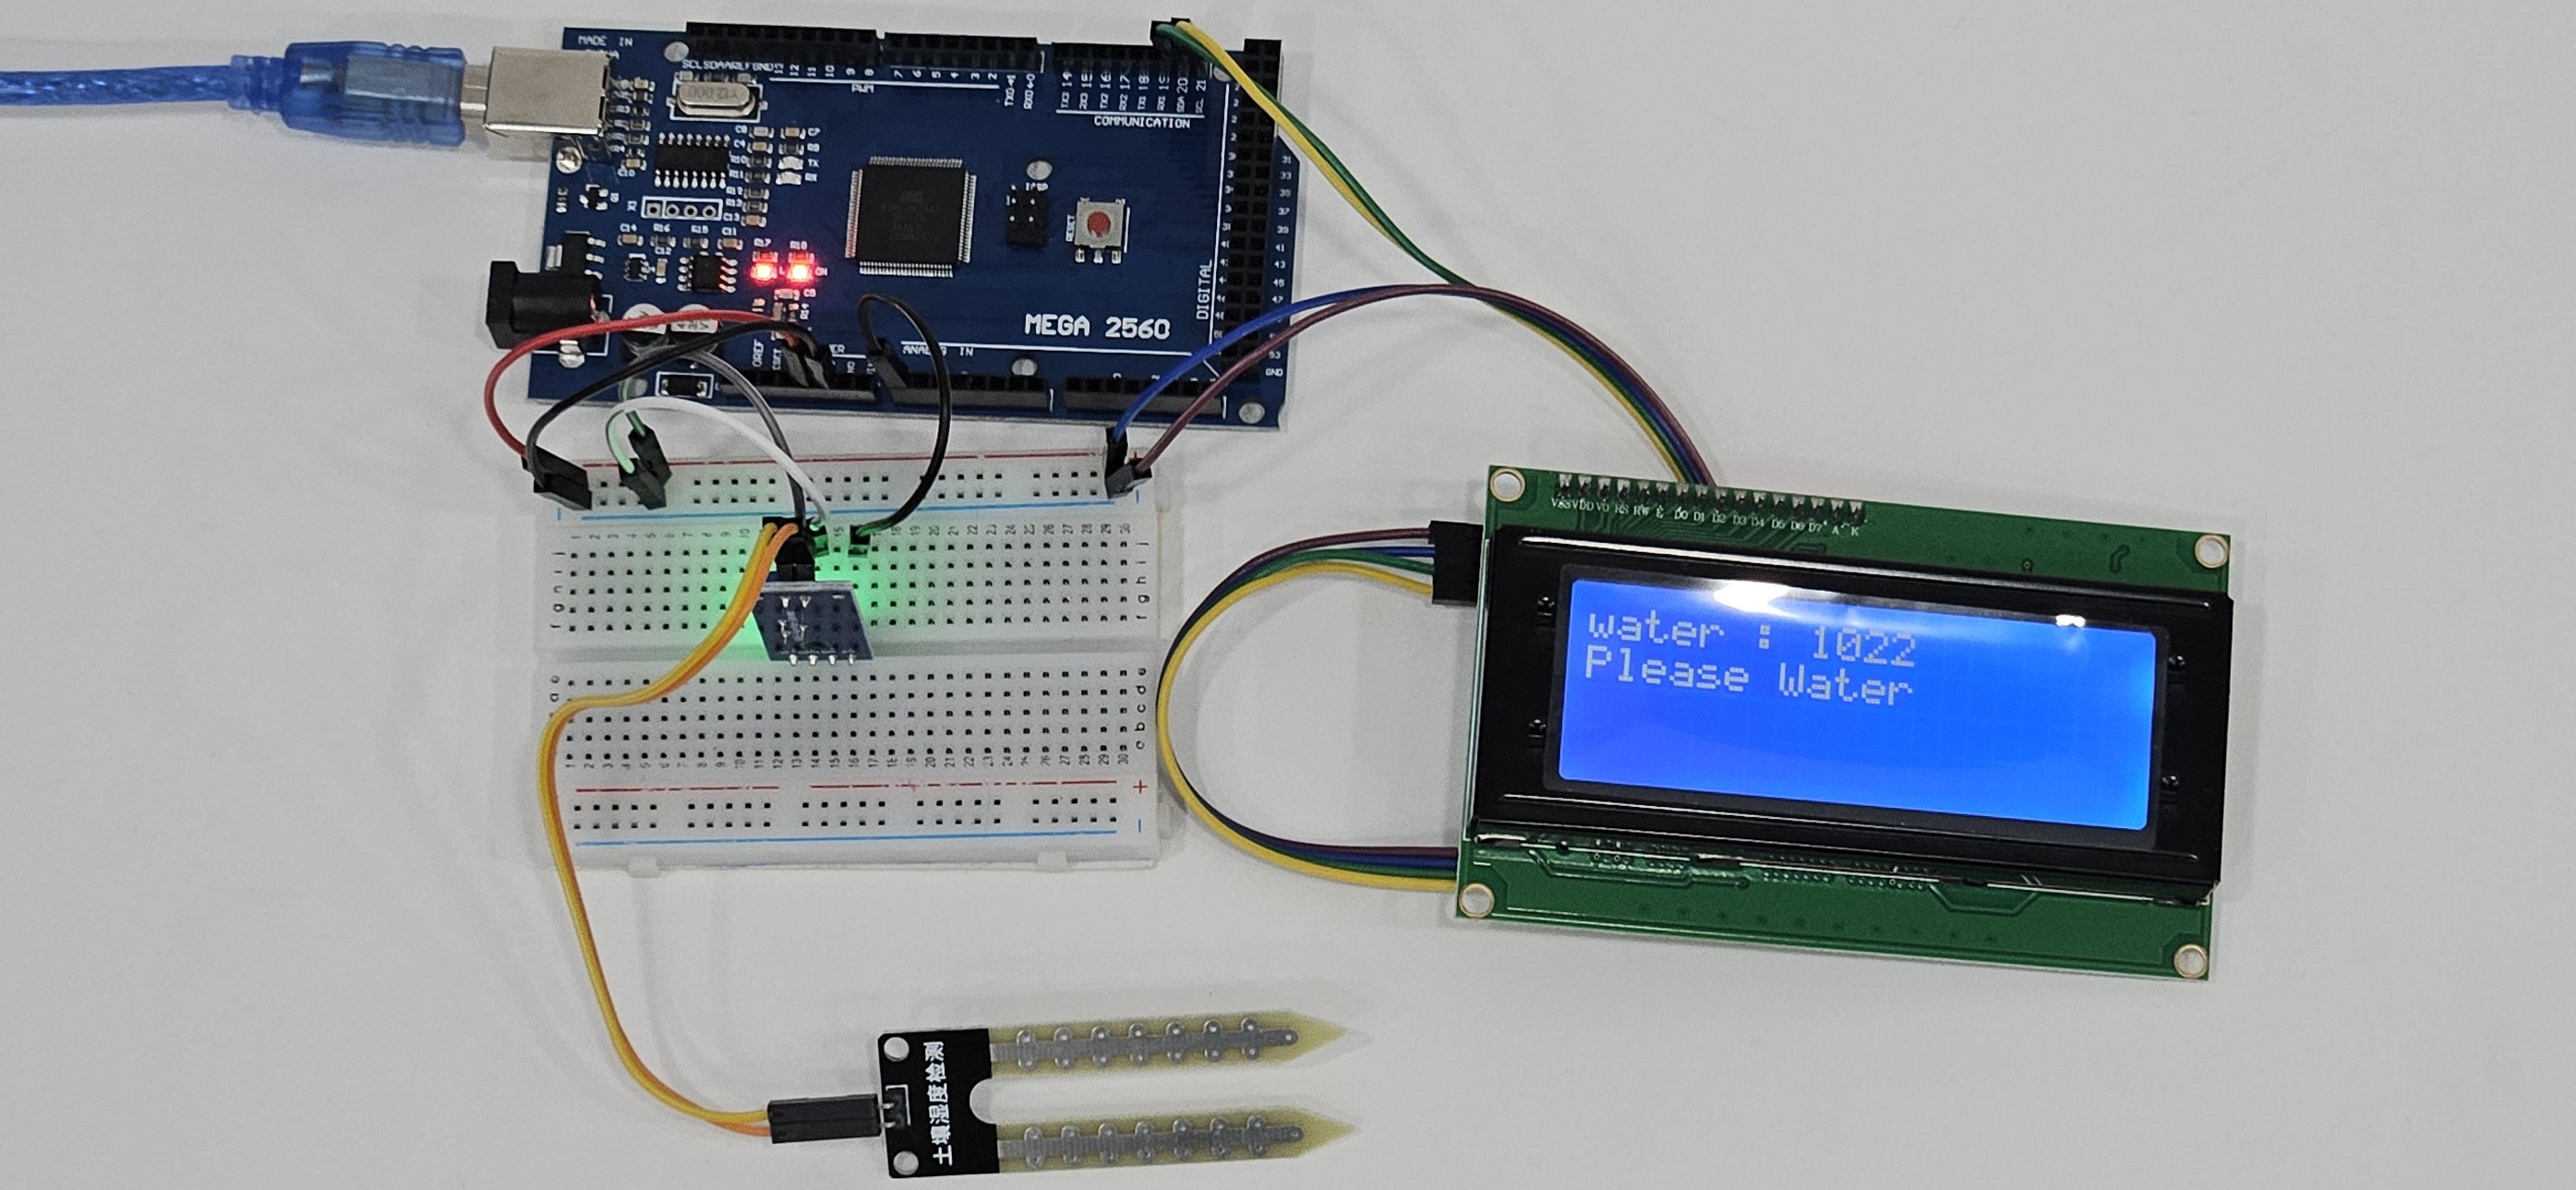
When there is no moisture, "Please Water" is displayed on the LCD.
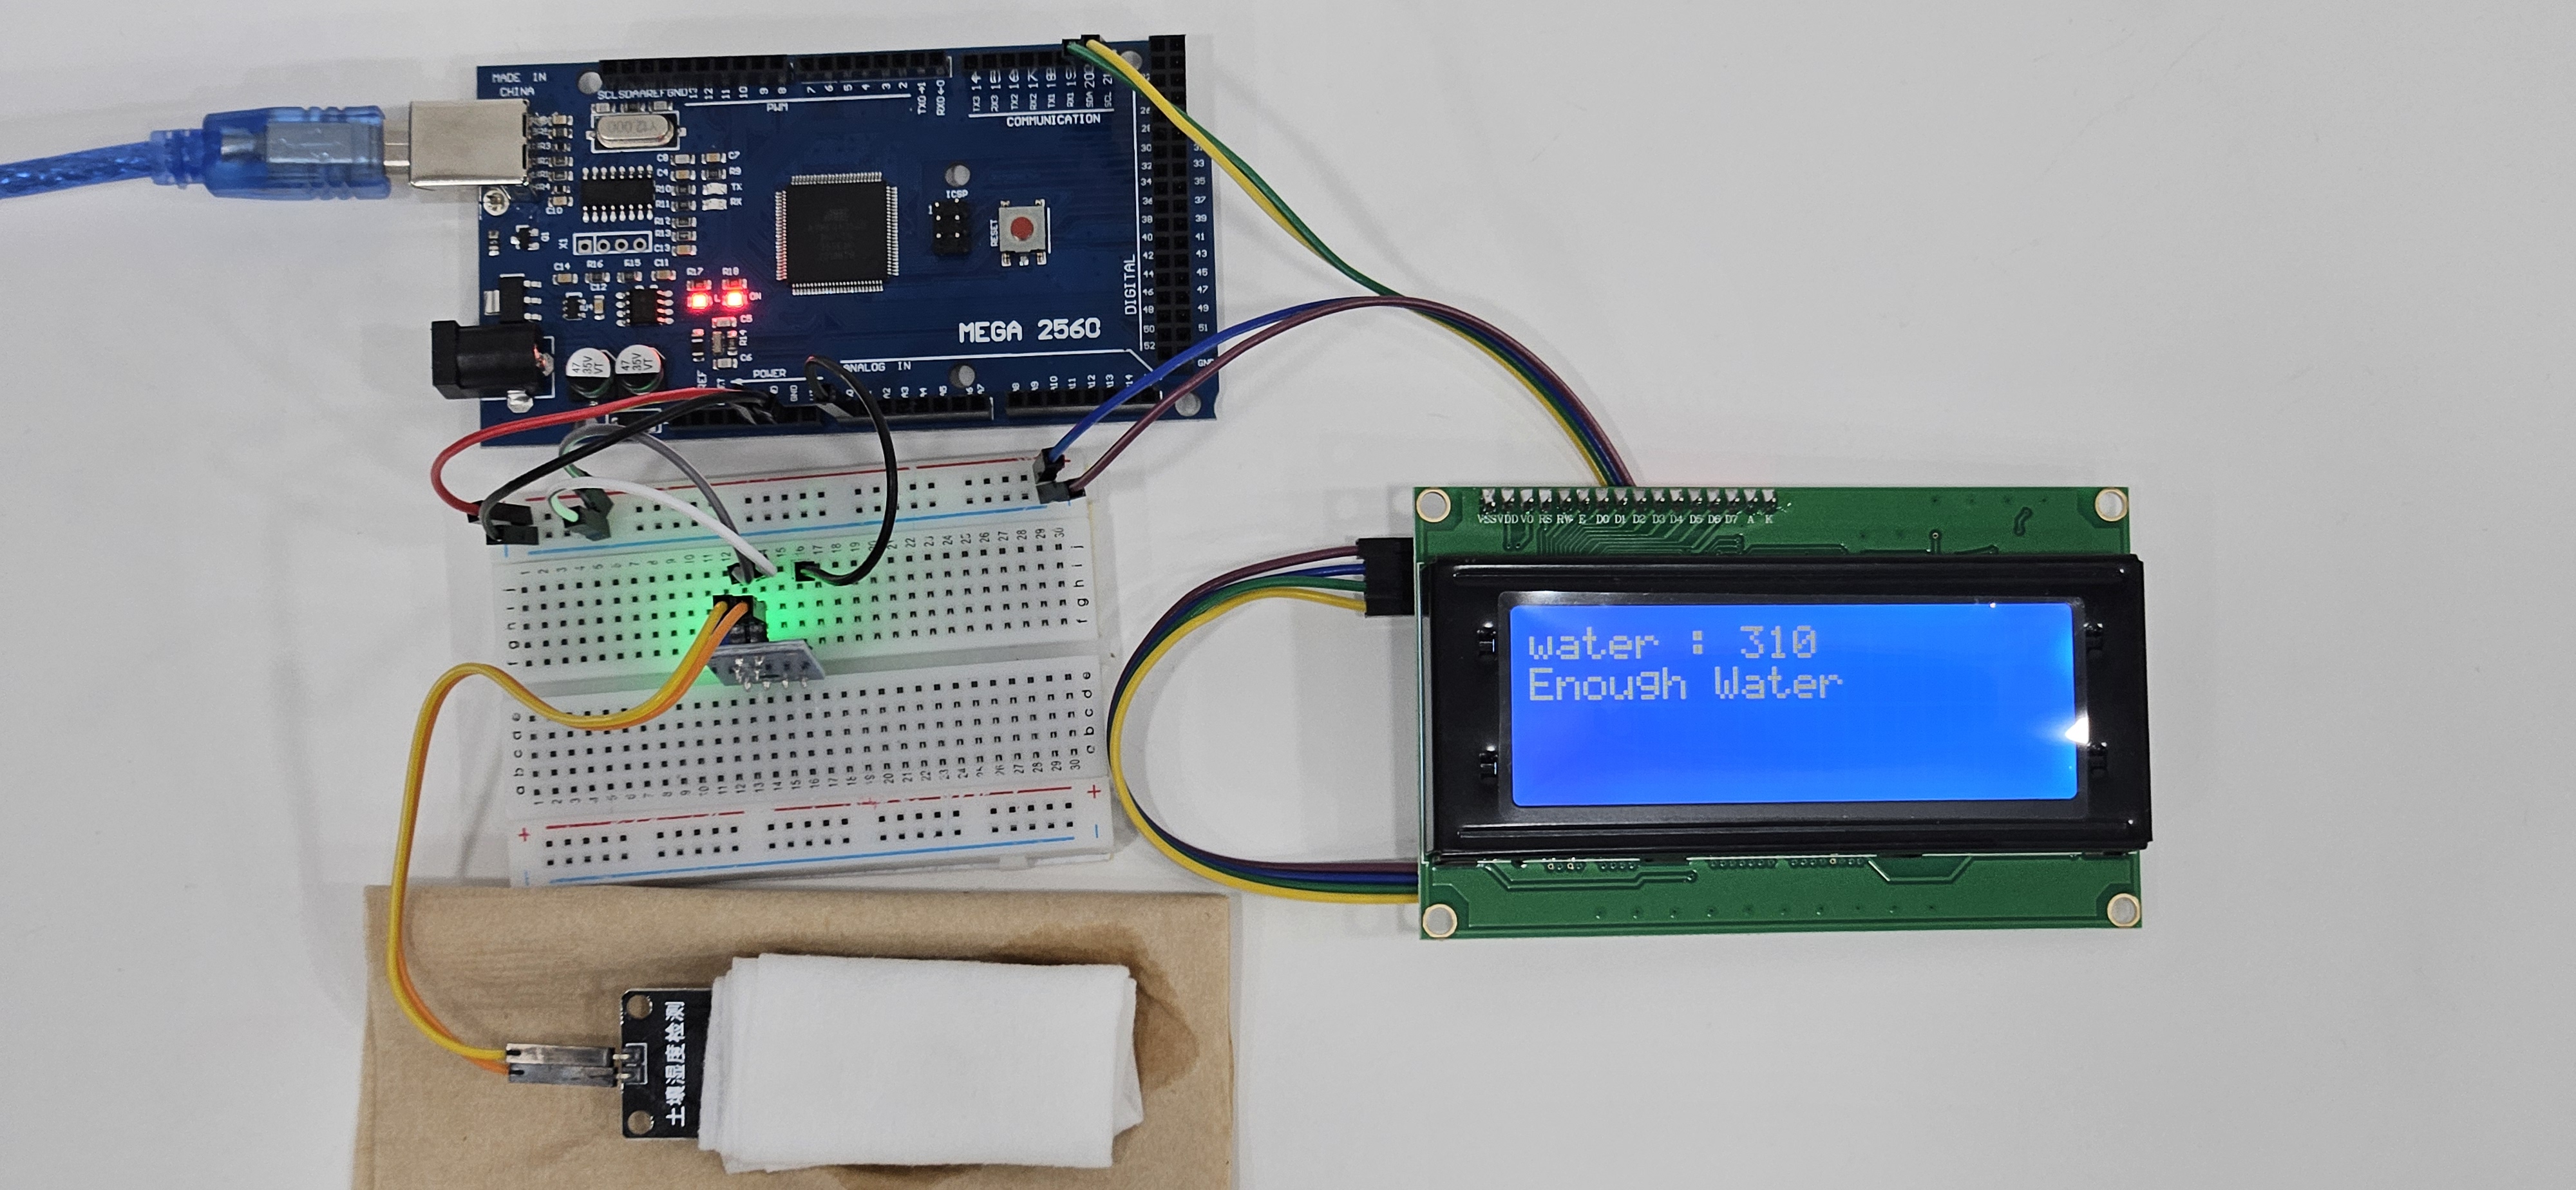
On the other hand, when there is moisture, "Enough Water" is displayed.
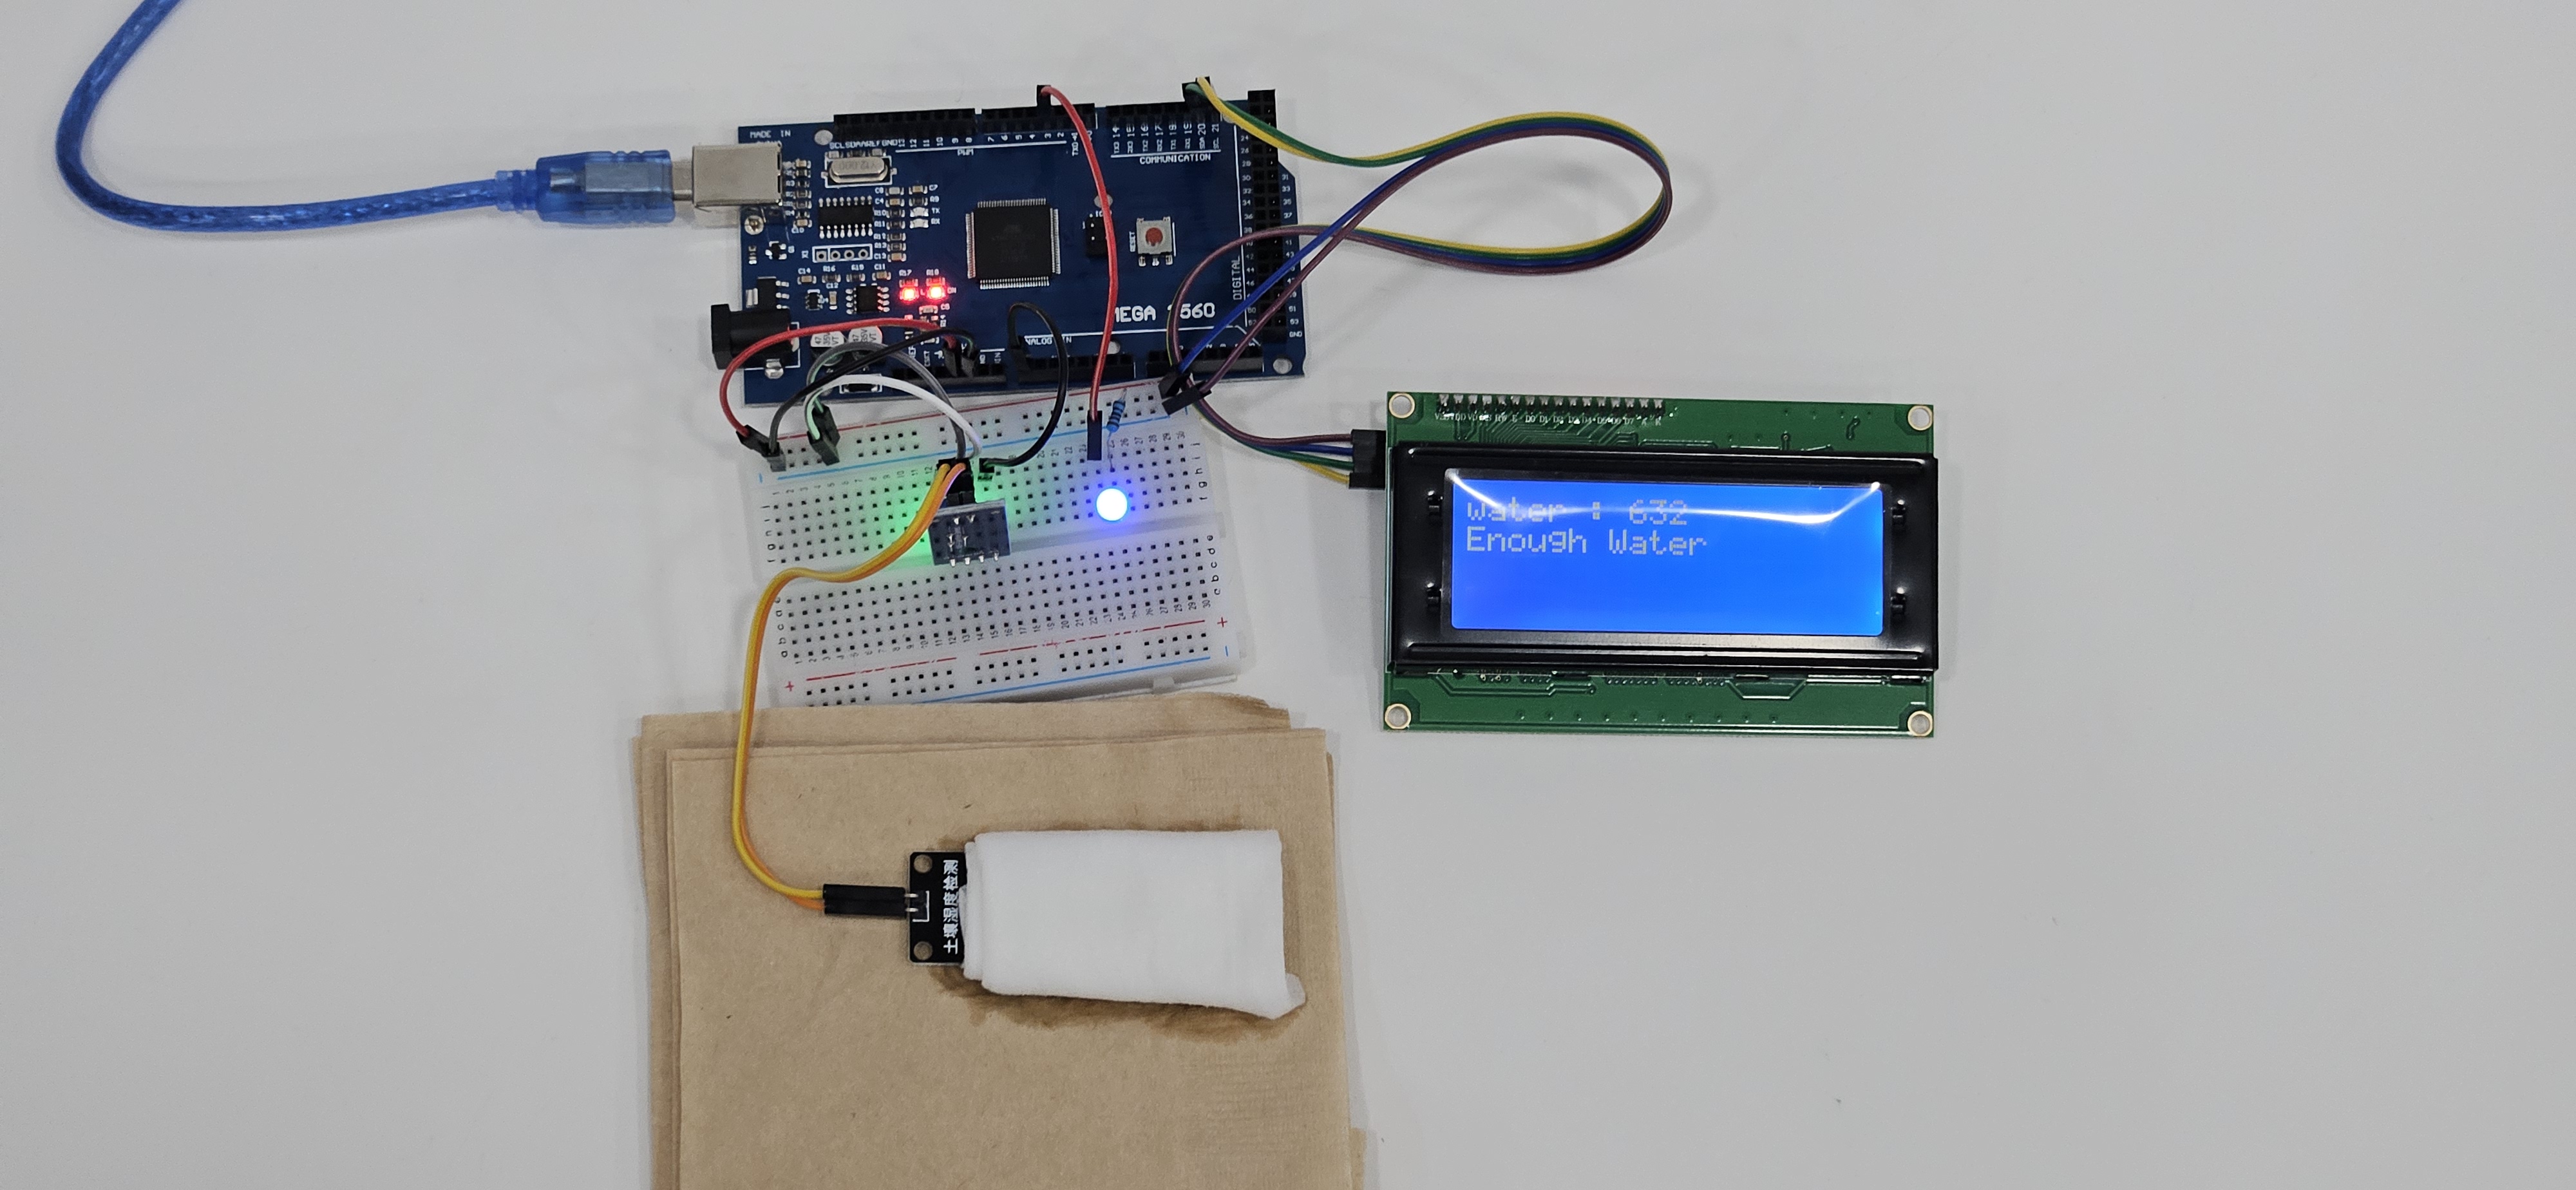
3. Utilizing Soil Moisture Sensor with LCD and LED
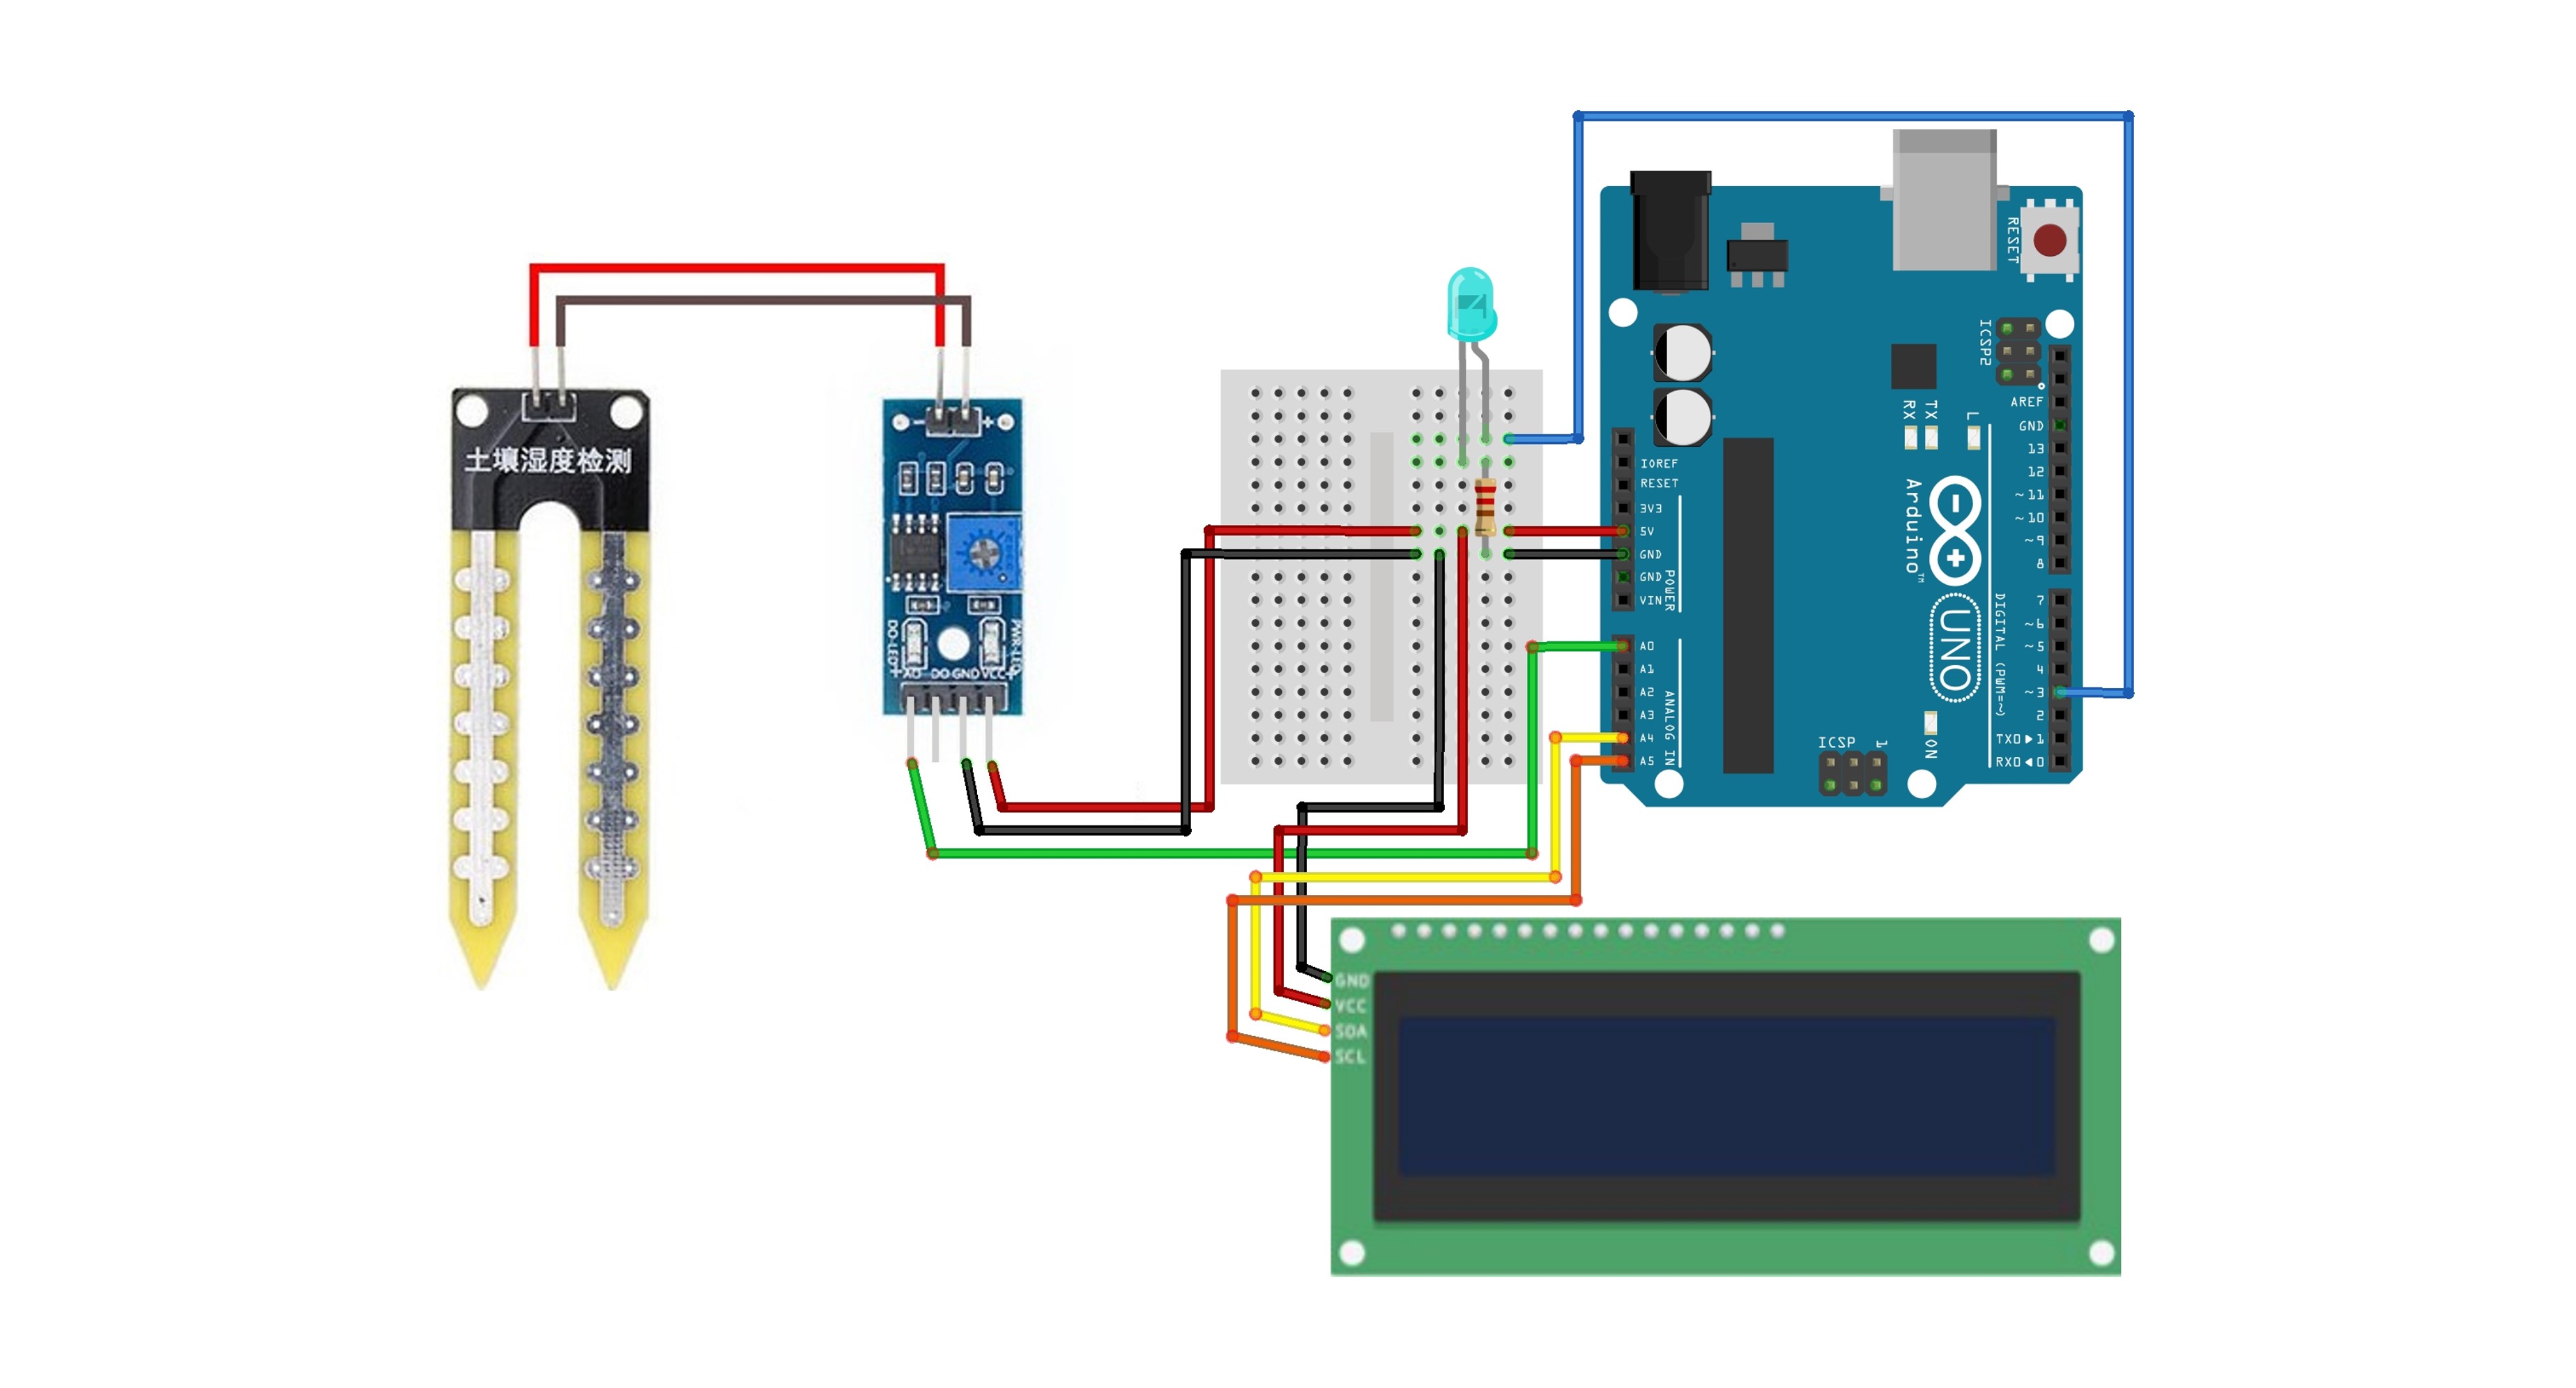
This example adds an LED to the previous example so that a blue light turns on when there is sufficient moisture, while the LED turns off when moisture is lacking, indicating the need for water.
==== 3-1. Circuit Configuration ====
3-2. Arduino Code
#include <Wire.h>
#include <LiquidCrystal_I2C.h>

// I2C LCD initialization: address 0x27, columns 16, rows 2
LiquidCrystal_I2C lcd(0x27, 16, 2);

// YL-69 sensor pin definition
const int sensorPin = A0;
const int ledPin = 3;

void setup() {
    lcd.init();
    lcd.clear();
    lcd.backlight(); // Turn on backlight
    Serial.begin(9600); // Start serial communication
    pinMode(ledPin, OUTPUT);
}

void loop() {
    int sensorValue = analogRead(sensorPin); // Read sensor value
    Serial.print("Soil moisture level: ");
    Serial.println(sensorValue); // Output to serial monitor

    // Display value on LCD
    lcd.clear(); // Clear LCD screen
    lcd.setCursor(0, 0); // Move cursor to the first column of the first row
    lcd.print("water : ");
    lcd.print(sensorValue); // Output sensor value
    lcd.setCursor(0, 1); // Move cursor to the first column of the second row
    if (sensorValue > 500) {
        lcd.print("Please Water");
        digitalWrtie(ledPin, LOW); // Turn off the LED
    }
    else {
        lcd.print("Enough Water");
        digitalWrtie(ledPin, HIGH); // Turn on the LED
    }

    delay(1000); // Wait a second
}
3-3. Execution Result
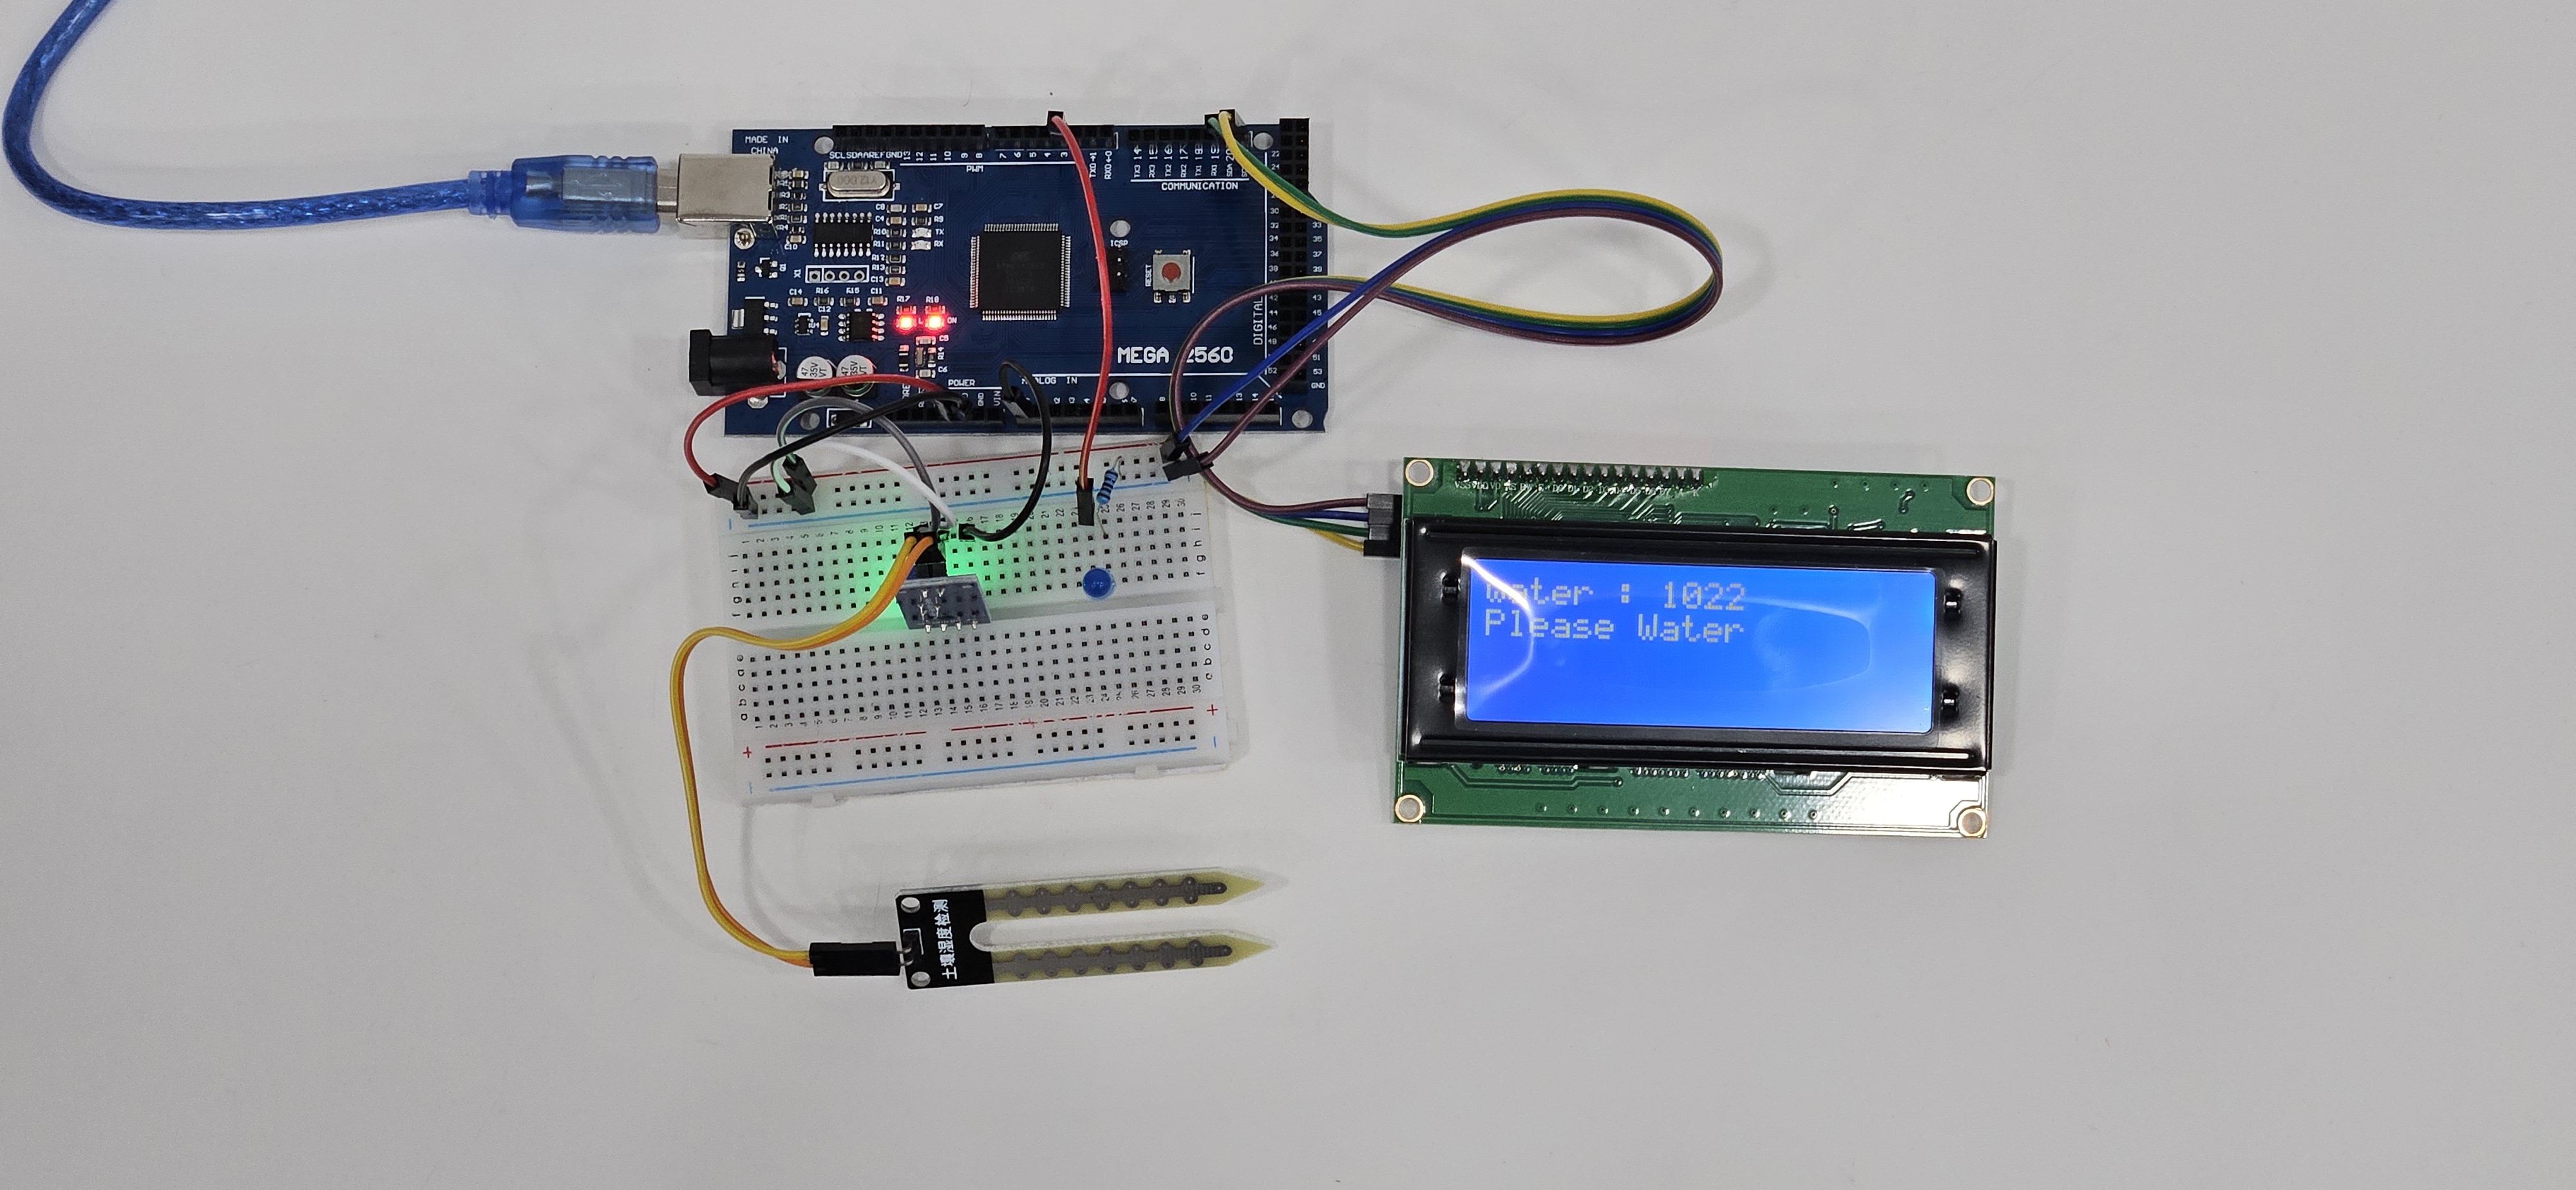
When there is no moisture, "Please Water" is displayed on the LCD, and the LED is turned off.
On the other hand, when there is moisture, "Enough Water" is displayed, and the LED is turned on.
In addition, if water pumps are used together, it can be applied to various projects such as automatic irrigation systems.