Switch Module(KY-004): 두 판 사이의 차이
(새 문서: {{#seo:|title=아두위키 : 아두이노 스위치 모듈(KY-004) 가이드|title_mode=append|keywords=아두이노, 정보과학, 메이커학습, 수행평가, 스위치 모듈(KY-004), 아두이노 작품, 캡스톤작품, 아두이노 예제코드|description=아두이노로 스위치 모듈(KY-004)를 제어하는 방법(기본정보, 회로, 예제 코드)을 소개합니다. 정보과학과 메이커수업에 활용가능합니다.}} 파일:Ky004스위치모듈.jpg|...) |
잔글편집 요약 없음 |
||
| 1번째 줄: | 1번째 줄: | ||
{{#seo:|title= | {{#seo:|title=Arduwiki : Arduino Switch Module(KY-004) Guide|title_mode=append|keywords=Arduino, Information Science, Maker Learning, Performance Assessment, Switch Module(KY-004), Arduino Project, Capstone Project, Arduino Example Code|description=This introduces how to control a Switch Module(KY-004) with Arduino (basic information, circuit, example code). It can be used in Information Science and Maker classes.}} | ||
[[파일:Ky004스위치모듈.jpg|가운데|class=coders100]] | [[파일:Ky004스위치모듈.jpg|가운데|class=coders100]] | ||
== ''' | == '''Overview''' == | ||
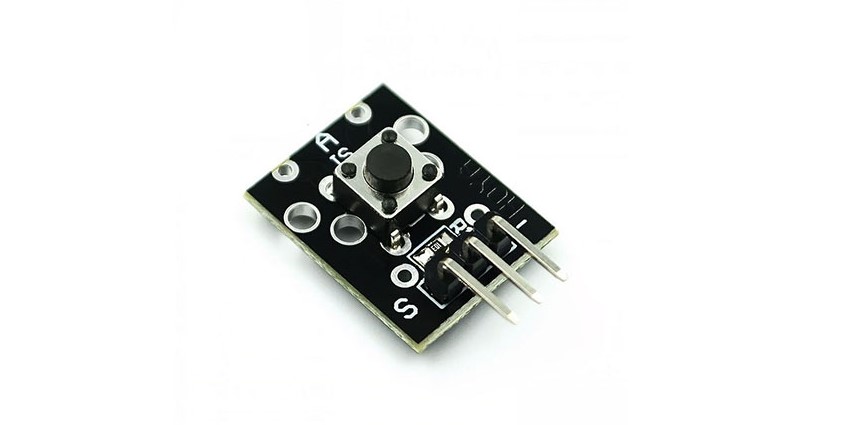
KY-004 | The KY-004 switch module is a simple switch input module compatible with Arduino boards. It can be connected to an Arduino board to receive switch input. | ||
[[ | Since it functions almost identically to a [[Tact Switch]], for details related to switches such as floating phenomena, pull-up, and pull-down resistors, please refer to the [[Tact Switch|Tact Switch]] document. | ||
== ''' | == '''Specifications''' == | ||
* | *Operating Voltage: 3.3V ~ 5V | ||
* | *Switch Output Level: LOW (0V) / HIGH (VCC) | ||
== ''' | == '''Application Example''' == | ||
=== 1. | === 1. Checking Switch Input via Serial Monitor === | ||
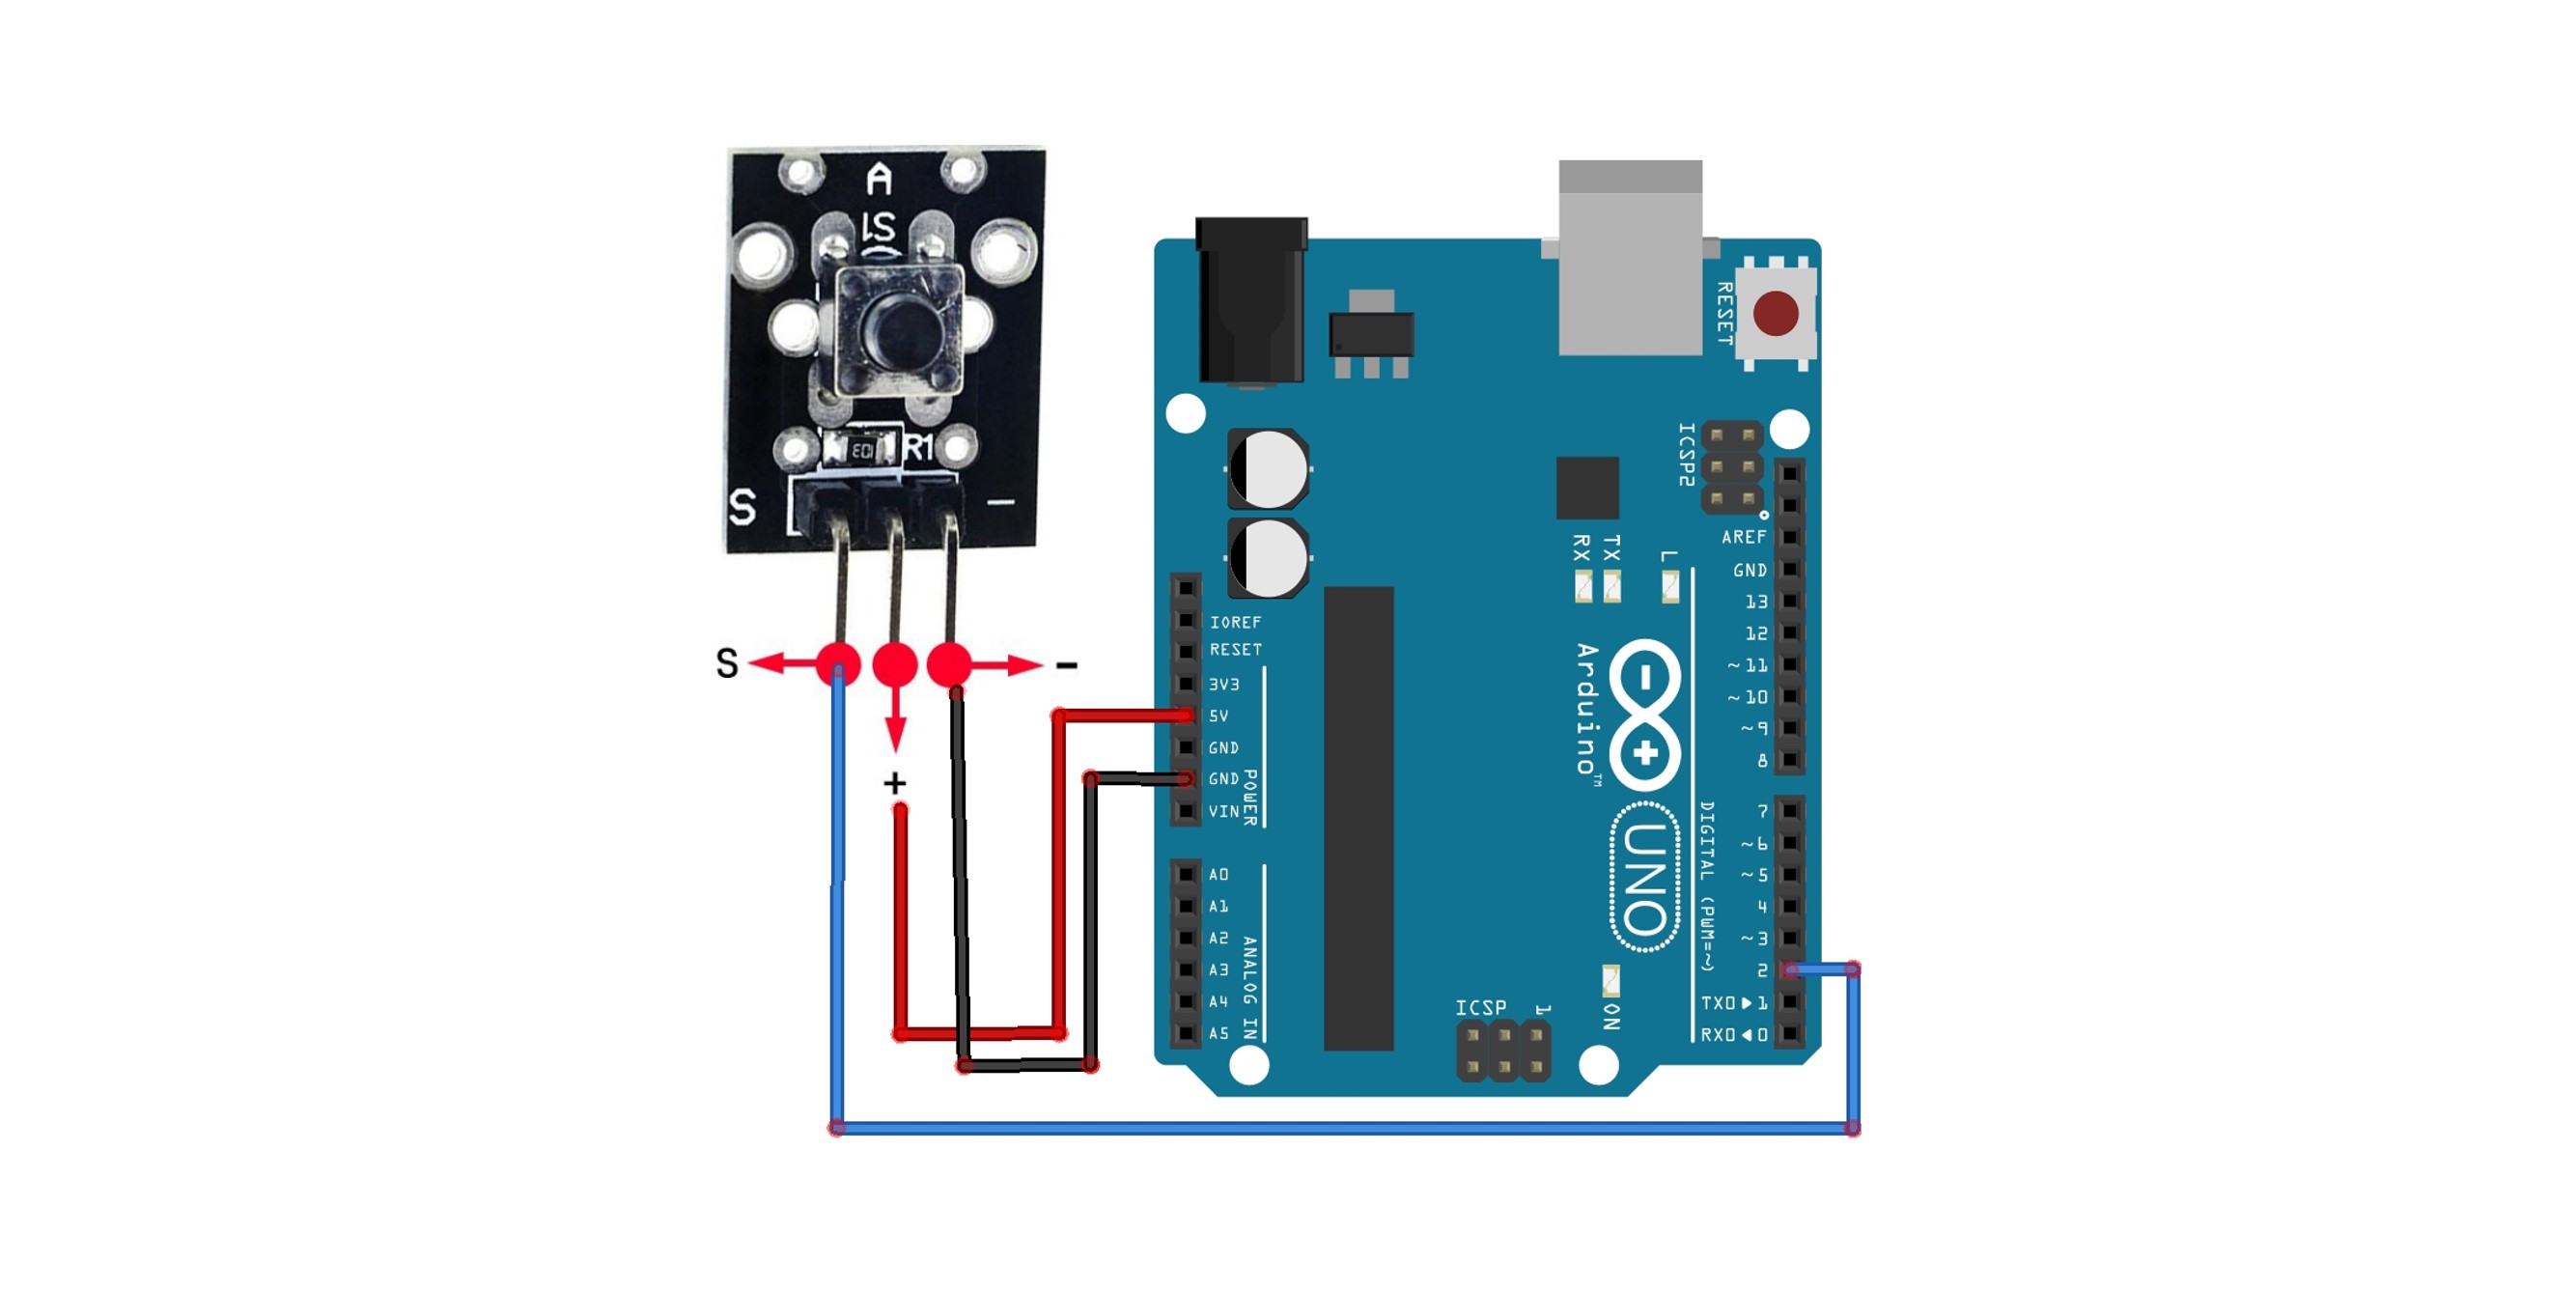
This example demonstrates how to check whether the switch has been pressed or not using the serial monitor. | |||
==== Circuit Configuration ==== | |||
==== | |||
[[파일:Ky004예제1회로.jpg|가운데|class=coders100]] | [[파일:Ky004예제1회로.jpg|가운데|class=coders100]] | ||
==== | ==== Code ==== | ||
<syntaxhighlight lang="c++" line="1"> | <syntaxhighlight lang="c++" line="1"> | ||
int switchPin = 2; // KY-004 | int switchPin = 2; // Connect the OUT pin of the KY-004 module to Arduino digital pin 2. | ||
void setup() { | void setup() { | ||
pinMode(switchPin, INPUT); | pinMode(switchPin, INPUT); | ||
Serial.begin(9600); // | Serial.begin(9600); // Start serial communication. | ||
} | } | ||
void loop() { | void loop() { | ||
int switchState = digitalRead(switchPin); // | int switchState = digitalRead(switchPin); // Read the switch status. | ||
if (switchState == LOW) { // | if (switchState == LOW) { // When the switch is pressed | ||
Serial.println(" | Serial.println("Switch pressed"); | ||
} else { // | } else { // When the switch is not pressed | ||
Serial.println(" | Serial.println("Switch not pressed"); | ||
} | } | ||
delay(100); // | delay(100); // Wait for 0.1second | ||
} | } | ||
</syntaxhighlight> | </syntaxhighlight> | ||
==== | ==== Execution Result ==== | ||
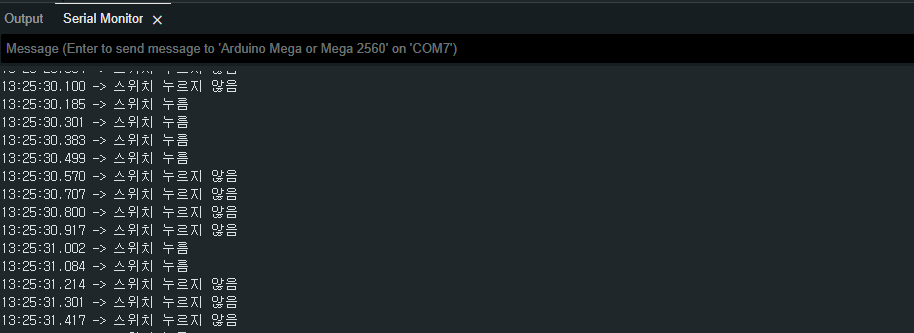
The status of the switch will be displayed on the serial monitor. | |||
[[파일:Ky004예제1실행결과.png|가운데|class=coders100]] | [[파일:Ky004예제1실행결과.png|가운데|class=coders100]] | ||
=== 2. | === 2. Using Switch and LED Together === | ||
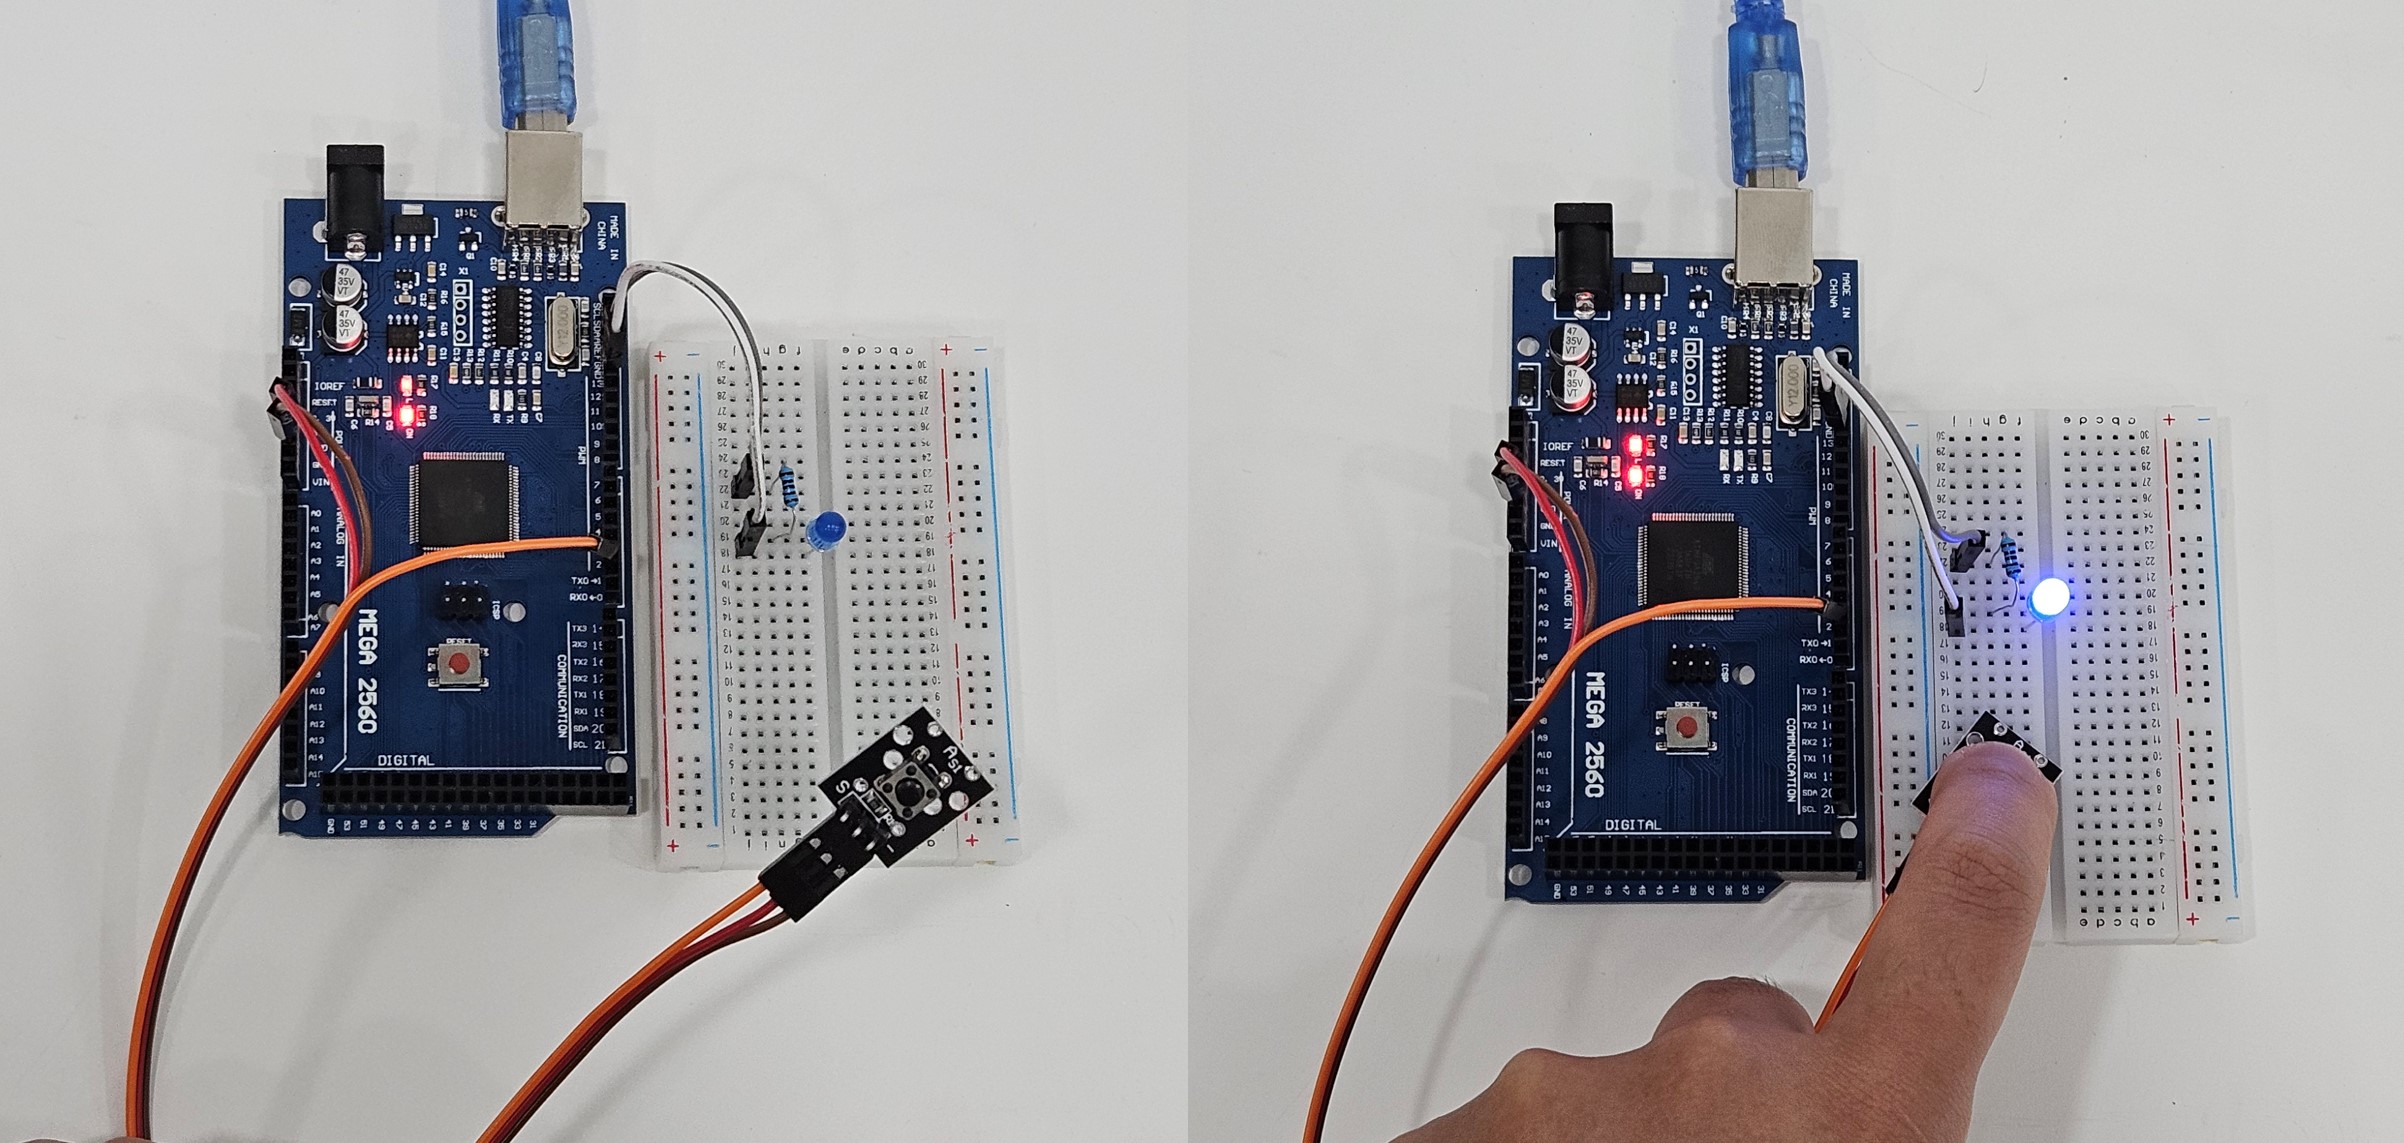
This example demonstrates that when the switch is pressed, the LED lights up, and when it is not pressed, the LED turns off. | |||
==== | ==== Circuit Configuration ==== | ||
[[파일:Ky004예제2회로.jpg|가운데|class=coders100]] | [[파일:Ky004예제2회로.jpg|가운데|class=coders100]] | ||
==== | ==== Code ==== | ||
<syntaxhighlight lang="c++" line="1"> | <syntaxhighlight lang="c++" line="1"> | ||
int switchPin = 2; // KY-004 | int switchPin = 2; // Connect the OUT pin of the KY-004 module to Arduino digital pin 2. | ||
int ledPin = 13; // | int ledPin = 13; // Led Pin | ||
void setup() { | void setup() { | ||
pinMode(switchPin, INPUT); | pinMode(switchPin, INPUT); | ||
pinMode(ledPin, OUTPUT); | pinMode(ledPin, OUTPUT); | ||
} | } | ||
void loop() { | void loop() { | ||
int switchState = digitalRead(switchPin); // | int switchState = digitalRead(switchPin); // Read the switch status. | ||
// 스위치가 눌려있으면(LOW | // 스위치가 눌려있으면(LOW) | ||
if (switchState == LOW) { | if (switchState == LOW) { | ||
digitalWrite(ledPin, HIGH); // LED | digitalWrite(ledPin, HIGH); // Turn on the LED | ||
} else { | } else { | ||
digitalWrite(ledPin, LOW); // LED | digitalWrite(ledPin, LOW); // Trun off the LED | ||
} | } | ||
} | } | ||
| 84번째 줄: | 83번째 줄: | ||
==== | ==== Execution Result ==== | ||
You can confirm that the LED lights up only when the switch is pressed. | |||
[[파일:Ky004예제2실행결과.jpg|가운데|class=coders100]] | [[파일:Ky004예제2실행결과.jpg|가운데|class=coders100]] | ||
== ''' | == '''Purchase Link''' == | ||
[https://gongzipsa.com/shop/1712917627 | [https://gongzipsa.com/shop/1712917627 GONGZIPSA] | ||
2024년 8월 9일 (금) 15:40 판
Overview
The KY-004 switch module is a simple switch input module compatible with Arduino boards. It can be connected to an Arduino board to receive switch input.
Since it functions almost identically to a Tact Switch, for details related to switches such as floating phenomena, pull-up, and pull-down resistors, please refer to the Tact Switch document.
Specifications
- Operating Voltage: 3.3V ~ 5V
- Switch Output Level: LOW (0V) / HIGH (VCC)
Application Example
1. Checking Switch Input via Serial Monitor
This example demonstrates how to check whether the switch has been pressed or not using the serial monitor.
Circuit Configuration
Code
int switchPin = 2; // Connect the OUT pin of the KY-004 module to Arduino digital pin 2.

void setup() {
  pinMode(switchPin, INPUT);
  Serial.begin(9600); // Start serial communication.
}

void loop() {
  int switchState = digitalRead(switchPin); // Read the switch status.

  if (switchState == LOW) { // When the switch is pressed
    Serial.println("Switch pressed");
  } else { // When the switch is not pressed
    Serial.println("Switch not pressed");
  }

  delay(100); // Wait for 0.1second
}
Execution Result
The status of the switch will be displayed on the serial monitor.
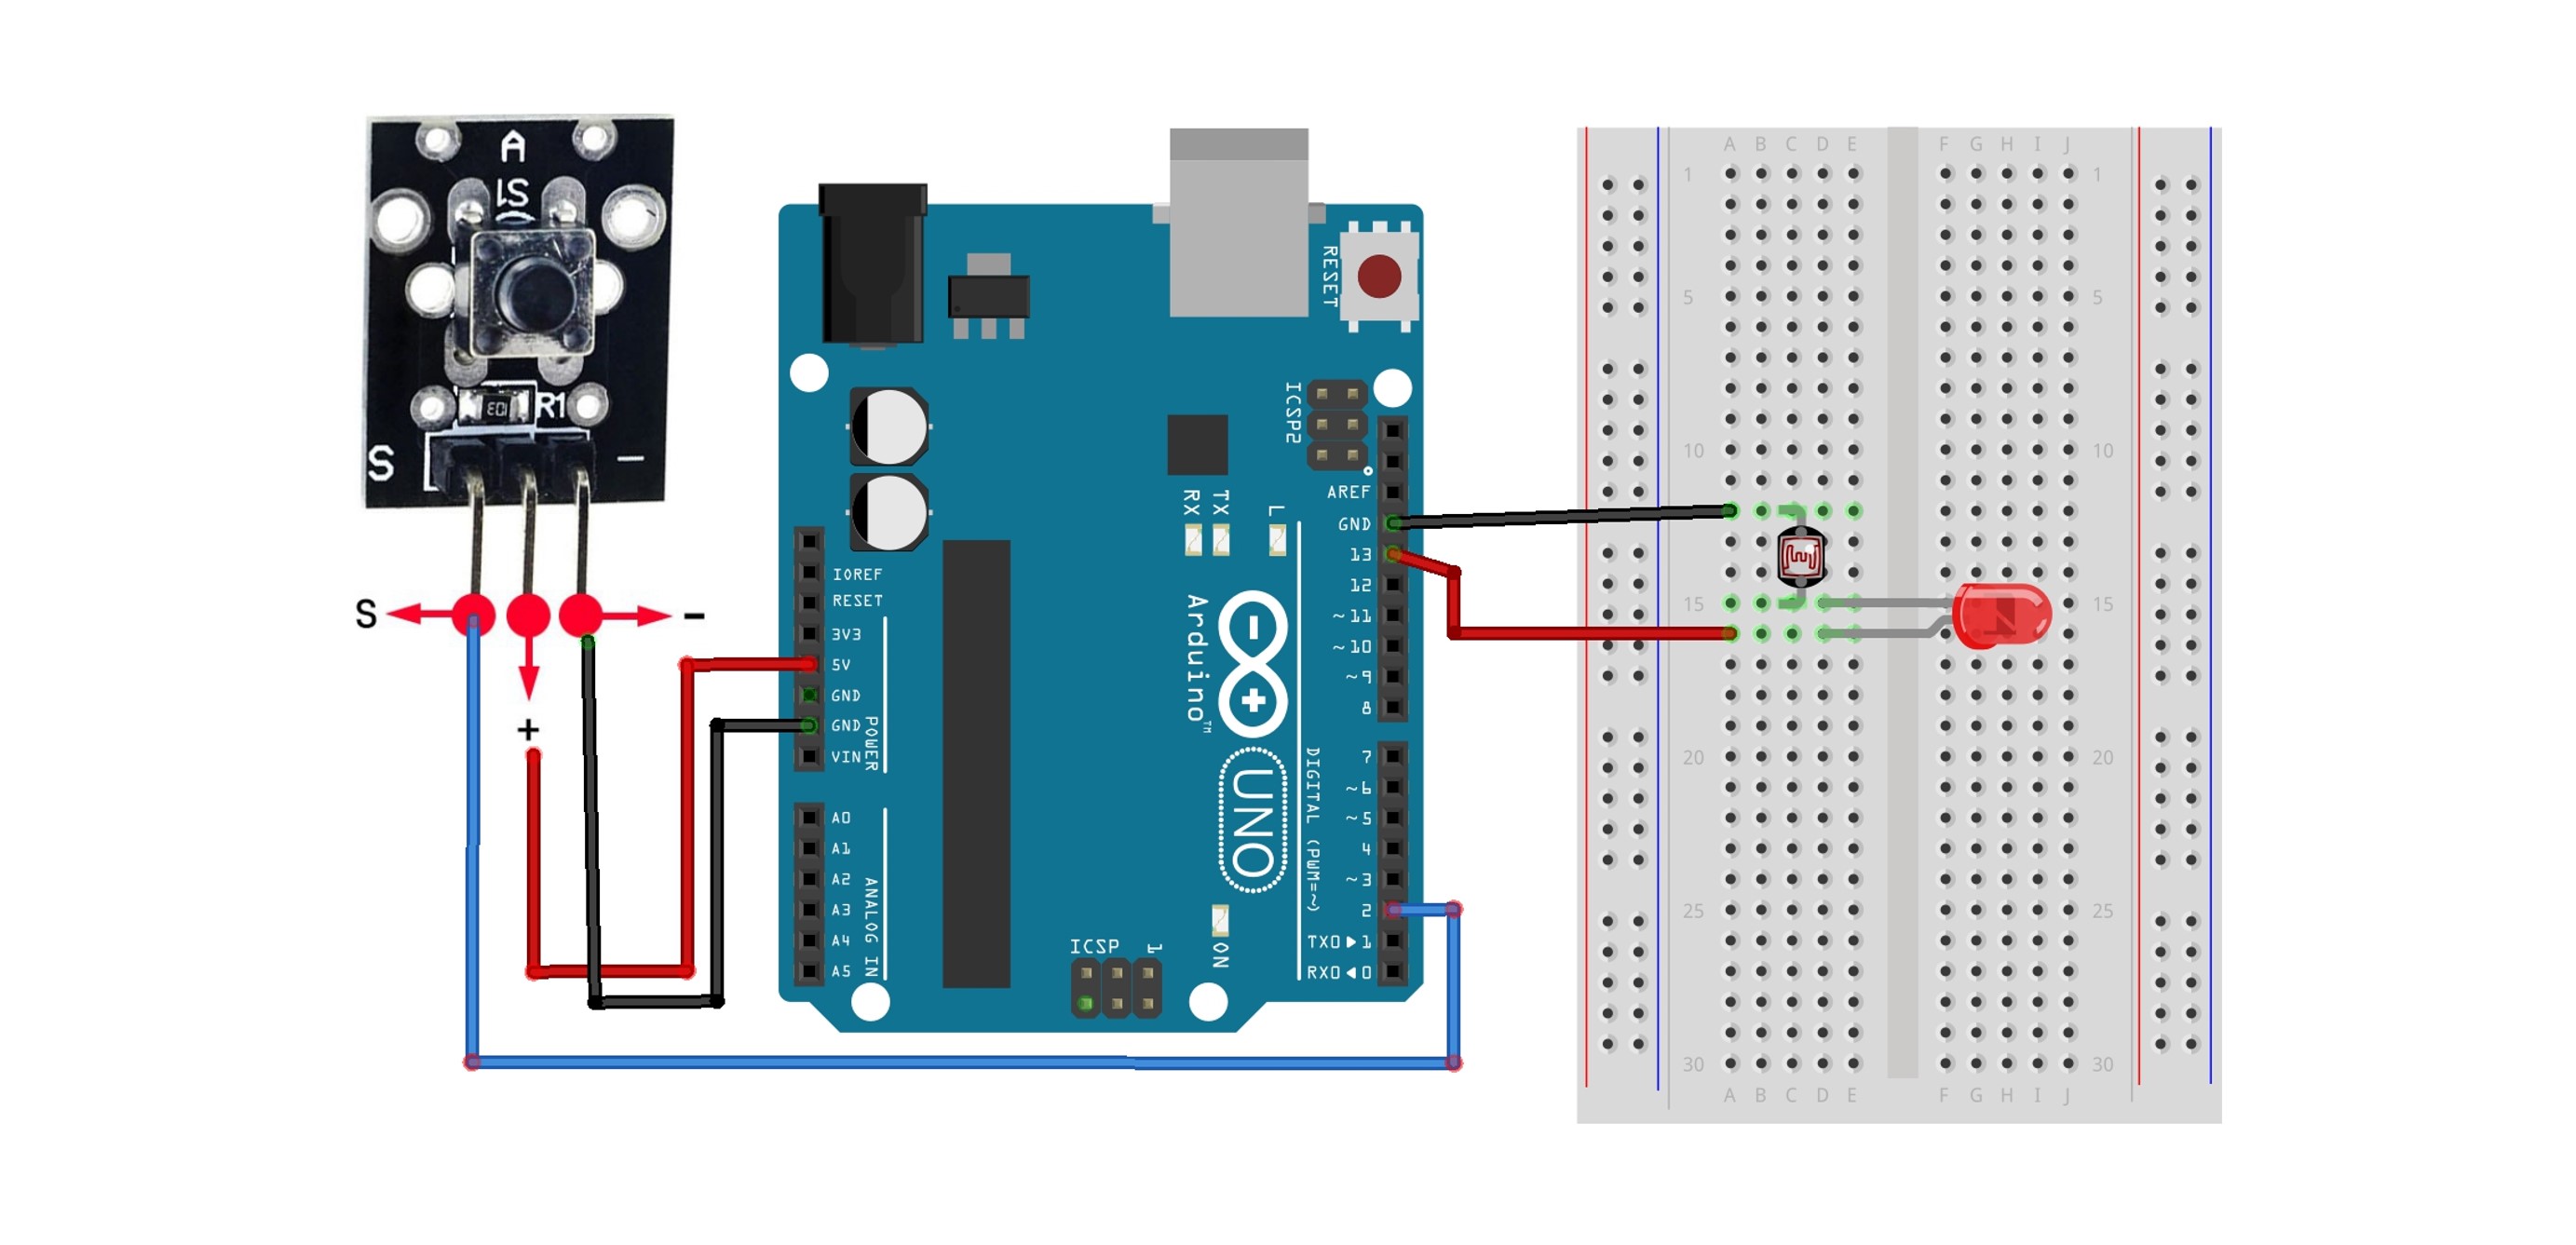
2. Using Switch and LED Together
This example demonstrates that when the switch is pressed, the LED lights up, and when it is not pressed, the LED turns off.
Circuit Configuration
Code
int switchPin = 2; // Connect the OUT pin of the KY-004 module to Arduino digital pin 2.
int ledPin = 13; // Led Pin

void setup() {
  pinMode(switchPin, INPUT);
  pinMode(ledPin, OUTPUT);
}

void loop() {
  int switchState = digitalRead(switchPin); // Read the switch status.

  // 스위치가 눌려있으면(LOW)
  if (switchState == LOW) {
    digitalWrite(ledPin, HIGH); // Turn on the LED
  } else {
    digitalWrite(ledPin, LOW); // Trun off the LED
  }
}
Execution Result
You can confirm that the LED lights up only when the switch is pressed.
