5주차 도트매드릭스 사용하기
1. 도트매트릭스 사용하기
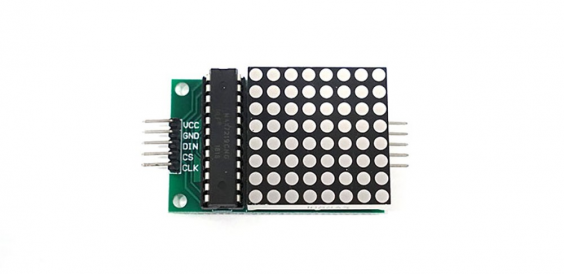
먼저 아두이노 IDE에서 도트매트릭스를 사용하기 위해 라이브러리를 설치합니다.
[스케치] - [라이브러리 포함] - [라이브러리 관리] 에서 "LedControl"를 검색합니다.
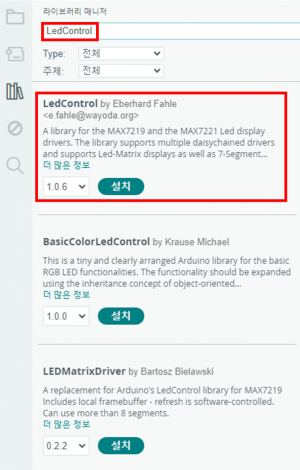
2. 도트매트릭스 회로 연결
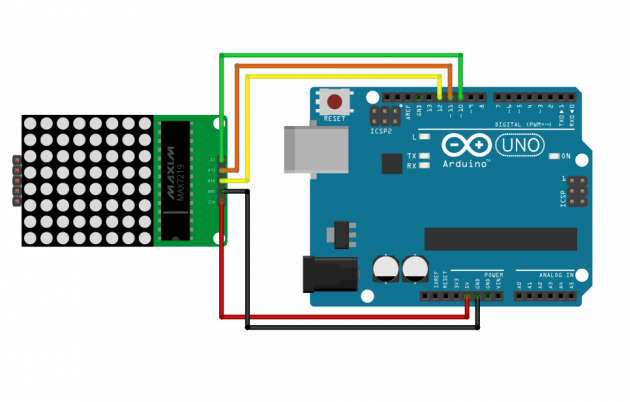
도트매트릭스를 아두이노와 연결해봅시다.
| 도트매트릭스 | 아두이노 |
|---|---|
| VCC | 5V |
| GND | GND |
| DIN | 12 |
| CS | 11 |
| CLK | 10 |
3. 도트매트릭스 LED 제어
도트매트릭스의 LED를 제어해봅시다.
먼저 도트매트릭스의 [행 0번][열 0번]의 LED를 켜고 끄는 동작을 만들어 봅시다.
#include "LedControl.h" //dot matrix를 사용하기 위한 라이브러리 호출

int din = 12;
int cs = 11;
int clk = 10;

//LedControl('DIN핀 번호', 'CLK핀 번호', 'CS핀 번호', 'dot matrix 갯수')
LedControl lc = LedControl(din, clk, cs, 1);

void setup() {
  lc.shutdown(0, false);    //dot matrix를 깨우는 코드. shutdown('지정할 dotmatrix의 주소', 'false : 깨우기')
  lc.setIntensity(0, 8);    //밝기 설정. setIntensity('지정할 dotmatrix의 주소','밝기값(0~15)')
  lc.clearDisplay(0);       //사용하기 전 초기화. clearDisplay('지정할 dotmatrix의 주소')
}
int col = 0;
int row = 0;
void loop()
{
  lc.setLed(0, col, row, true);
  delay(1000);
  lc.setLed(0, col, row, false);
  delay(1000);
}
setLed() 함수를 이용해 도트매트릭스의 LED를 제어할 수 있습니다.
setLed(0, 세로번호, 가로번호, true or false) 의 값을 수정하여 원하는 위치의 LED를 제어할 수 있으며 맨 뒤에 매개변수로 true를 넣으면 LED가 켜지고 false를 넣으면 LED가 꺼지게 됩니다.
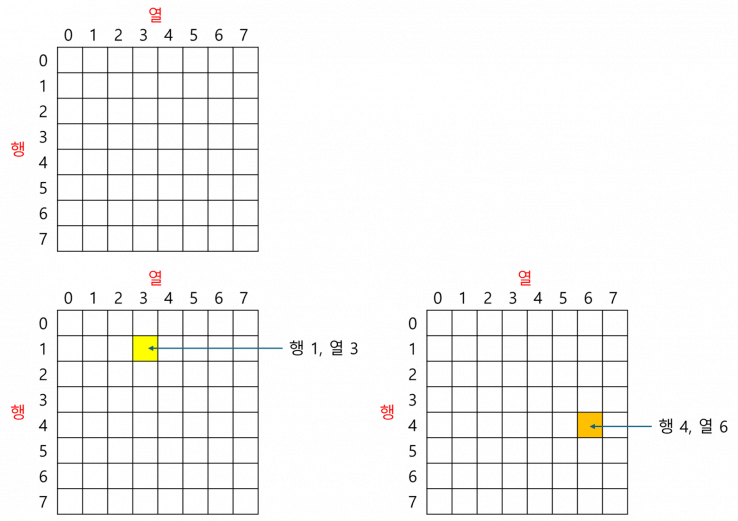
도트매트릭스를 제어하기 위해서는 2차원 배열의 개념을 알아야합니다.
행과 열로 이루어진 2차원 배열의 구조는 위의 그림과 같습니다.
행은 세로 라인을 의미하고 열은 가로 라인을 의미합니다.
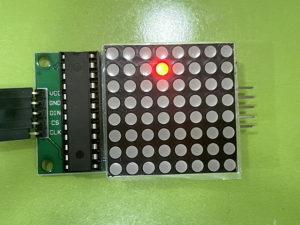
3-1. 실습1) [행 1][열 3] LED 켜기
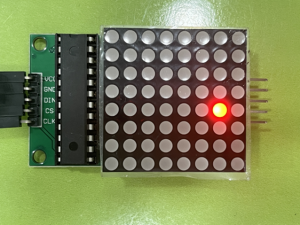
3-2. 실습2) [행 4][열 6] LED 켜기
3-3. 실습3-1) 대각선 LED 순차적으로 켜고 끄기
배운 반복문을 이용해 대각선 LED를 순차적으로 켜고 끄는 동작을 만들어 봅시다.
반복문 응용이 어렵다면 먼저 반복문을 사용하지 않고 코드를 작성해본 후 반복문을 이용해 변경하는 연습을 해봅시다.
#include "LedControl.h"

int din = 12;
int cs = 11;
int clk = 10;

LedControl lc = LedControl(din, clk, cs, 1);

void setup() {
  lc.shutdown(0, false);
  lc.setIntensity(0, 8);
  lc.clearDisplay(0);
}

void loop()
{
  // code..
}
3-3. 실습3-2) 대각선 LED 순차적으로 켜고 끄기(거꾸로)
위 실습 3-1을 완성하였다면 이번에는 LED가 순차적으로 켜지고 거꾸로 꺼질 수 있도록 코딩해 봅시다.
#include "LedControl.h"

int din = 12;
int cs = 11;
int clk = 10;

LedControl lc = LedControl(din, clk, cs, 1);

void setup() {
  lc.shutdown(0, false);
  lc.setIntensity(0, 8);
  lc.clearDisplay(0);
}

void loop()
{
  // code..
}
4. 2차원 배열을 이용해 LED 제어하기
4-1. 하트 모양 출력하기
2차원 배열에 원하는 모양을 저장하고 도트매트릭스에 LED를 켜고 끌 수 있도록 만들어 봅시다.
아래 하트 모양의 2차원 배열을 이용해 도트매트릭스를 켜보겠습니다.
행 8개, 열 8개의 데이터를 저장하는 2차원 배열입니다.
"0"은 LED를 끄고 "1"은 LED를 켜는 모습을 표현한 것입니다.
bool heart[8][8] =
{
  {0,1,1,0,0,1,1,0},
  {1,1,1,1,1,1,1,1},
  {1,1,1,1,1,1,1,1},
  {1,1,1,1,1,1,1,1},
  {0,1,1,1,1,1,1,0},
  {0,0,1,1,1,1,0,0},
  {0,0,0,1,1,0,0,0},
  {0,0,0,0,0,0,0,0}
};
중첩 반복문을 이용해 8X8 2차원 배열을 순차적으로 접근하여 하트 모양으로 LED를 켜봅시다.
아래 코드를 아두이노에 업로드하여 실행해 보세요.
#include "LedControl.h"

int din = 12;
int cs = 11;
int clk = 10;

LedControl lc = LedControl(din, clk, cs, 1);

bool heart[8][8] =
{
  {0,1,1,0,0,1,1,0},
  {1,1,1,1,1,1,1,1},
  {1,1,1,1,1,1,1,1},
  {1,1,1,1,1,1,1,1},
  {0,1,1,1,1,1,1,0},
  {0,0,1,1,1,1,0,0},
  {0,0,0,1,1,0,0,0},
  {0,0,0,0,0,0,0,0}
};

void setup() {
  lc.shutdown(0, false);
  lc.setIntensity(0, 8);
  lc.clearDisplay(0);
}

void loop()
{
  showLed();
  delay(1000);
  lc.clearDisplay(0);
  delay(1000);
}

void showLed() {
  for(int col=0; col<8; col+=1) {
    for(int row=0; row<8; row+=1) {
      lc.setLed(0, col, row, heart[col][row]);
    }
  }
}
4-2. 스마일 모양 출력하기
위의 코드를 수정하여 이모티콘을 만들어 출력해 봅시다.
bool smile[8][8] =
{
  {0,0,1,1,1,1,0,0},
  {0,1,0,0,0,0,1,0},
  {1,0,1,0,0,1,0,1},
  {1,0,0,0,0,0,0,1},
  {1,0,1,0,0,1,0,1},
  {1,0,0,1,1,0,0,1},
  {0,1,0,0,0,0,1,0},
  {0,0,1,1,1,1,0,0}
};
웃음 이모티콘 외에도 내가 만들어보고 싶은 모양을 출력해봅시다!
4-3. 실습 4) 이름 이니셜 출력해보기
3개의 2차원 배열을 선언하고 학생의 이니셜 모양을 먼저 만들어봅시다.
이니셜 3개를 순차적으로 도트매트릭스에 표현할 수 있도록 코딩해 봅시다.
#include "LedControl.h"

int din = 12;
int cs = 11;
int clk = 10;

LedControl lc = LedControl(din, clk, cs, 1);

void setup() {
  lc.shutdown(0, false);
  lc.setIntensity(0, 8);
  lc.clearDisplay(0);
}

void loop()
{
  // code..
}
5. 버튼과 도트매트릭스 함께 사용하기
5-1. 실습 5) 버튼을 눌러 도트매트릭스 제어하기
앞서 계속 사용해보았던 버튼을 이용해 도트매트릭스를 제어해봅시다.
다양한 변수와 조건문을 이용해 버튼을 누를 때마다 도트매트릭스에 LED를 제어할 수 있도록 코딩해주세요.
버튼을 누를 때마다 LED가 한 칸씩 전진하도록 만들어 주세요. 단, 8번째 칸에 도달한 후 다시 버튼을 누르면 다음 행으로 넘어가도록 만들어 봅시다.
영상을 참고하여 코딩을 해봅시다.
#include "LedControl.h"

int din = 12;
int cs = 11;
int clk = 10;
int btn = 7;

LedControl lc = LedControl(din, clk, cs, 1);

void setup() {
  pinMode(btn, INPUT_PULLUP);
  lc.shutdown(0, false);
  lc.setIntensity(0, 2);
  lc.clearDisplay(0);
}

int col = 0;
int row = 0;

void loop()
{
  // code..
}
실습 코드 참고하기
실습1) [행 1][열 3] LED 켜기
#include "LedControl.h"

int din = 12;
int cs = 11;
int clk = 10;

LedControl lc = LedControl(din, clk, cs, 1);

void setup() {
  lc.shutdown(0, false);
  lc.setIntensity(0, 8);
  lc.clearDisplay(0);
}

int col = 1;
int row = 3;

void loop()
{
  lc.setLed(0, col, row, true);
}
실습2) [행 4][열 6] LED 켜기
#include "LedControl.h"

int din = 12;
int cs = 11;
int clk = 10;

LedControl lc = LedControl(din, clk, cs, 1);

void setup() {
  lc.shutdown(0, false);
  lc.setIntensity(0, 8);
  lc.clearDisplay(0);
}

int col = 4;
int row = 6;

void loop()
{
  lc.setLed(0, col, row, true);
}
실습3-1) 대각선 LED 순차적으로 켜고 끄기
#include "LedControl.h"

int din = 12;
int cs = 11;
int clk = 10;

LedControl lc = LedControl(din, clk, cs, 1);

void setup() {
  lc.shutdown(0, false);
  lc.setIntensity(0, 8);
  lc.clearDisplay(0);
}

void loop()
{
  for(int i=0; i<8; i++) {
    lc.setLed(0, i, i, true);
    delay(300);
  }
  for(int i=0; i<8; i++) {
    lc.setLed(0, i, i, false);
    delay(300);
  }
}
실습3-2) 대각선 LED 순차적으로 켜고 끄기(거꾸로)
#include "LedControl.h"

int din = 12;
int cs = 11;
int clk = 10;

LedControl lc = LedControl(din, clk, cs, 1);

void setup() {
  lc.shutdown(0, false);
  lc.setIntensity(0, 8);
  lc.clearDisplay(0);
}

void loop()
{
  for(int i=0; i<8; i++) {
    lc.setLed(0, i, i, true);
    delay(300);
  }
  for(int i=7; i>=0; i--) {
    lc.setLed(0, i, i, false);
    delay(300);
  }
}
실습 4) 이름 이니셜 출력해보기
#include "LedControl.h"

int din = 12;
int cs = 11;
int clk = 10;

LedControl lc = LedControl(din, clk, cs, 1);

bool NAME_C[8][8] =
{
  {1,1,1,1,1,1,1,1},
  {1,1,1,1,1,1,1,1},
  {1,1,0,0,0,0,0,0},
  {1,1,0,0,0,0,0,0},
  {1,1,0,0,0,0,0,0},
  {1,1,0,0,0,0,0,0},
  {1,1,1,1,1,1,1,1},
  {1,1,1,1,1,1,1,1}
};

bool NAME_J[8][8] =
{
  {1,1,1,1,1,1,1,1},
  {1,1,1,1,1,1,1,1},
  {0,0,0,1,1,0,0,0},
  {0,0,0,1,1,0,0,0},
  {1,1,0,1,1,0,0,0},
  {1,1,0,1,1,0,0,0},
  {1,1,0,1,1,0,0,0},
  {1,1,1,1,1,0,0,0}
};

bool NAME_H[8][8] =
{
  {1,1,0,0,0,0,1,1},
  {1,1,0,0,0,0,1,1},
  {1,1,0,0,0,0,1,1},
  {1,1,1,1,1,1,1,1},
  {1,1,1,1,1,1,1,1},
  {1,1,0,0,0,0,1,1},
  {1,1,0,0,0,0,1,1},
  {1,1,0,0,0,0,1,1}
};

bool heart[8][8] =
{
  {0,1,1,0,0,1,1,0},
  {1,1,1,1,1,1,1,1},
  {1,1,1,1,1,1,1,1},
  {1,1,1,1,1,1,1,1},
  {0,1,1,1,1,1,1,0},
  {0,0,1,1,1,1,0,0},
  {0,0,0,1,1,0,0,0},
  {0,0,0,0,0,0,0,0}
};

void setup() {
  lc.shutdown(0, false);
  lc.setIntensity(0, 8);
  lc.clearDisplay(0);
}

void loop()
{
  showLed_C();
  delay(1000);
  lc.clearDisplay(0);
  showLed_J();
  delay(1000);
  lc.clearDisplay(0);
  showLed_H();
  delay(1000);
  lc.clearDisplay(0);
  showLed_HEART();
  delay(1000);
  lc.clearDisplay(0);
}

void showLed_C() {
  for(int col=0; col<8; col+=1) {
    for(int row=0; row<8; row+=1) {
      lc.setLed(0, col, row, NAME_C[col][row]);
    }
  }
}

void showLed_J() {
  for(int col=0; col<8; col+=1) {
    for(int row=0; row<8; row+=1) {
      lc.setLed(0, col, row, NAME_J[col][row]);
    }
  }
}

void showLed_H() {
  for(int col=0; col<8; col+=1) {
    for(int row=0; row<8; row+=1) {
      lc.setLed(0, col, row, NAME_H[col][row]);
    }
  }
}

void showLed_HEART() {
  for(int col=0; col<8; col+=1) {
    for(int row=0; row<8; row+=1) {
      lc.setLed(0, col, row, heart[col][row]);
    }
  }
}
실습 5) 버튼을 눌러 도트매트릭스 제어하기
#include "LedControl.h"

int din = 12;
int cs = 11;
int clk = 10;
int btn = 7;

LedControl lc = LedControl(din, clk, cs, 1);

void setup() {
  pinMode(btn, INPUT_PULLUP);
  lc.shutdown(0, false);
  lc.setIntensity(0, 2);
  lc.clearDisplay(0);
}

int col = 0;
int row = 0;

void loop()
{
  if (digitalRead(btn) == LOW) {
    lc.clearDisplay(0);
    row+=1;
    if (row ==8) {
      row = 0;
      col += 1;
    }
  }
  lc.setLed(0, col, row, true);
  delay(150);
}