Motor Driver(L298N): 두 판 사이의 차이
(Created page with "{{#seo:|title=아두위키 : 아두이노 L298N 모터 드라이버 가이드|title_mode=append|keywords=아두이노, 정보과학, 메이커학습, 수행평가, L298N 모터 드라이버, 아두이노 작품, 캡스톤작품, 아두이노 예제코드|description=아두이노로 L298N 모터 드라이버를 제어하는 방법(기본정보, 회로, 예제 코드)을 소개합니다. 정보과학과 메이커수업에 활용가능합니다.}} 파일:L298N.jpg|center|...") |
잔글편집 요약 없음 |
||
| 1번째 줄: | 1번째 줄: | ||
{{#seo:|title=아두위키 : 아두이노 L298N 모터 드라이버 가이드|title_mode=append|keywords=아두이노, 정보과학, 메이커학습, 수행평가, L298N 모터 드라이버, 아두이노 작품, 캡스톤작품, 아두이노 예제코드|description=아두이노로 L298N 모터 드라이버를 제어하는 방법(기본정보, 회로, 예제 코드)을 소개합니다. 정보과학과 메이커수업에 활용가능합니다.}} | {{#seo:|title=아두위키 : 아두이노 L298N 모터 드라이버 가이드|title_mode=append|keywords=아두이노, 정보과학, 메이커학습, 수행평가, L298N 모터 드라이버, 아두이노 작품, 캡스톤작품, 아두이노 예제코드|description=아두이노로 L298N 모터 드라이버를 제어하는 방법(기본정보, 회로, 예제 코드)을 소개합니다. 정보과학과 메이커수업에 활용가능합니다.}} | ||
[[ | [[File:L298N.jpg|center|class=coders100]] | ||
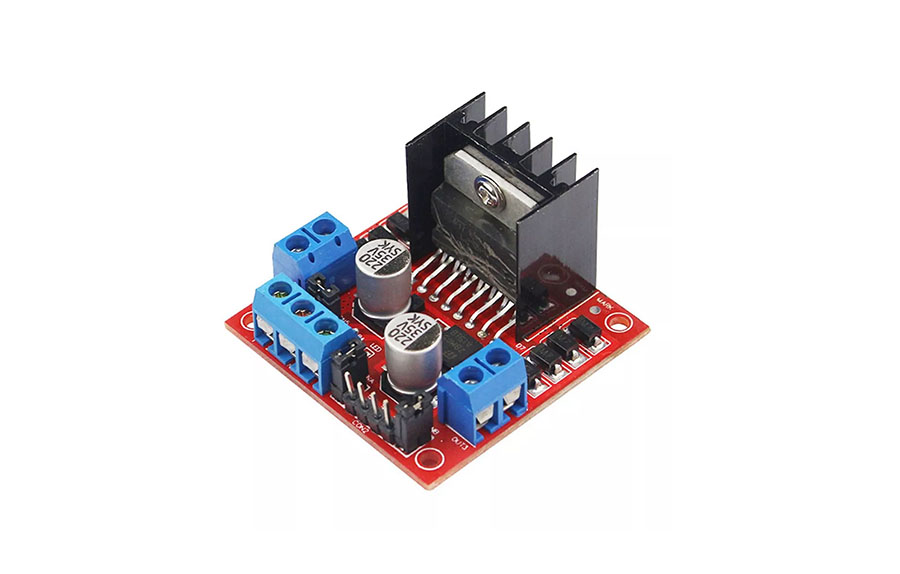
This module allows for control over the speed and direction of motors. It can operate two DC motors or one stepper motor. | |||
== '''Specifications''' == | |||
* Input Voltage: 9V ~ 12V | |||
* Speed control via PWM signal | |||
* Direction control with digital signals | |||
== '''Example Required Hardware''' == | |||
* Arduino board | |||
* Jumper cables | |||
* Power supply (9 ~ 12V, battery or adapter) | |||
* DC motors | |||
* L298N motor driver | |||
== '''Connection''' == | |||
== ''' | |||
{| class="wikitable" | {| class="wikitable" | ||
| colspan="1" rowspan="1" | | | colspan="1" rowspan="1" |Arduino | ||
| colspan="1" rowspan="1" |L298N | | colspan="1" rowspan="1" |L298N Motor Driver | ||
| colspan="1" rowspan="1" |DC | | colspan="1" rowspan="1" |DC motors | ||
| colspan="1" rowspan="1" | | | colspan="1" rowspan="1" |power supply | ||
|- | |- | ||
| colspan="1" rowspan="1" |GND | | colspan="1" rowspan="1" |GND | ||
| 53번째 줄: | 51번째 줄: | ||
| colspan="1" rowspan="1" | | | colspan="1" rowspan="1" | | ||
| colspan="1" rowspan="1" |OUT1 | | colspan="1" rowspan="1" |OUT1 | ||
| colspan="1" rowspan="1" | | | colspan="1" rowspan="1" |Connect | ||
| colspan="1" rowspan="1" | | | colspan="1" rowspan="1" | | ||
|- | |- | ||
| colspan="1" rowspan="1" | | | colspan="1" rowspan="1" | | ||
| colspan="1" rowspan="1" |OUT2 | | colspan="1" rowspan="1" |OUT2 | ||
| colspan="1" rowspan="1" | | | colspan="1" rowspan="1" |Connect | ||
|} | |} | ||
[[ | [[File:L298N 회로.png|center|class=coders100]] | ||
== ''' | == '''Example Code''' == | ||
This example demonstrates gradually decreasing the motor's speed until it stops and then reversing direction.<syntaxhighlight lang="c++" line="1"> | |||
const int IN1 = 8; | const int IN1 = 8; | ||
const int IN2 = 7; | const int IN2 = 7; | ||
| 96번째 줄: | 94번째 줄: | ||
delay(100); | delay(100); | ||
} | } | ||
</syntaxhighlight> | </syntaxhighlight> | ||
=== | === Execution Result === | ||
[https://blog.naver.com/gongzipsa/223168351657 | Please check the [https://blog.naver.com/gongzipsa/223168351657 link] for the operation video. | ||
2024년 3월 24일 (일) 17:50 판

This module allows for control over the speed and direction of motors. It can operate two DC motors or one stepper motor.
Specifications
- Input Voltage: 9V ~ 12V
- Speed control via PWM signal
- Direction control with digital signals
Example Required Hardware
- Arduino board
- Jumper cables
- Power supply (9 ~ 12V, battery or adapter)
- DC motors
- L298N motor driver
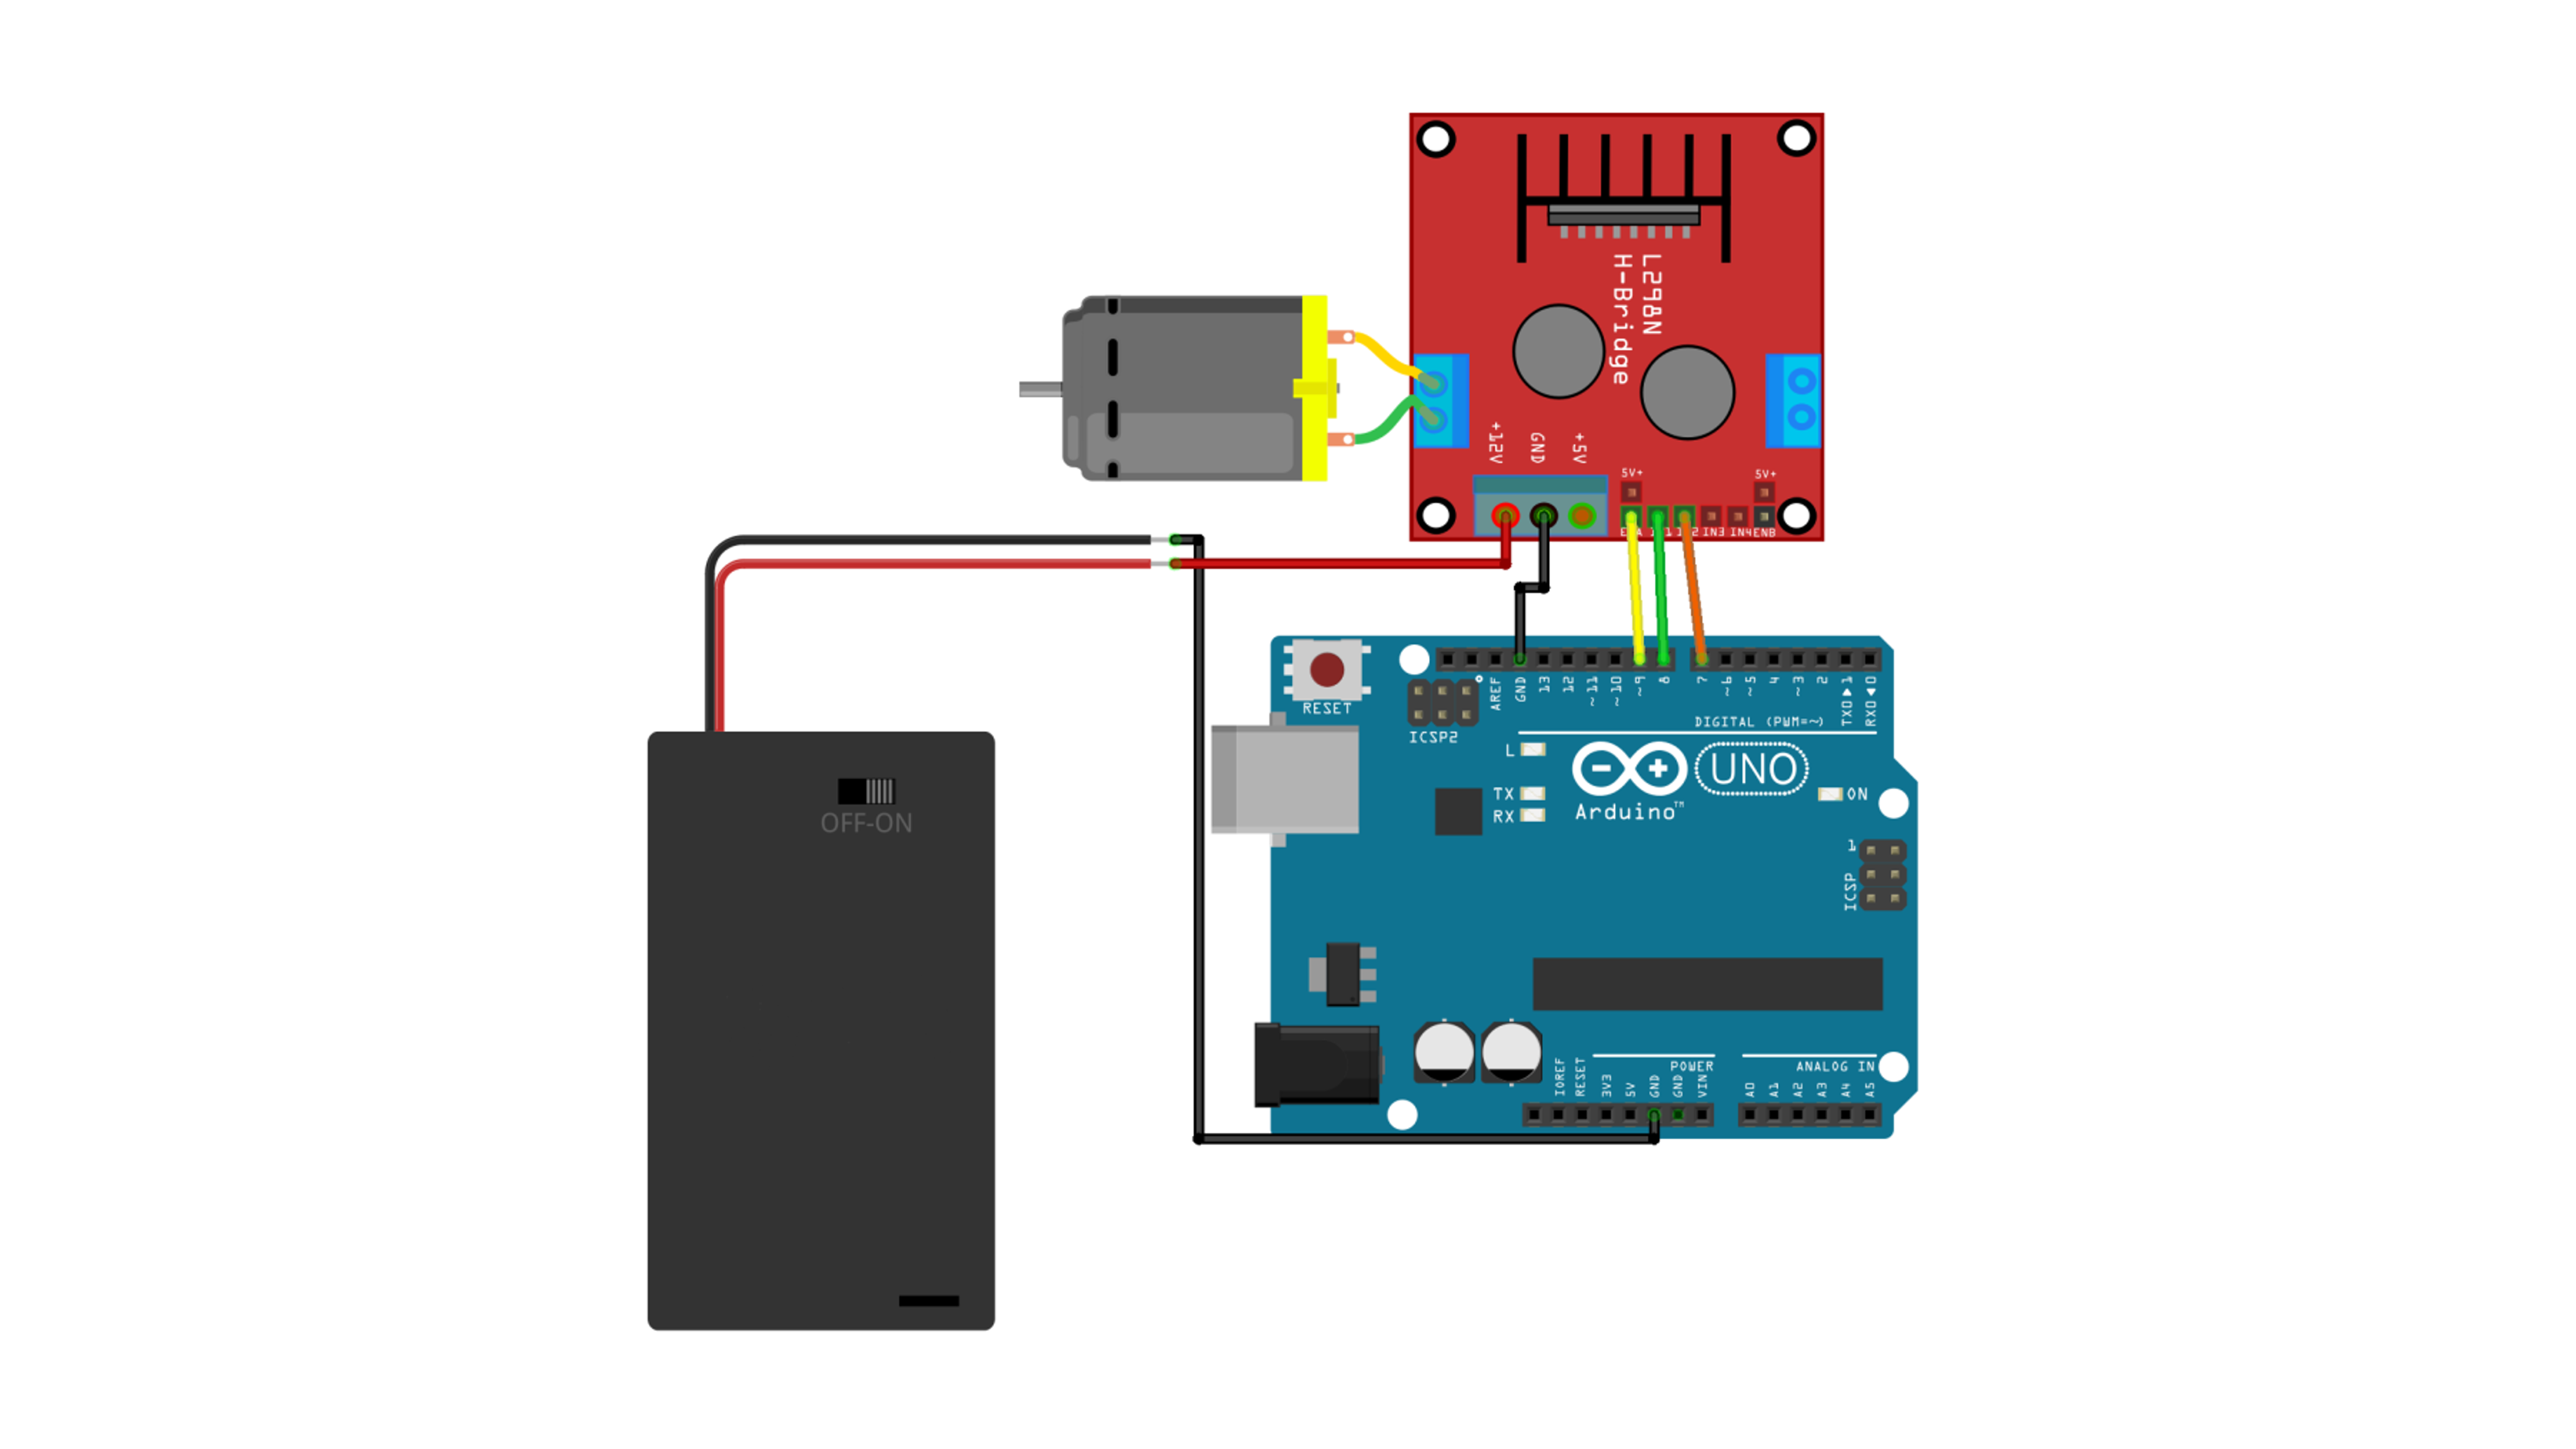
Connection
| Arduino | L298N Motor Driver | DC motors | power supply |
| GND | GND | GND | |
| D9 | ENA | ||
| D8 | IN1 | ||
| D7 | IN2 | ||
| 9 ~ 12V | VCC | ||
| OUT1 | Connect | ||
| OUT2 | Connect |

Example Code
This example demonstrates gradually decreasing the motor's speed until it stops and then reversing direction.
const int IN1 = 8;
const int IN2 = 7;
const int ENA = 9;

void setup() {
  pinMode(IN1, OUTPUT);
  pinMode(IN2, OUTPUT);
  digitalWrite(IN1, HIGH);
  digitalWrite(IN2, LOW);
  analogWrite(ENA, 255);
  delay(2000);
  analogWrite(ENA, 170);
  delay(2000);
  analogWrite(ENA, 85);
  delay(2000);
  analogWrite(ENA, 0);
  delay(2000);
  digitalWrite(IN1, LOW);
  digitalWrite(IN2, HIGH);
  analogWrite(ENA, 255);
  delay(2000);
  analogWrite(ENA, 170);
  delay(2000);
  analogWrite(ENA, 85);
  delay(2000);
  analogWrite(ENA, 0);
  delay(2000);
}

void loop() {
  delay(100);
}
Execution Result
Please check the link for the operation video.