7주차 금고 만들기: 두 판 사이의 차이
잔글편집 요약 없음 |
|||
| 162번째 줄: | 162번째 줄: | ||
|A5 | |A5 | ||
|} | |} | ||
[[파일: | [[파일:키패드LCD.png|프레임없음|672x672픽셀]] | ||
==== 2-2. 키패드를 눌러 LCD에 문자 출력하기 ==== | ==== 2-2. 키패드를 눌러 LCD에 문자 출력하기 ==== | ||
| 208번째 줄: | 208번째 줄: | ||
비밀번호가 맞다면 LCD에 "OK!!"를 출력하고 아니라면 "NOoooo!!"를 3초 동안 출력합니다. | 비밀번호가 맞다면 LCD에 "OK!!"를 출력하고 아니라면 "NOoooo!!"를 3초 동안 출력합니다. | ||
★ 비밀번호를 확인 후 문자열 초기화를 해야 다시 문자열을 입력해 비밀번호를 확인할 수 있습니다. | |||
//영상<syntaxhighlight lang="arduino" line="1"> | //영상<syntaxhighlight lang="arduino" line="1"> | ||
| 253번째 줄: | 256번째 줄: | ||
</syntaxhighlight> | </syntaxhighlight> | ||
=== ?. 실습 코드 참고하기 === | === 3. 서보모터 움직이기 === | ||
==== 3-1. 서보모터 회로 ==== | |||
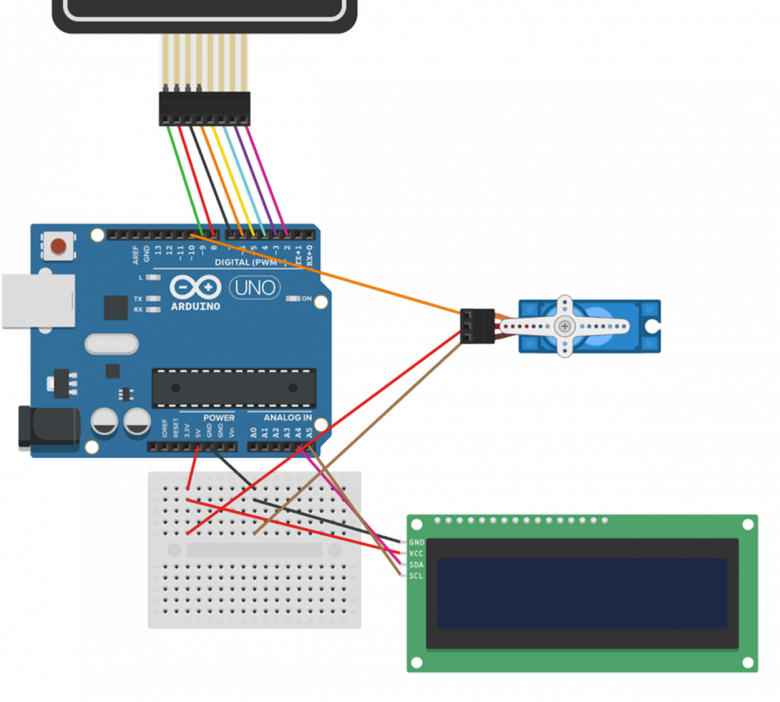
[[파일:키패드LCD서보.png|프레임없음|780x780픽셀]] | |||
서보모터를 아두이노에 연결해봅시다. | |||
서보모터의 '''검정색 선을 GND, 빨간색 선을 5V, 주황색 선을 디지털 핀(10번)'''에 연결해주세요. | |||
==== 3-2. 서보모터 회전하기 ==== | |||
//영상 | |||
먼저 서보모터를 움직여 봅시다. 서보모터를 움직여 각도를 제어해 봅시다.<syntaxhighlight lang="arduino" line="1"> | |||
#include <Servo.h> | |||
Servo s; | |||
void setup() { | |||
s.attach(10); | |||
} | |||
void loop() { | |||
s.write(0); | |||
delay(2000); | |||
s.write(90); | |||
delay(2000); | |||
s.write(180); | |||
delay(2000); | |||
} | |||
</syntaxhighlight> | |||
==== 3-3. [실습] 비밀번호가 맞으면 금고 열기 ==== | |||
위의 실습에서 비밀번호를 확인하는 코드를 작성해 보았습니다. | |||
비밀번호가 맞다면 서보모터를 회전하여 금고를 열어봅시다. | |||
//영상<syntaxhighlight lang="arduino" line="1"> | |||
#include <LiquidCrystal_I2C.h> | |||
LiquidCrystal_I2C lcd(0x27, 16, 2); | |||
#include <Keypad.h> | |||
char hexaKeys[4][4] = { | |||
{'1', '2', '3', 'A'}, | |||
{'4', '5', '6', 'B'}, | |||
{'7', '8', '9', 'C'}, | |||
{'*', '0', '#', 'D'}}; | |||
byte rowPins[4] = {9, 8, 7, 6}; | |||
byte colPins[4] = {5, 4, 3, 2}; | |||
Keypad customKeypad = Keypad(makeKeymap(hexaKeys), rowPins, colPins, 4, 4); | |||
char keyPressed; | |||
String s = ""; | |||
String pw = "2025"; | |||
#include <Servo.h> | |||
Servo s; | |||
void setup(){ | |||
lcd.init(); | |||
lcd.backlight(); | |||
s.attach(10); | |||
} | |||
void loop(){ | |||
keyPressed = customKeypad.getKey(); | |||
if (keyPressed) | |||
{ | |||
if (keyPressed == '#') { | |||
if (s == pw) { | |||
// code .. | |||
} | |||
else { | |||
// code .. | |||
} | |||
// code .. | |||
} | |||
else { | |||
s += keyPressed; | |||
lcd.clear(); | |||
lcd.print("PW : "); | |||
lcd.print(s); | |||
} | |||
} | |||
} | |||
</syntaxhighlight> | |||
==== [참고사항] 서보모터가 움직이지 않는다면? ==== | |||
서보모터가 움직이지 않을 때는 아두이노에 전력이 부족해서 그럴 수도 있어요! | |||
이런 경우 서보모터를 움직일 때만 attach() 함수를 이용해 서보모터를 연결한 후 회전합니다. 회전 후 서보모터 연결을 detach() 함수를 이용해 해제합니다.<syntaxhighlight lang="arduino" line="1"> | |||
#include <Servo.h> | |||
Servo s; | |||
void setup() { | |||
} | |||
void loop() { | |||
s.attach(10); | |||
s.write(0); | |||
delay(300); | |||
s.detach(); | |||
delay(2000); | |||
s.attach(10); | |||
s.write(90); | |||
delay(300); | |||
s.detach(); | |||
delay(2000); | |||
s.attach(10); | |||
s.write(0); | |||
delay(300); | |||
s.detach(); | |||
delay(2000); | |||
} | |||
</syntaxhighlight> | |||
==== 3-4. [실습] 금고 완성하기 ==== | |||
비밀번호를 확인하여 서보모터를 이용해 금고를 열었습니다. 나머지 동작을 코딩해 금고 프로젝트를 완성해 봅시다. 아래 순서에 따라 코드를 작성해보세요. | |||
# 금고가 열리고 1초 후 LCD에 모든 문자열을 지우고 "Press 'A'"라는 문자열을 출력합니다. | |||
# "Press 'A'"라는 문자열이 출력된 후 키패드의 'A'를 누르면 서보모터를 회전시켜 금고를 다시 잠궈주세요. | |||
# 다시 비밀번호를 치고 '#' 버튼을 눌렀을 때 금고가 열리는지 확인하세요. | |||
//영상 | |||
=== 4. 실습 코드 참고하기 === | |||
==== 1-4. [실습] 특정 버튼이 눌렸을 때 LED 켜기 ==== | ==== 1-4. [실습] 특정 버튼이 눌렸을 때 LED 켜기 ==== | ||
2025년 1월 16일 (목) 20:10 판
1. 키패드
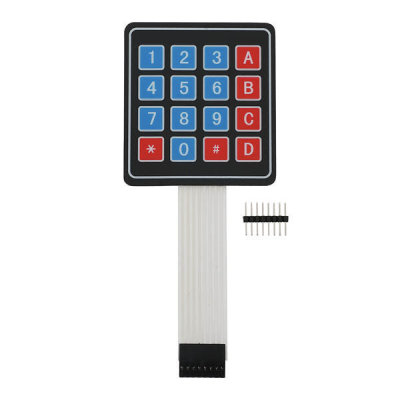
4 x 4 크기의 키패드 모듈을 사용해 봅시다. 금고에 비밀번호를 설정해두고 키패드를 이용해 비밀번호를 누르는 기능을 만들 예정입니다.
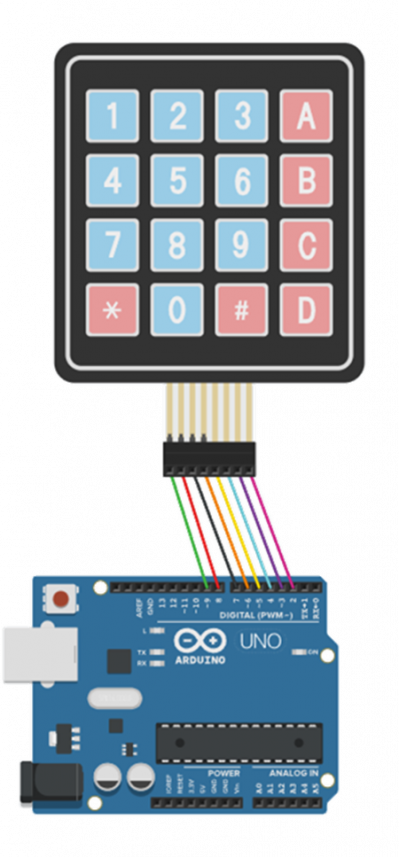
1-1. 회로
1-2. 라이브러리 추가
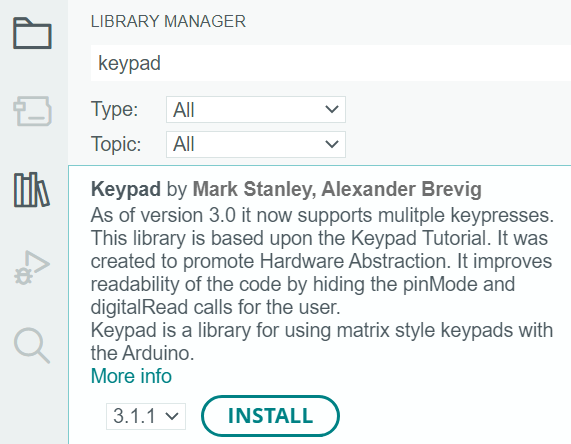
먼저 아두이노 IDE 에서 키패드를 사용하기 위해 라이브러리를 설치합니다.
[스케치] - [라이브러리 포함] - [라이브러리 관리] 에서 "keypad"을 검색합니다. [Keypad by Mark Stanley, Alexander Brevig]을 찾아 설치해주세요.
1-3. 키패드를 눌러 시리얼 모니터에 출력하기
키패드가 눌릴 때마다 시리얼 모니터에 눌린 버튼에 해당하는 문자를 출력해 봅시다.
//영상
#include <Keypad.h>
char hexaKeys[4][4] = {
  {'1', '2', '3', 'A'},
  {'4', '5', '6', 'B'},
  {'7', '8', '9', 'C'},
  {'*', '0', '#', 'D'}};
byte rowPins[4] = {9, 8, 7, 6};
byte colPins[4] = {5, 4, 3, 2};
Keypad customKeypad = Keypad(makeKeymap(hexaKeys), rowPins, colPins, 4, 4);
char keyPressed;

void setup(){
  Serial.begin(9600);
}
void loop(){
  keyPressed = customKeypad.getKey();

  if (keyPressed)
  {
    Serial.println(keyPressed);
  }
}
1-4. [실습] 특정 버튼이 눌렸을 때 LED 켜기
버튼 '*'이 눌리면 LED를 켜고, 버튼 '#'이 눌리면 LED를 끄는 코드를 작성해 봅시다.
#include <Keypad.h>
char hexaKeys[4][4] = {
  {'1', '2', '3', 'A'},
  {'4', '5', '6', 'B'},
  {'7', '8', '9', 'C'},
  {'*', '0', '#', 'D'}};
byte rowPins[4] = {9, 8, 7, 6};
byte colPins[4] = {5, 4, 3, 2};
Keypad customKeypad = Keypad(makeKeymap(hexaKeys), rowPins, colPins, 4, 4);
char keyPressed;

void setup(){
  Serial.begin(9600);
  pinMode(13,  OUTPUT);
}
void loop(){
  keyPressed = customKeypad.getKey();

  if (keyPressed)
  {
    Serial.println(keyPressed);
    if(keyPressed=='*') {
      // code ..
    }
    if(keyPressed=='#'){
      // code ..
    }
  }
}
1-5. String 자료형의 이해
String 자료형은 문자열을 쉽게 사용하고 저장, 관리할 수 있습니다.
금고의 비밀번호를 저장하고 비교하기 위해 사용할 것입니다.
문자열은 더하기(+) 연산이 가능합니다. 문자열 더하기 연산은 두 문자열을 연결해서 새로운 문자열을 만들어낼 수 있습니다.
String a = "hello";
String b = "coders";
String c = a + b;
// c에는 "hellocoders"가 저장된다.
1-6. 문자열 비교
String 변수 2개가 같은 문자인지 확인하기 위해서는 앞서 배운 비교연산자 "=="을 사용하면 됩니다.
String a = "hello"
String b = "coders"
if (a==b) {
    //같은 문자열이라면
}
if (a!=b) {
    //다른 문자열이라면
}
1-7. [실습] 누른 문자열을 모두 합쳐 출력하기
키패드에서 누르는 문자를 모두 String 변수에 합쳐 저장해 봅시다.
키패드의 '#'이 눌렀을 때 이전까지 누른 문자열이 "1234"라면 LED를 1번 깜빡이고 아니라면 LED를 3번 깜빡이게 코드를 작성해 봅시다.
#include <Keypad.h>
char hexaKeys[4][4] = {
  {'1', '2', '3', 'A'},
  {'4', '5', '6', 'B'},
  {'7', '8', '9', 'C'},
  {'*', '0', '#', 'D'}};
byte rowPins[4] = {9, 8, 7, 6};
byte colPins[4] = {5, 4, 3, 2};
Keypad customKeypad = Keypad(makeKeymap(hexaKeys), rowPins, colPins, 4, 4);
char keyPressed;
String s = "";
String pw = "1234";

void setup(){
  Serial.begin(9600);
  pinMode(13,  OUTPUT);
}
void loop(){
  keyPressed = customKeypad.getKey();

  if (keyPressed)
  {
    if (keyPressed=='#') {
      if(s == pw) {

      }
      if(s != pw) {

      }
      s = "";
    }
    else{
      s += keyPressed;
    }
  }
}
2. LCD
키패드로 누른 문자를 LCD를 이용해 출력해 봅시다.
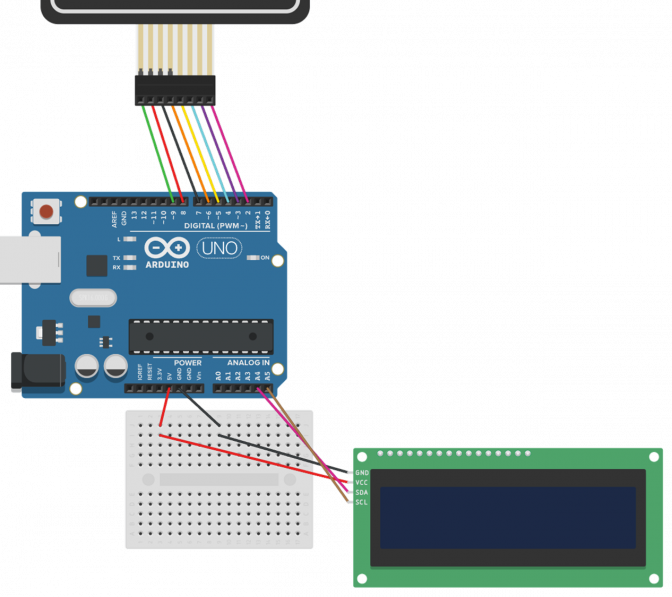
2-1. LCD 회로도[편집 | 원본 편집]
| I2C LCD 모듈 핀 | 아두이노 우노 핀 |
|---|---|
| VCC | 5V |
| GND | GND |
| SDA | A4 |
| SCL | A5 |
2-2. 키패드를 눌러 LCD에 문자 출력하기
키패드가 눌리면 LCD에 문자열을 출력하도록 코드를 작성해 봅시다.
//영상
#include <LiquidCrystal_I2C.h>
LiquidCrystal_I2C lcd(0x27, 16, 2);
#include <Keypad.h>
char hexaKeys[4][4] = {
  {'1', '2', '3', 'A'},
  {'4', '5', '6', 'B'},
  {'7', '8', '9', 'C'},
  {'*', '0', '#', 'D'}};
byte rowPins[4] = {9, 8, 7, 6};
byte colPins[4] = {5, 4, 3, 2};
Keypad customKeypad = Keypad(makeKeymap(hexaKeys), rowPins, colPins, 4, 4);
char keyPressed;
String s = "";

void setup(){
  lcd.init();
  lcd.backlight();
}
void loop(){
  keyPressed = customKeypad.getKey();

  if (keyPressed)
  {
    s += keyPressed;
    lcd.clear();
    lcd.print(s);
  }
}
2-3. [실습] 비밀번호 확인하기
금고 프로젝트를 위해 비밀번호를 확인하는 기능을 구현해 봅시다.
비밀번호는 "2025"라는 문자열로 지정합니다.
키패드에 눌리는 문자열을 LCD에 출력합니다.
만약 키패드의 '#'을 눌렀다면 비밀번호를 확인합니다.
비밀번호가 맞다면 LCD에 "OK!!"를 출력하고 아니라면 "NOoooo!!"를 3초 동안 출력합니다.
★ 비밀번호를 확인 후 문자열 초기화를 해야 다시 문자열을 입력해 비밀번호를 확인할 수 있습니다.
//영상
#include <LiquidCrystal_I2C.h>
LiquidCrystal_I2C lcd(0x27, 16, 2);
#include <Keypad.h>
char hexaKeys[4][4] = {
  {'1', '2', '3', 'A'},
  {'4', '5', '6', 'B'},
  {'7', '8', '9', 'C'},
  {'*', '0', '#', 'D'}};
byte rowPins[4] = {9, 8, 7, 6};
byte colPins[4] = {5, 4, 3, 2};
Keypad customKeypad = Keypad(makeKeymap(hexaKeys), rowPins, colPins, 4, 4);
char keyPressed;
String s = "";
String pw = "2025";

void setup(){
  lcd.init();
  lcd.backlight();
}
void loop(){
  keyPressed = customKeypad.getKey();

  if (keyPressed)
  {
    if (keyPressed == '#') {
      if (s == pw) {
        // code ..
      }
      else {
        // code ..
      }
      // code ..
    }
    else {
      s += keyPressed;
      lcd.clear();
      lcd.print("PW : ");
      lcd.print(s);
    }
  }
}
3. 서보모터 움직이기
3-1. 서보모터 회로
서보모터를 아두이노에 연결해봅시다.
서보모터의 검정색 선을 GND, 빨간색 선을 5V, 주황색 선을 디지털 핀(10번)에 연결해주세요.
3-2. 서보모터 회전하기
//영상
먼저 서보모터를 움직여 봅시다. 서보모터를 움직여 각도를 제어해 봅시다.
#include <Servo.h>
Servo s;

void setup() {
  s.attach(10);
}

void loop() {
  s.write(0);
  delay(2000);
  s.write(90);
  delay(2000);
  s.write(180);
  delay(2000);
}
3-3. [실습] 비밀번호가 맞으면 금고 열기
위의 실습에서 비밀번호를 확인하는 코드를 작성해 보았습니다.
비밀번호가 맞다면 서보모터를 회전하여 금고를 열어봅시다.
//영상
#include <LiquidCrystal_I2C.h>
LiquidCrystal_I2C lcd(0x27, 16, 2);
#include <Keypad.h>
char hexaKeys[4][4] = {
  {'1', '2', '3', 'A'},
  {'4', '5', '6', 'B'},
  {'7', '8', '9', 'C'},
  {'*', '0', '#', 'D'}};
byte rowPins[4] = {9, 8, 7, 6};
byte colPins[4] = {5, 4, 3, 2};
Keypad customKeypad = Keypad(makeKeymap(hexaKeys), rowPins, colPins, 4, 4);
char keyPressed;
String s = "";
String pw = "2025";

#include <Servo.h>
Servo s;

void setup(){
  lcd.init();
  lcd.backlight();
  s.attach(10);
}
void loop(){
  keyPressed = customKeypad.getKey();

  if (keyPressed)
  {
    if (keyPressed == '#') {
      if (s == pw) {
        // code ..
      }
      else {
        // code ..
      }
      // code ..
    }
    else {
      s += keyPressed;
      lcd.clear();
      lcd.print("PW : ");
      lcd.print(s);
    }
  }
}
[참고사항] 서보모터가 움직이지 않는다면?
서보모터가 움직이지 않을 때는 아두이노에 전력이 부족해서 그럴 수도 있어요!
이런 경우 서보모터를 움직일 때만 attach() 함수를 이용해 서보모터를 연결한 후 회전합니다. 회전 후 서보모터 연결을 detach() 함수를 이용해 해제합니다.
#include <Servo.h>
Servo s;

void setup() {
}

void loop() {
  s.attach(10);
  s.write(0);
  delay(300);
  s.detach();

  delay(2000);

  s.attach(10);
  s.write(90);
  delay(300);
  s.detach();

  delay(2000);

  s.attach(10);
  s.write(0);
  delay(300);
  s.detach();

  delay(2000);
}
3-4. [실습] 금고 완성하기
비밀번호를 확인하여 서보모터를 이용해 금고를 열었습니다. 나머지 동작을 코딩해 금고 프로젝트를 완성해 봅시다. 아래 순서에 따라 코드를 작성해보세요.
- 금고가 열리고 1초 후 LCD에 모든 문자열을 지우고 "Press 'A'"라는 문자열을 출력합니다.
- "Press 'A'"라는 문자열이 출력된 후 키패드의 'A'를 누르면 서보모터를 회전시켜 금고를 다시 잠궈주세요.
- 다시 비밀번호를 치고 '#' 버튼을 눌렀을 때 금고가 열리는지 확인하세요.
//영상
4. 실습 코드 참고하기
1-4. [실습] 특정 버튼이 눌렸을 때 LED 켜기
#include <Keypad.h>
char hexaKeys[4][4] = {
  {'1', '2', '3', 'A'},
  {'4', '5', '6', 'B'},
  {'7', '8', '9', 'C'},
  {'*', '0', '#', 'D'}};
byte rowPins[4] = {9, 8, 7, 6};
byte colPins[4] = {5, 4, 3, 2};
Keypad customKeypad = Keypad(makeKeymap(hexaKeys), rowPins, colPins, 4, 4);
char keyPressed;

void setup(){
  Serial.begin(9600);
  pinMode(13,  OUTPUT);
}
void loop(){
  keyPressed = customKeypad.getKey();

  if (keyPressed)
  {
    Serial.println(keyPressed);
    if(keyPressed=='*') {
      digitalWrite(13, HIGH);
    }
    if(keyPressed=='#'){
      digitalWrite(13, LOW);
    }
  }
}
1-7. [실습] 누른 문자열을 모두 합쳐 출력하기
#include <Keypad.h>
char hexaKeys[4][4] = {
  {'1', '2', '3', 'A'},
  {'4', '5', '6', 'B'},
  {'7', '8', '9', 'C'},
  {'*', '0', '#', 'D'}};
byte rowPins[4] = {9, 8, 7, 6};
byte colPins[4] = {5, 4, 3, 2};
Keypad customKeypad = Keypad(makeKeymap(hexaKeys), rowPins, colPins, 4, 4);
char keyPressed;
String s = "";
String pw = "1234";

void setup(){
  Serial.begin(9600);
  pinMode(13,  OUTPUT);
}
void loop(){
  keyPressed = customKeypad.getKey();

  if (keyPressed)
  {
    if (keyPressed=='#') {
      Serial.println(s);
      if(s == pw) {
        digitalWrite(13, HIGH);
        delay(500);
        digitalWrite(13, LOW);
        delay(500);
      }
      if(s != pw) {
        for(int i=0; i<3; i++) {
          digitalWrite(13, HIGH);
          delay(500);
          digitalWrite(13, LOW);
          delay(500);
        }
      }
      s = "";
    }
    else{
      s += keyPressed;
    }
  }
}
2-3. [실습] 비밀번호 확인하기
#include <LiquidCrystal_I2C.h>
LiquidCrystal_I2C lcd(0x27, 16, 2);
#include <Keypad.h>
char hexaKeys[4][4] = {
  {'1', '2', '3', 'A'},
  {'4', '5', '6', 'B'},
  {'7', '8', '9', 'C'},
  {'*', '0', '#', 'D'}};
byte rowPins[4] = {9, 8, 7, 6};
byte colPins[4] = {5, 4, 3, 2};
Keypad customKeypad = Keypad(makeKeymap(hexaKeys), rowPins, colPins, 4, 4);
char keyPressed;
String s = "";
String pw = "2025";

void setup(){
  lcd.init();
  lcd.backlight();
}
void loop(){
  keyPressed = customKeypad.getKey();

  if (keyPressed)
  {
    if (keyPressed == '#') {
      if (s == pw) {
        lcd.clear();
        lcd.print("OK!!");
        delay(3000);
      }
      else {
        lcd.clear();
        lcd.print("NOoooo!!");
        delay(3000);
      }
      s="";
      lcd.clear();
      lcd.print("PW : ");
    }
    else {
      s += keyPressed;
      lcd.clear();
      lcd.print("PW : ");
      lcd.print(s);
    }
  }
}
