MOSFET Driver Module(IRF520): 두 판 사이의 차이
(Created page with "{{#seo:|title=아두위키 : 아두이노 모스펫 드라이버 모듈(IRF520) 가이드|title_mode=append|keywords=아두이노, 정보과학, 메이커학습, 수행평가, 모스펫 드라이버 모듈(IRF520), 아두이노 작품, 캡스톤작품, 아두이노 예제코드|description=아두이노로 모스펫 드라이버 모듈(IRF520)을 제어하는 방법(기본정보, 회로, 예제 코드)을 소개합니다. 정보과학과 메이커수업에 활용가능합...") |
잔글편집 요약 없음 |
||
| 85번째 줄: | 85번째 줄: | ||
=== Execution Result: === | === Execution Result: === | ||
<div class="coders70"> | |||
<youtube> Y91z0HHYAGI </youtube> | |||
</div> | |||
2024년 7월 10일 (수) 14:42 판

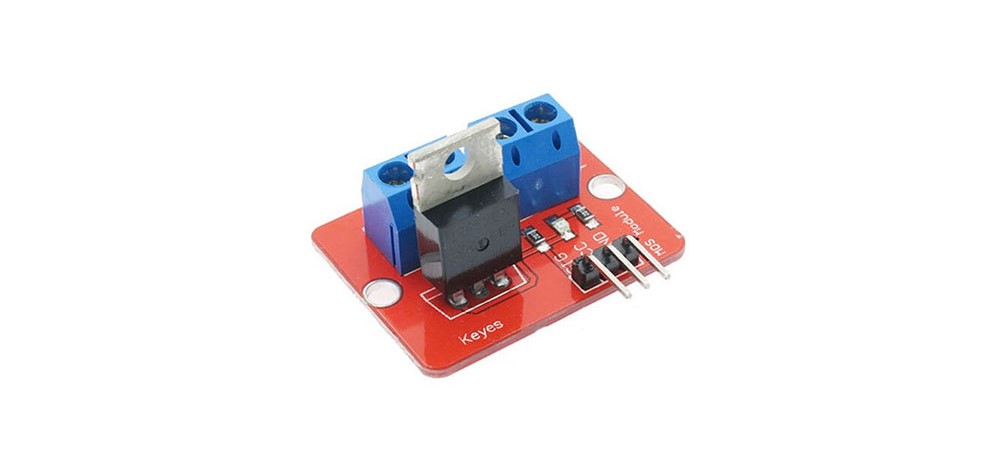
The IRF520 MOSFET Driver Module is a module that can be controlled with a PWM signal. It requires a heatsink for currents above 1A.
Specifications
- Operating Voltage: 3.3V ~ 5V
- Input/Output Voltage: 0V ~ 24V
- Input/Output Current: ~5A (Heatsink required for currents above 1A)
Example Required Hardware
- Arduino board
- Jumper cables
- MOSFET module
- DC motor
- 4.5V power supply (AA batteries x3)
Connection
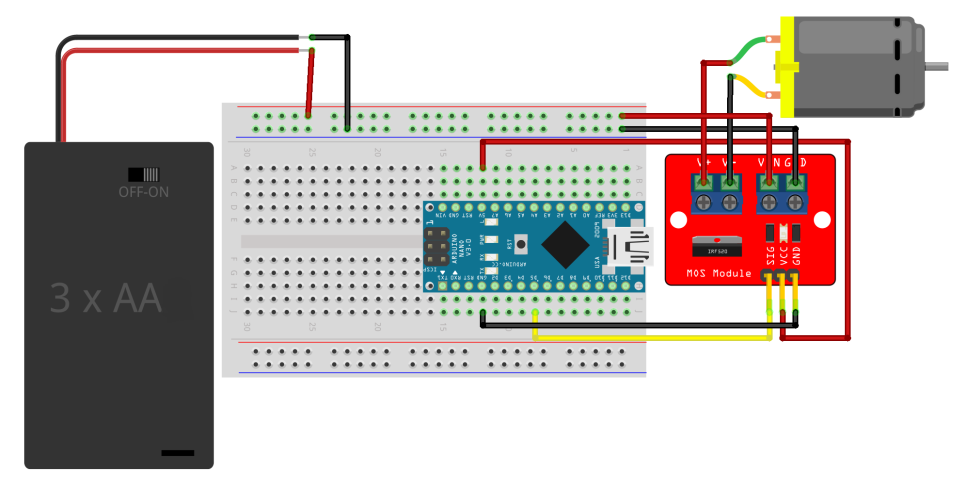
This example demonstrates motor speed control using the MOSFET module. The motor's rotation direction is not considered in this test (connect the motor to the MOSFET module's V+ and V-).
| Arduino | Motor | MOSFET Module | 4.5V Power Supply |
| D5 | SIG | ||
| 5V | VCC | ||
| GND | GND | ||
| VIN | + | ||
| GND | - | ||
| Connect | V+ | ||
| Connect | V- |

Example Code
The example gradually decreases the motor speed until it stops, then repeats the process.
int mosfetSignal = 5;
int val = 0;
int interval = 51;
void setup() {
  analogWrite(mosfetSignal, val);
  val = 255;
  delay(3000);
}

void loop() {
  for (int i = 0; i < 6; i++) {
    analogWrite(mosfetSignal, val);
    val -= interval;
    delay(3000);
  }
  val = 255;
}
Execution Result: