Electromagnet En: 두 판 사이의 차이
잔글 (→2. Control Method) |
|
| (같은 사용자의 중간 판 하나는 보이지 않습니다) | |
(차이 없음)
| |
2024년 8월 9일 (금) 17:40 기준 최신판

Overview
An electromagnet is a type of magnet that generates a magnetic field only when an electric current flows through it. Electromagnets can be used in various applications depending on their size and strength, and they can be easily controlled using microcontrollers like Arduino.
Operating Principle
The operation of an electromagnet is based on the interaction between electricity and magnetism. When electric current flows through a wire, a magnetic field is generated around it due to electromagnetic induction. This magnetic field varies based on the shape and direction of the wire, and when the wire is wound around a ferromagnetic core, a strong magnetic field is formed inside the core. Using this principle, the electromagnet can adjust its magnetic force according to the strength and direction of the current.
Specifications
| Voltage | Available in various options such as 5V, 12V, 24V, etc. |
| 'Magnetic Force | The magnetic force varies as well, and this document uses the 12V 15kg model. |
Usage Example
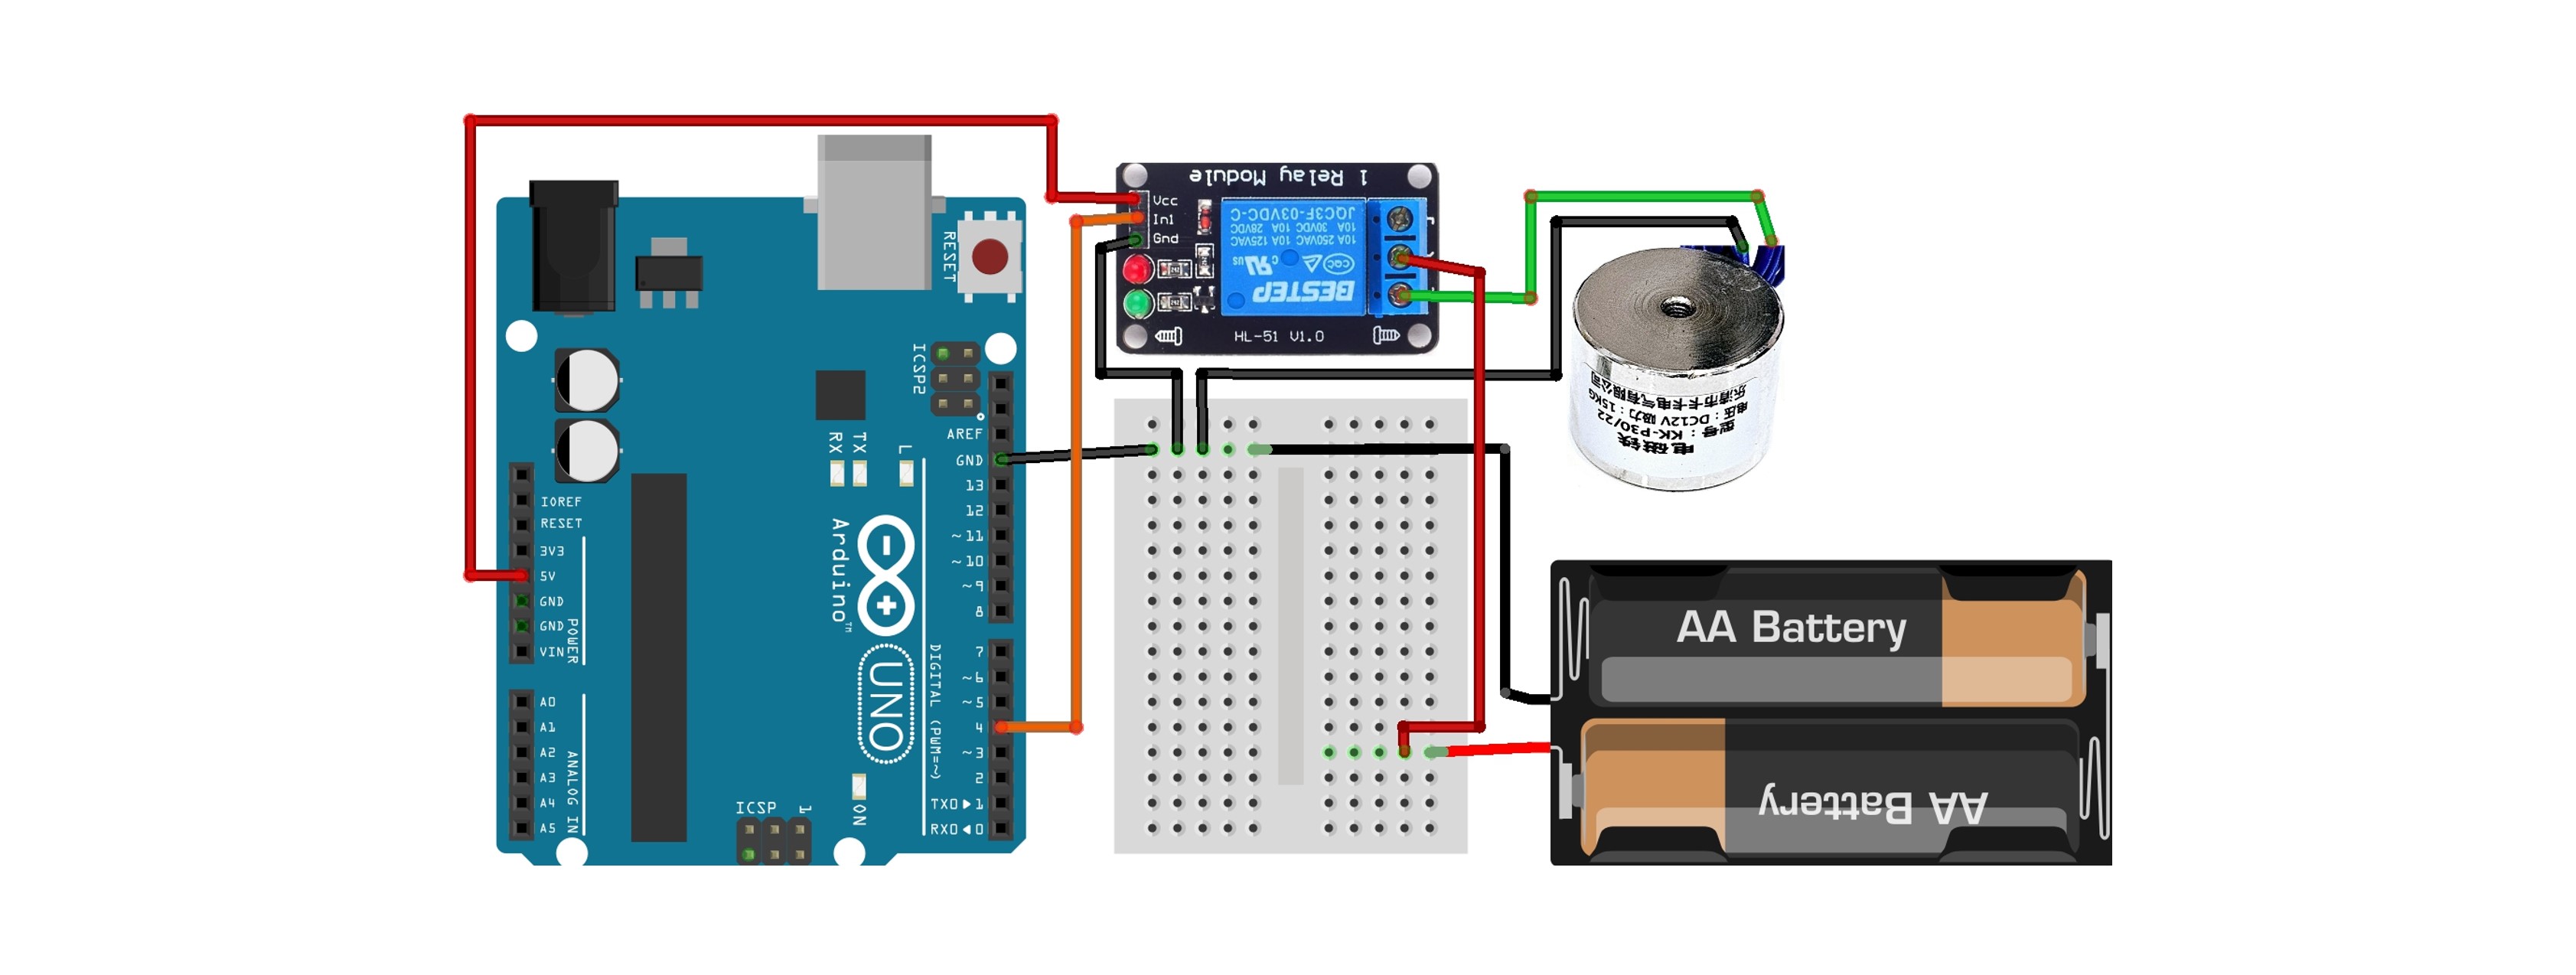
This is an example of controlling an electromagnet to alternate between being magnetized and demagnetized every 3 seconds using a relay module.
Circuit Configuration
The pins for the electromagnet do not have a specific designation, so you can connect them arbitrarily to GND and the relay.
In the diagram, there are 2 batteries shown, but in reality, 4 AA batteries were used.

Reasons for Using a Relay
The electromagnet is utilized through a relay instead of being directly connected to the Arduino. The reasons are as follows:
1. Electrical Isolation
- Using a Relay: A relay provides electrical isolation, allowing low-voltage circuits like Arduino to control high-voltage devices (e.g., electromagnets, motors). When current flows through the relay's coil, it activates the switch, connecting the high-voltage circuit.
- Direct Connection: If connected directly, the Arduino pins would connect straight to the high-voltage device, risking damage to the Arduino board if there are any issues in the circuit configuration. This is because the low-voltage and high-voltage circuits would share the same path. This ensures the safety and stability of the circuit.
2. Control Method
- Using a Relay: By using a relay, the Arduino can operate the relay with a low-voltage signal to control higher currents or voltages safely. Thus, the electromagnet or high-power equipment can be controlled safely.
- Direct Connection: When connected directly, the Arduino would have to control high-voltage devices that are significantly higher than the operating voltage of the Arduino. Therefore, the current from the Arduino pin must meet the device's current requirements. For more details on relays, please refer to the Relay Module En document.
Example Code
const int relay = 4;

void setup() {
  pinMode(relay, OUTPUT);
}

void loop() {
  digitalWrite(relay, LOW);
  delay(3000);
  digitalWrite(relay, HIGH);
  delay(3000);
}
Execution Result