4 bits Segment Display(TM1637): 두 판 사이의 차이
(새 문서: {{#seo:|title=아두위키 : 아두이노 4비트 7세그먼트 가이드|title_mode=append|keywords=아두이노, 정보과학, 메이커학습, 수행평가, 4비트 7세그먼트, 아두이노 작품, 캡스톤작품, 아두이노 예제코드|description=아두이노로 4비트 7세그먼트를 제어하는 방법(기본정보, 회로, 예제 코드)을 소개합니다. 정보과학과 메이커수업에 활용가능합니다.}} 파일:4비트세그먼트대표이미지1.j...) |
잔글 (→Overview) |
||
| (같은 사용자의 중간 판 2개는 보이지 않습니다) | |||
| 1번째 줄: | 1번째 줄: | ||
{{#seo:|title= | {{#seo:|title=Arduwiki : Arduino 4 bits Segment Display(TM1637) Guide|title_mode=append|keywords=Arduino, Information Science, Maker Learning, Performance Assessment, 4 bits Segment Display(TM1637), Arduino Project, Capstone Project, Arduino Example Code|description=This introduces how to control a 4 bits Segment Display(TM1637) with Arduino (basic information, circuit, example code). It can be used in Information Science and Maker classes.}} | ||
[[파일:4비트세그먼트대표이미지1.jpg|가운데|클래스=coders100]] | [[파일:4비트세그먼트대표이미지1.jpg|가운데|클래스=coders100]] | ||
== ''' | == '''Overview''' == | ||
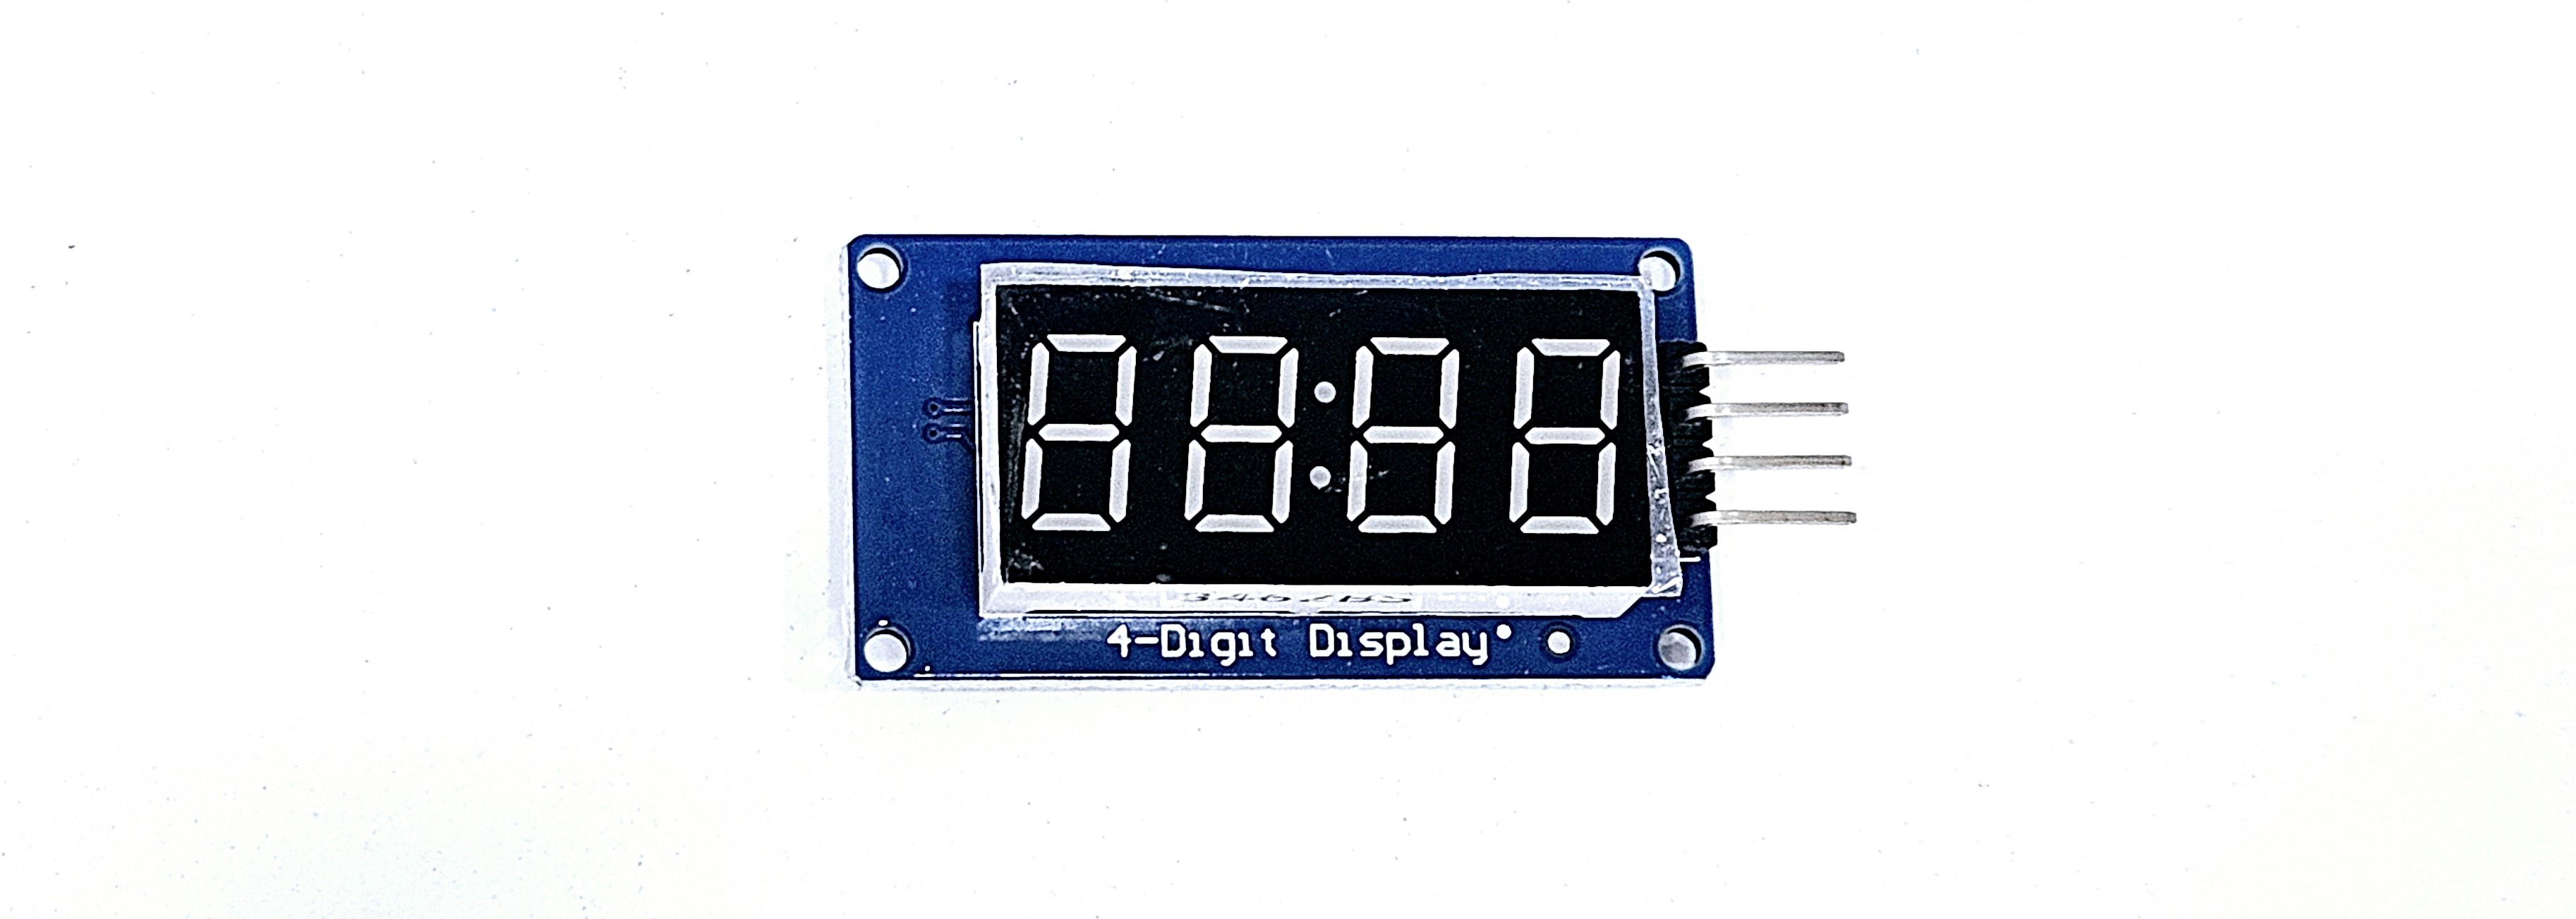
TM1637 is a driver IC for controlling 7-segment displays, and it can use easily connected with microcontrollers like Arduino. It has a colon (:) between the numbers so it has been used for particularly digital clocks, and widely used in various electronic projects such as thermometers and counters. | |||
== ''' | == '''Specifications''' == | ||
=== TM1637 | === TM1637 Module Specifications === | ||
{| class="wikitable" | {| class="wikitable" | ||
! | !List | ||
! | !Specifications | ||
|- | |- | ||
|''' | |'''Power Supply''' | ||
|3.3V ~ 5V | |3.3V ~ 5V | ||
|- | |- | ||
|''' | |'''Interface''' | ||
|I2C (TWI) | |I2C (TWI) | ||
|- | |- | ||
|''' | |'''Display''' | ||
| | |7segment Display (4자리) | ||
|- | |- | ||
|''' | |'''Control Pin''' | ||
|CLK ( | |CLK (Clock), DIO (Data) | ||
|- | |- | ||
|''' | |'''Temperature Range''' | ||
| -20°C ~ 70°C | | -20°C ~ 70°C | ||
|- | |- | ||
|''' | |'''Size''' | ||
|42 * 29 * 12 (mm) | |42 * 29 * 12 (mm) | ||
|} | |} | ||
=== | |||
=== Mounting Hole === | |||
{| class="wikitable" | {| class="wikitable" | ||
! | !List | ||
! | !Details | ||
|- | |- | ||
| | |Number of Holes | ||
| | |4 M2 Screw Holes | ||
|- | |- | ||
| | |Hole Size | ||
|2.2mm | |2.2mm | ||
|} | |} | ||
=== | == '''Usage Example''' == | ||
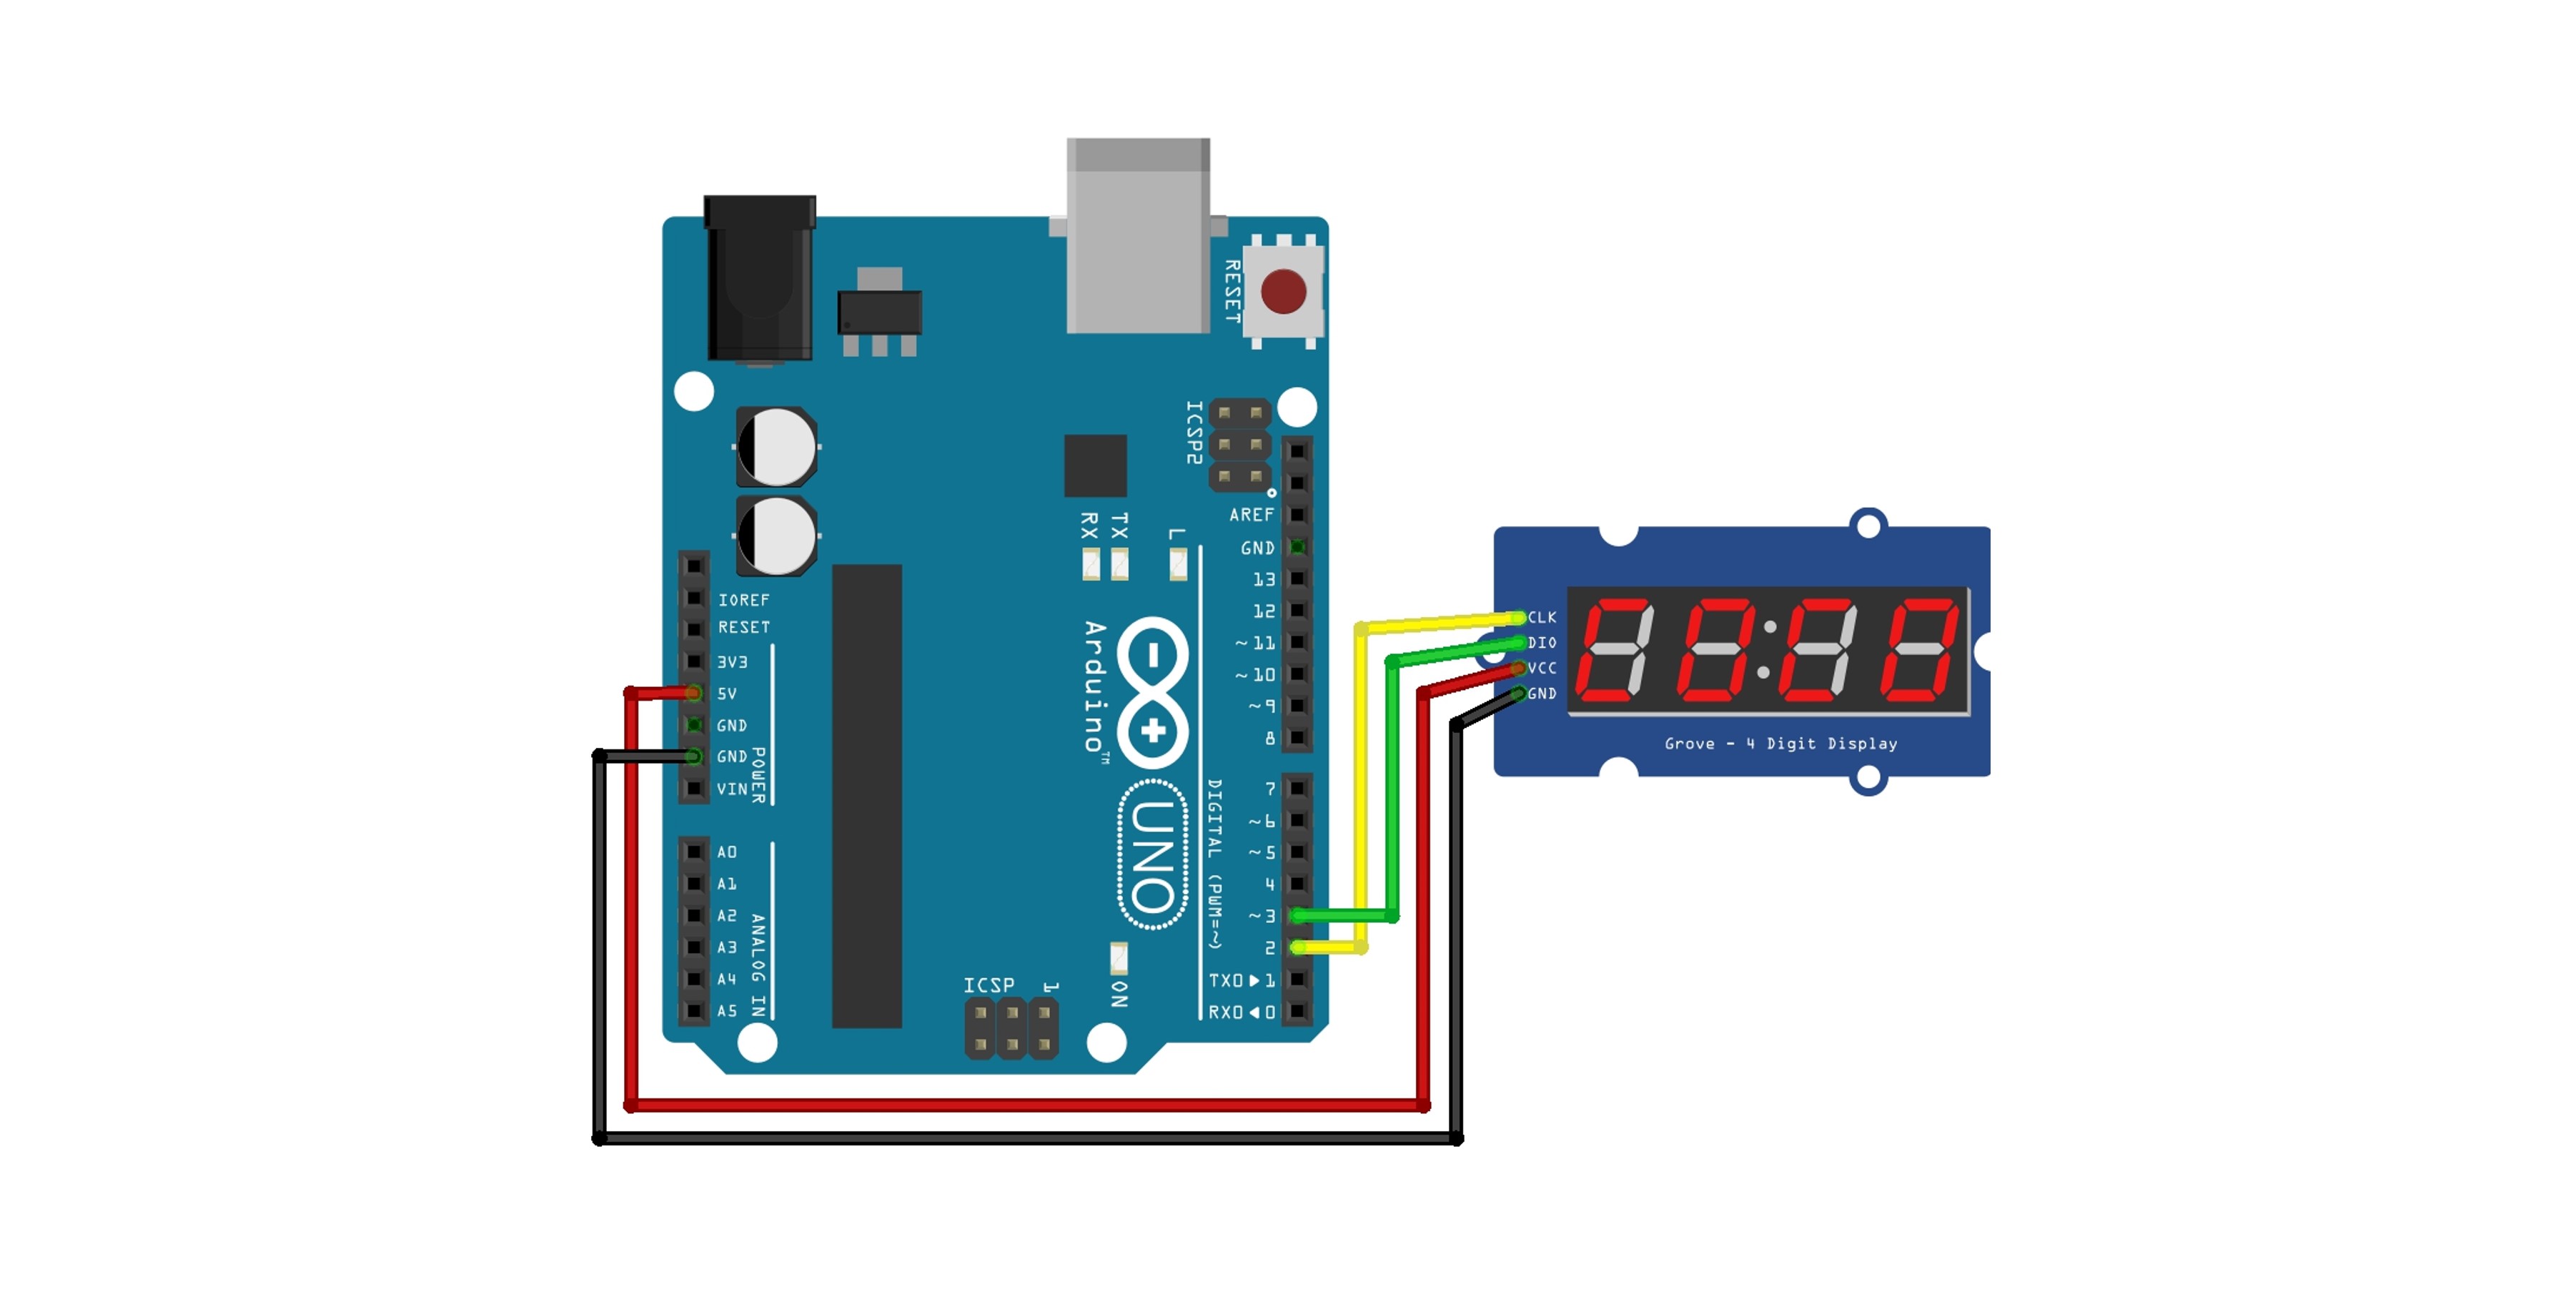
=== Circuit Configuration === | |||
{| class="wikitable" | {| class="wikitable" | ||
! | !Pin | ||
! | !Arduino | ||
|- | |- | ||
|GND | |GND | ||
| 62번째 줄: | 67번째 줄: | ||
|D2 | |D2 | ||
|} | |} | ||
[[파일:Tm1637_회로.jpg|가운데| | [[파일:Tm1637_회로.jpg|가운데|class=coders100]] | ||
=== | === Library === | ||
TM1637Display.h | TM1637Display.h library is used. | ||
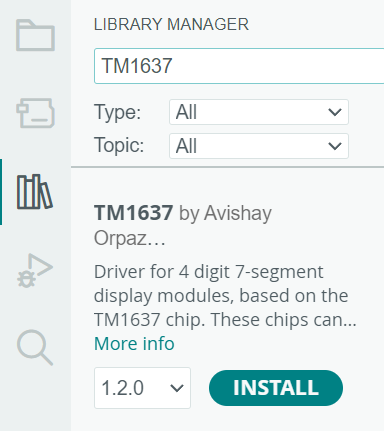
You can easily find and install TM1637 by searching in the library manager. | |||
For more detailed information related to the library, please refer to the [[아두이노 라이브러리]] document. | |||
[[파일:Tm1637_라이브러리.png| | [[파일:Tm1637_라이브러리.png|class=coders30]] | ||
==== TM1637 | ==== TM1637 Key Functions of the Library ==== | ||
{| class="wikitable" | {| class="wikitable" | ||
! | !Function | ||
! | !Explanation | ||
|- | |- | ||
|<code>TM1637Display(CLK, DIO, delay)</code> | |<code>TM1637Display(CLK, DIO, delay)</code> | ||
|TM1637 | |TM1637 object constructor. Sets the CLK and DIO pins. | ||
|- | |- | ||
|<code>setBrightness(uint8_t b, OnOff)</code> | |<code>setBrightness(uint8_t b, OnOff)</code> | ||
| | |Sets the brightness of the display (0x00 ~ 0x0f). | ||
|- | |- | ||
|<code>showNumberDec(int num, bool leading_zero)</code> | |<code>showNumberDec(int num, bool leading_zero)</code> | ||
| | |Displays an integer in decimal. If leading_zero is true, adds a leading 0. | ||
|- | |- | ||
|<code>showNumberHex(uint8_t num, bool leading_zero)</code> | |<code>showNumberHex(uint8_t num, bool leading_zero)</code> | ||
| | |Displays a number in hexadecimal. | ||
|- | |- | ||
|<code>clear()</code> | |<code>clear()</code> | ||
| | |Clears the display. | ||
|- | |- | ||
|<code>setSegments(const uint8_t segments[], uint8_t size)</code> | |<code>setSegments(const uint8_t segments[], uint8_t size)</code> | ||
| | |Displays custom segments. | ||
|} | |} | ||
=== 1. | |||
0 | === 1. Number Display === | ||
Displays numbers from 0 to 10, changing at intervals of 0.5 seconds. The displayed number can be easily modified up to 4 digits. | |||
{| class="wikitable" | {| class="wikitable" | ||
|<code>showNumberDec(int num, bool leading_zero)</code> | |<code>showNumberDec(int num, bool leading_zero)</code> | ||
| | |Displays an integer in decimal. If leading_zero is true, adds a leading 0. | ||
|} | |} | ||
If you modify the leading_zero part of showNumberDec to true, it will display the number 1 in the format 0001. | |||
<syntaxhighlight lang="c++" line="1"> | |||
#include <TM1637Display.h> | #include <TM1637Display.h> | ||
#define CLK 2 // | #define CLK 2 // Clock Pin | ||
#define DIO 3 // | #define DIO 3 // Data Pin | ||
TM1637Display display(CLK, DIO); | TM1637Display display(CLK, DIO); | ||
void setup() { | void setup() { | ||
display.setBrightness(0x0f); // | display.setBrightness(0x0f); // Sets the brightness. | ||
} | } | ||
void loop() { | void loop() { | ||
for (int i = 0; i <= 10; i++) { | for (int i = 0; i <= 10; i++) { | ||
display.showNumberDec(i, false); // | display.showNumberDec(i, false); // Display Number | ||
delay(500); // 0. | delay(500); // Wait for 0.5 seconds. | ||
} | } | ||
} | } | ||
</syntaxhighlight> | </syntaxhighlight> | ||
=== | === Execution Result === | ||
<div class="coders70"> | <div class="coders70"> | ||
<youtube> QVS91ZXbZvM </youtube> | <youtube> QVS91ZXbZvM </youtube> | ||
</div> | </div> | ||
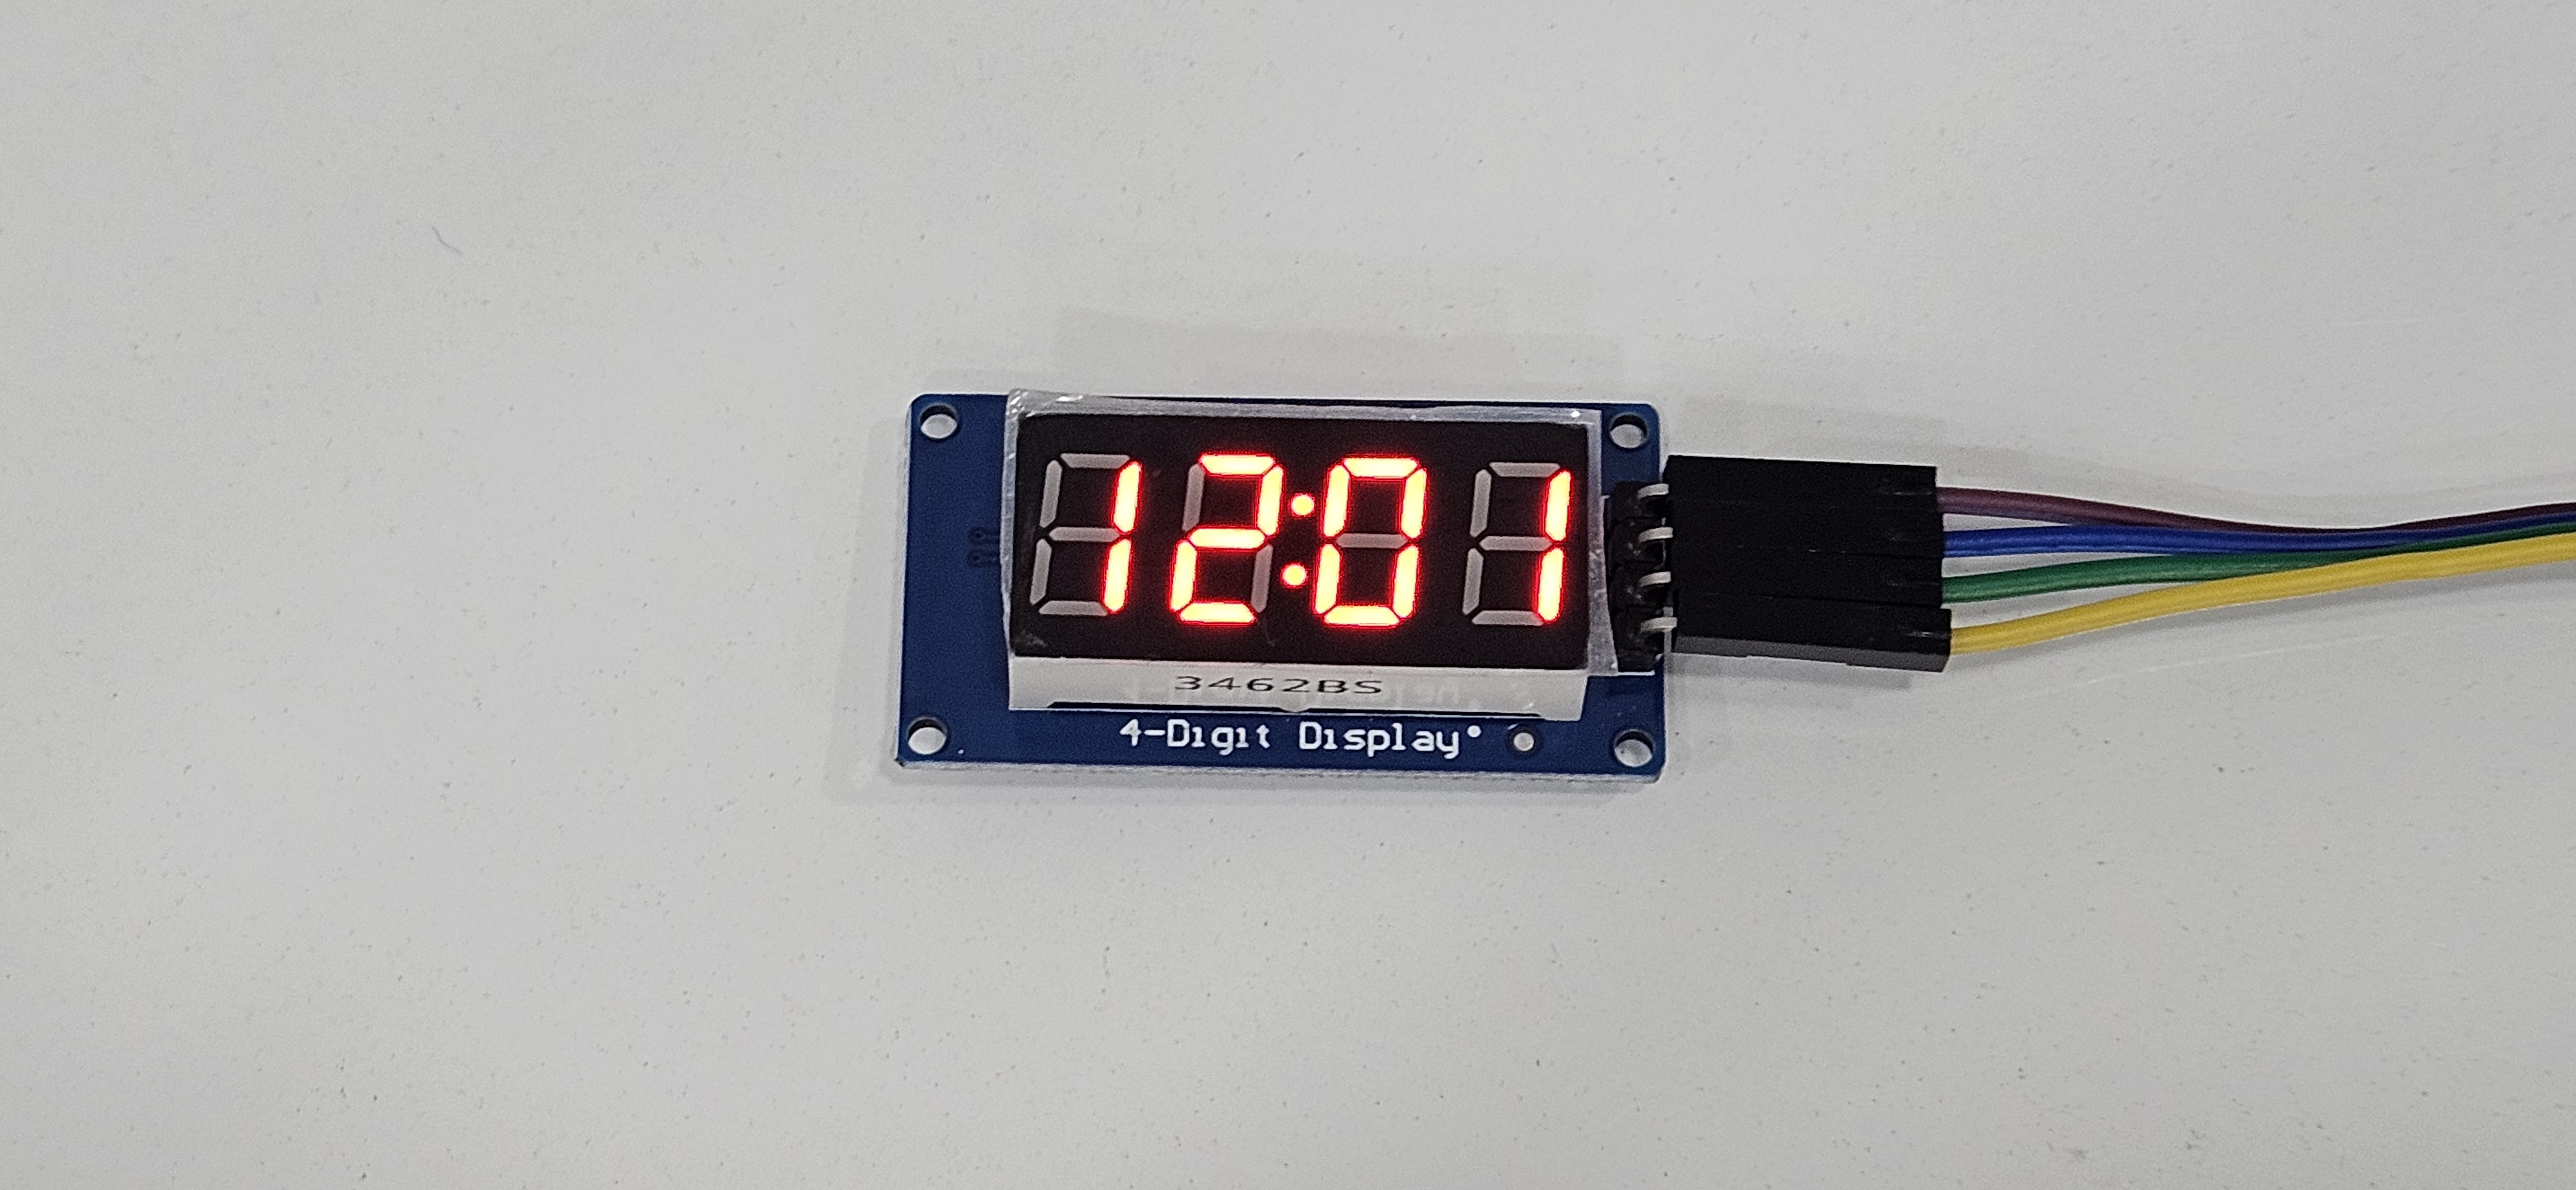
=== 2. | === 2. Digital Clock Display === | ||
showNumberDecEx | Displays hours and minutes in a 24-hour format. | ||
The showNumberDecEx function is an extended version of the showNumberDec function, used to display a dot in the center.<syntaxhighlight lang="c++" line="1"> | |||
#include <TM1637Display.h> | #include <TM1637Display.h> | ||
| 144번째 줄: | 153번째 줄: | ||
void loop() { | void loop() { | ||
int hour = 12; | int hour = 12; | ||
int minute = 0; | int minute = 0; | ||
for (int i = 0; i < 60; i++) { | for (int i = 0; i < 60; i++) { | ||
display.showNumberDecEx(hour * 100 + minute, 0b11100000, true); // 시간 표시 | display.showNumberDecEx(hour * 100 + minute, 0b11100000, true); // 시간 표시 | ||
delay(60000); // | delay(60000); // Wait for 1 Minute. | ||
minute = (minute + 1) % 60; // | minute = (minute + 1) % 60; // Increase minute | ||
if (minute == 0) hour = (hour + 1) % 24; // | if (minute == 0) hour = (hour + 1) % 24; // Increase hour | ||
} | } | ||
} | } | ||
</syntaxhighlight> | </syntaxhighlight> | ||
=== | === Execution Result === | ||
[[파일:4비트7세그먼트_예제2_디지털시계.jpg|가운데| | [[파일:4비트7세그먼트_예제2_디지털시계.jpg|가운데|class=coders100]] | ||
=== 3. String Output Using SetSegments Function === | |||
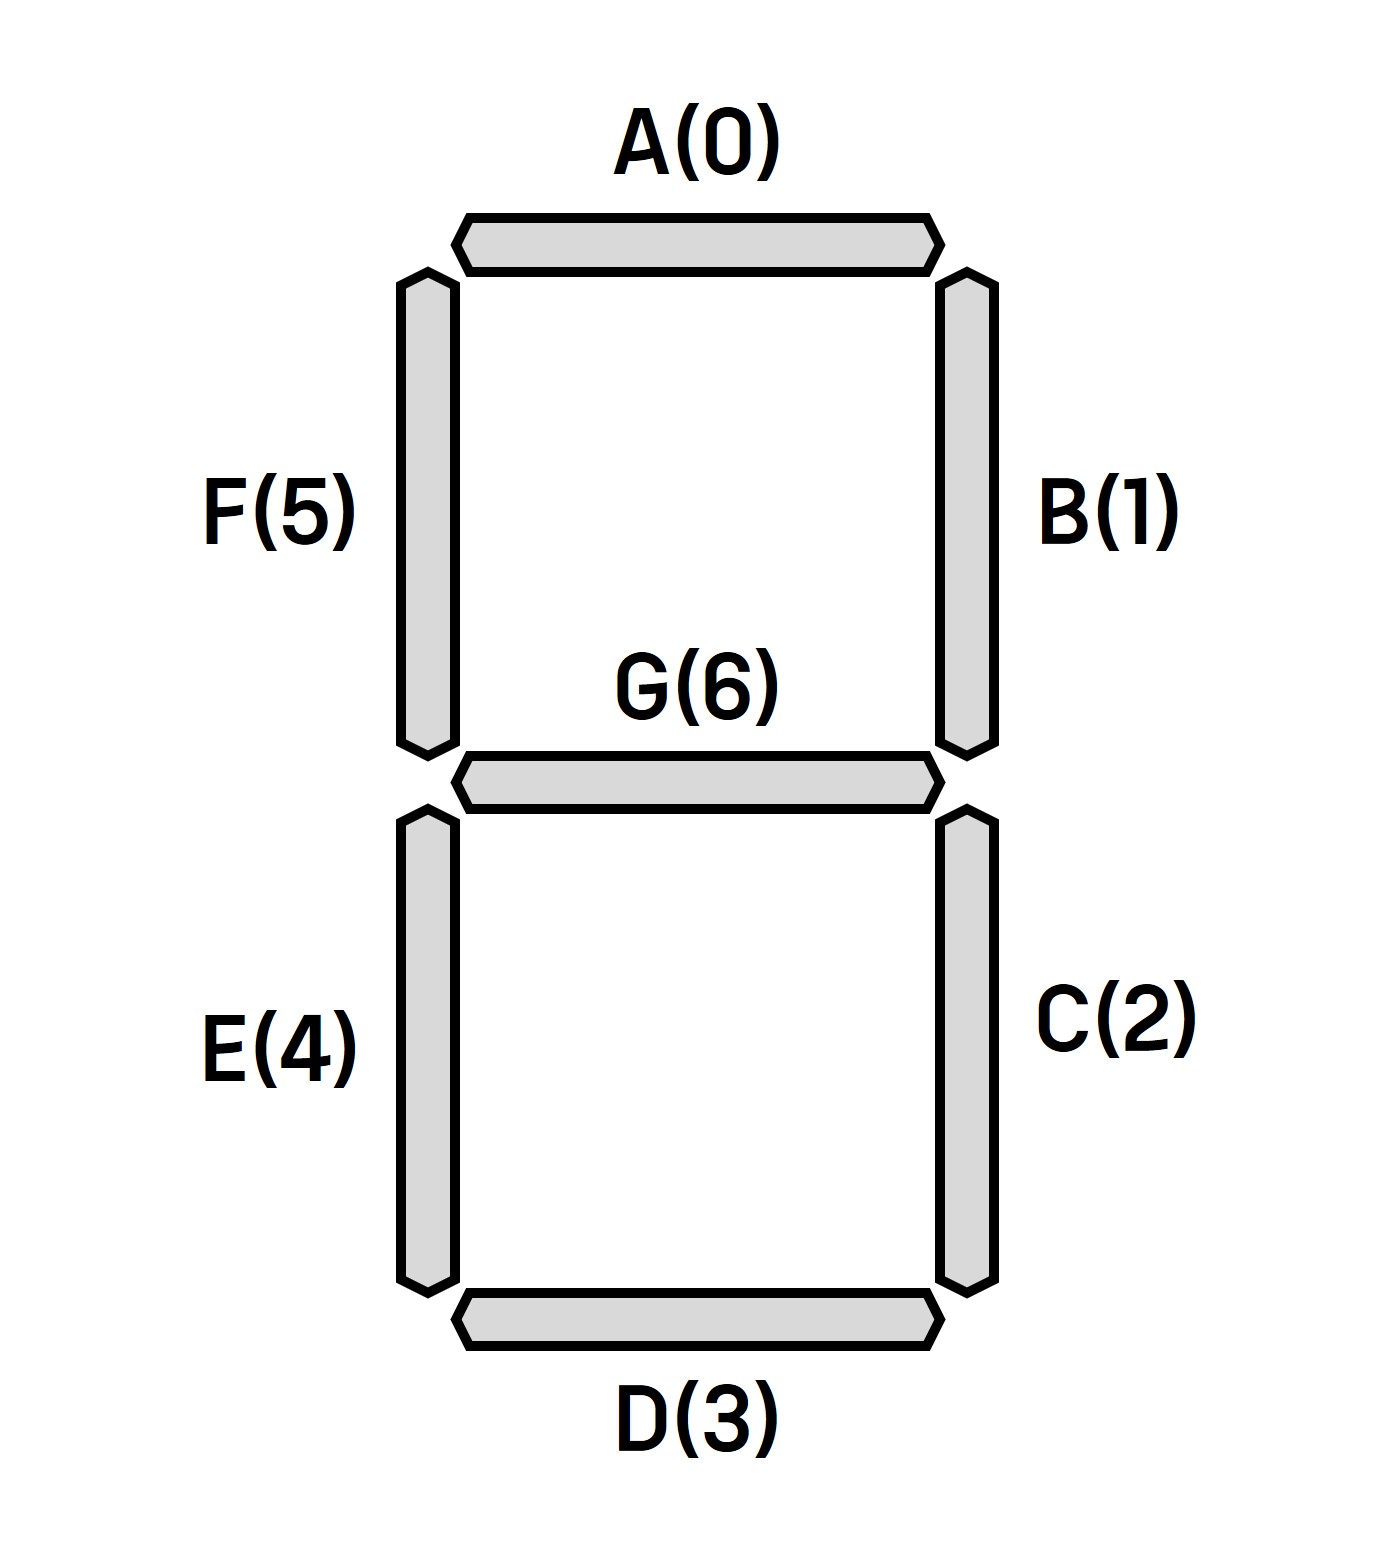
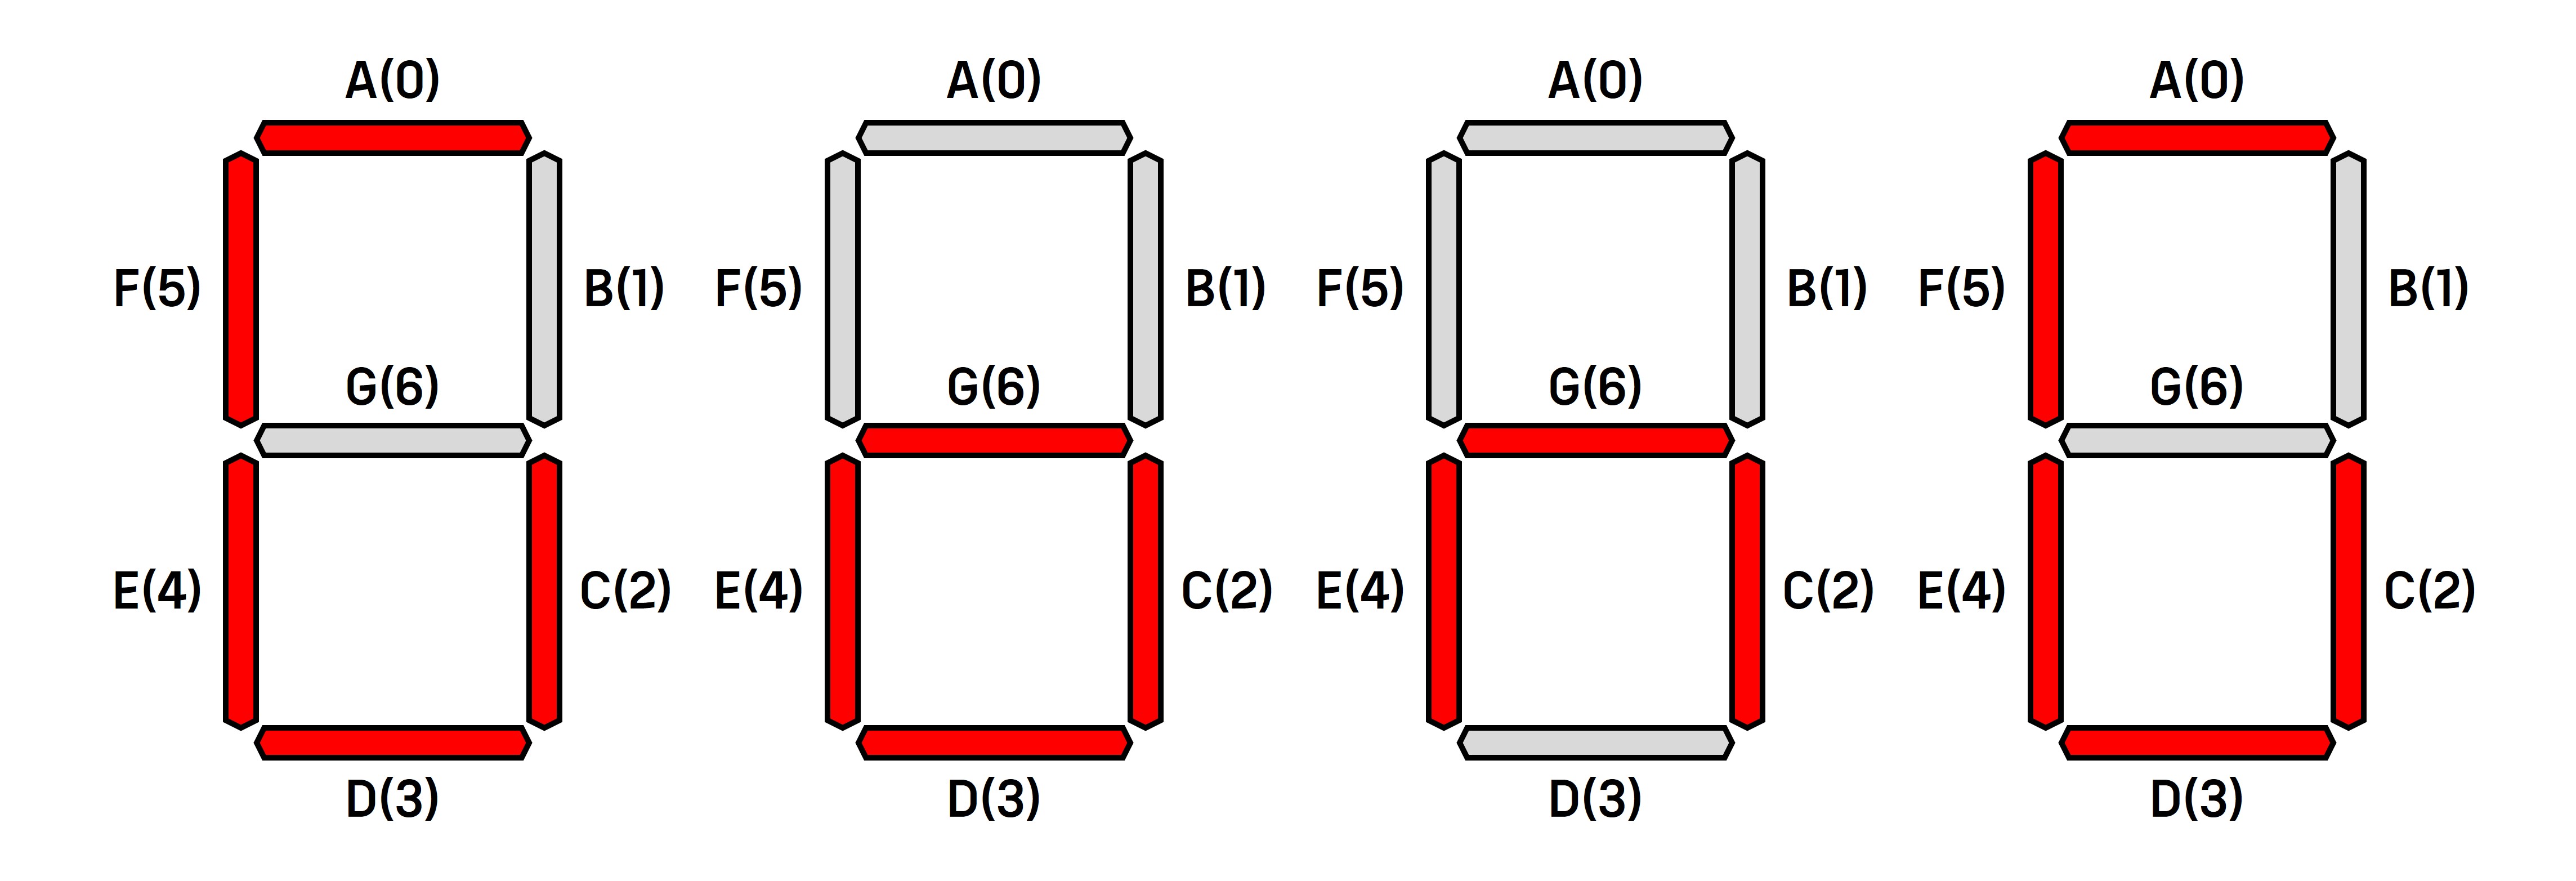
The 7-segment patterns are organized as follows. | |||
[[파일:7세그먼트_비트.jpg| | [[파일:7세그먼트_비트.jpg|class=coders30]] | ||
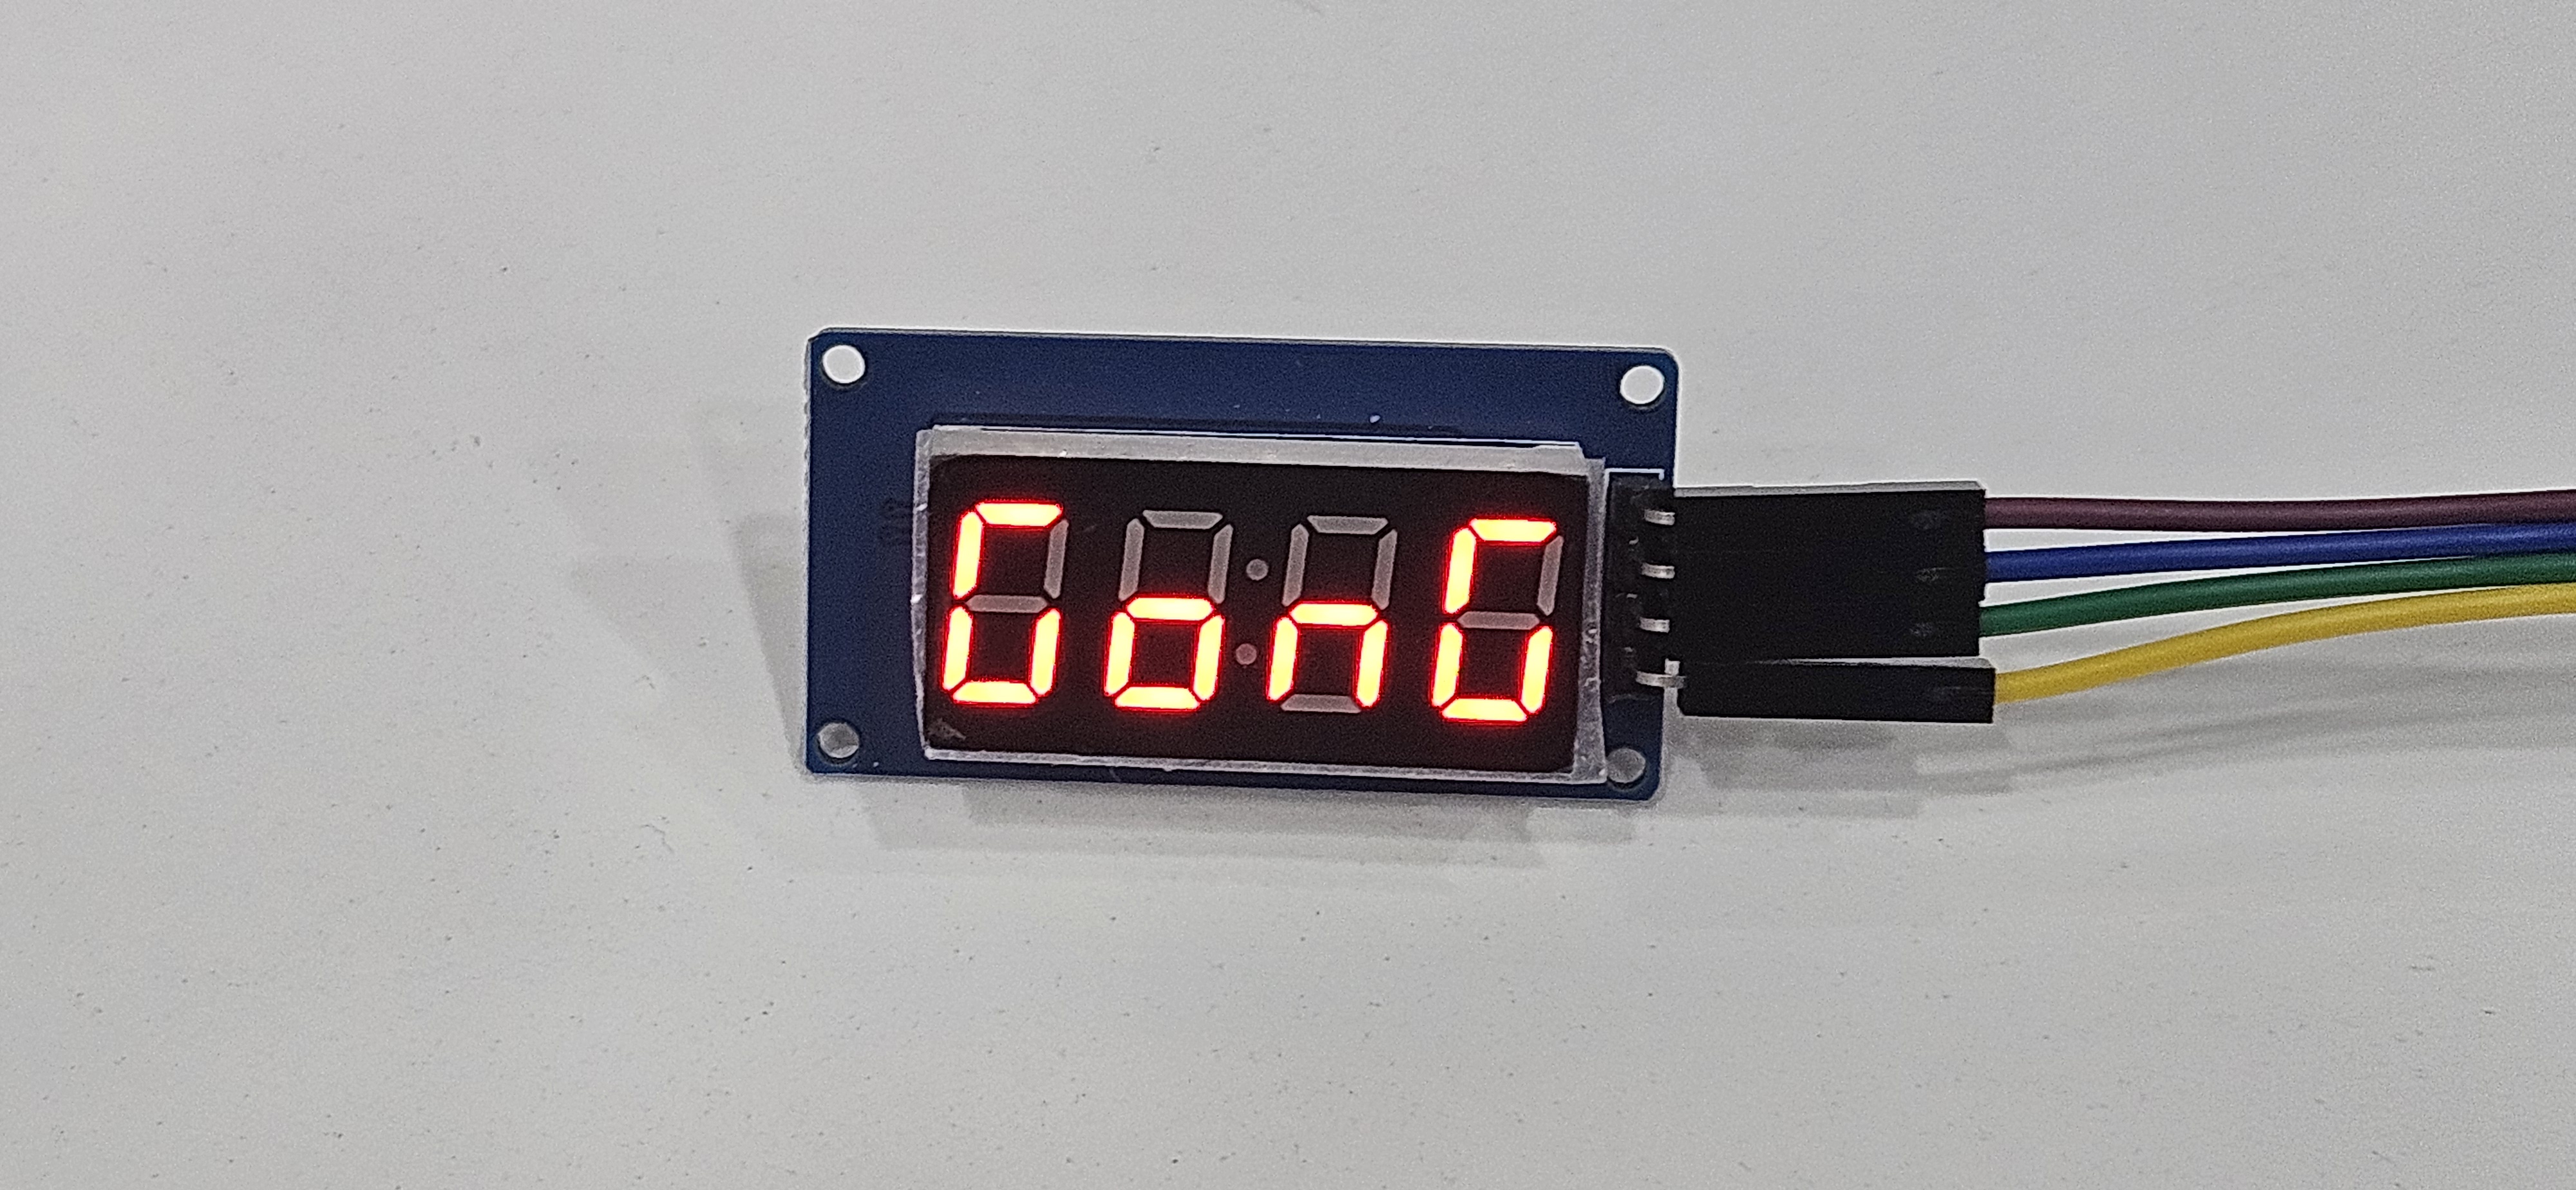
GONG | When the characters "GONG" are displayed on a 7-segment display, they appear as follows. | ||
[[파일:4비트세그_예제3_참고사진(GONG).jpg|가운데| | [[파일:4비트세그_예제3_참고사진(GONG).jpg|가운데|class=coders100]] | ||
{| class="wikitable" | {| class="wikitable" | ||
|+ | |+ | ||
! | !String | ||
!G | !G | ||
!F | !F | ||
| 176번째 줄: | 187번째 줄: | ||
!B | !B | ||
!A | !A | ||
! | !Binary | ||
! | !Hexadecimal | ||
|- | |- | ||
|G | |G | ||
| 212번째 줄: | 223번째 줄: | ||
|54 | |54 | ||
|} | |} | ||
The parts that should be turned on are set to 1, and the parts that should be turned off are set to 0. After finding the binary representation for the desired character, you can express it in hexadecimal and apply it to the array. | |||
The code implementing this is as follows.<syntaxhighlight lang="c++" line="1"> | |||
#include <TM1637Display.h> | #include <TM1637Display.h> | ||
| 224번째 줄: | 235번째 줄: | ||
void setup() { | void setup() { | ||
display.setBrightness(0x0f); // | display.setBrightness(0x0f); // Set maximum brightness | ||
} | } | ||
| 232번째 줄: | 243번째 줄: | ||
</syntaxhighlight> | </syntaxhighlight> | ||
=== 4. | === Execution Result === | ||
[[파일:4비트7세그먼트_예제3_GONG_표시.jpg|가운데|class=coders100]] | |||
=== 4. Scrolling Effect for Strings === | |||
This code displays characters longer than 4 characters by scrolling them to the left. | |||
GONGZIPSA | The characters "GONGZIPSA" are displayed as in the example above, scrolling one space to the left at a time.<syntaxhighlight lang="c++" line="1"> | ||
#include <TM1637Display.h> | #include <TM1637Display.h> | ||
| 245번째 줄: | 259번째 줄: | ||
TM1637Display display(CLK, DIO); | TM1637Display display(CLK, DIO); | ||
// | // Given segment pattern | ||
byte data[] = {0x3D, 0x5C, 0x54, 0x3D, 0x49, 0x30, 0x73, 0x6D, 0x77}; // | byte data[] = {0x3D, 0x5C, 0x54, 0x3D, 0x49, 0x30, 0x73, 0x6D, 0x77}; // Pattern for each character | ||
void setup() { | void setup() { | ||
display.setBrightness(0x0f); // | display.setBrightness(0x0f); // Set maximum brightness | ||
} | } | ||
void loop() { | void loop() { | ||
// | // Set string length and display size | ||
int stringLength = sizeof(data) / sizeof(data[0]); | int stringLength = sizeof(data) / sizeof(data[0]); | ||
int displaySize = 4; // | int displaySize = 4; // TM1637 can display up to 4 digits. | ||
// | // Implementing a scrolling effect for strings. | ||
for (int i = 0; i < stringLength + displaySize; i++) { | for (int i = 0; i < stringLength + displaySize; i++) { | ||
byte displayData[displaySize] = {0, 0, 0, 0}; // | byte displayData[displaySize] = {0, 0, 0, 0}; // Initialize data to be displayed on the display. | ||
// | // Set the character to be displayed based on the current position. | ||
for (int j = 0; j < displaySize; j++) { | for (int j = 0; j < displaySize; j++) { | ||
if (i + j >= 0 && i + j < stringLength) { // | if (i + j >= 0 && i + j < stringLength) { // In the array range. | ||
displayData[j] = data[i + j]; // | displayData[j] = data[i + j]; // Set the current character. | ||
} | } | ||
} | } | ||
display.setSegments(displayData); // | display.setSegments(displayData); // Display Segment | ||
delay(500); // 0. | delay(500); // Wait for 0.5 seconds | ||
} | } | ||
} | } | ||
</syntaxhighlight> | </syntaxhighlight> | ||
=== | === Execution Result === | ||
<div class="coders70"> | <div class="coders70"> | ||
<youtube> hxcmkRT0j-o </youtube> | <youtube> hxcmkRT0j-o </youtube> | ||
</div> | </div> | ||
== ''' | == '''Purchase Link''' == | ||
[https://gongzipsa.com/shop/1715255679 | [https://gongzipsa.com/shop/1715255679 GONGZIPSA] | ||
2024년 8월 9일 (금) 15:10 기준 최신판
Overview
TM1637 is a driver IC for controlling 7-segment displays, and it can use easily connected with microcontrollers like Arduino. It has a colon (:) between the numbers so it has been used for particularly digital clocks, and widely used in various electronic projects such as thermometers and counters.
Specifications
TM1637 Module Specifications
| List | Specifications |
|---|---|
| Power Supply | 3.3V ~ 5V |
| Interface | I2C (TWI) |
| Display | 7segment Display (4자리) |
| Control Pin | CLK (Clock), DIO (Data) |
| Temperature Range | -20°C ~ 70°C |
| Size | 42 * 29 * 12 (mm) |
Mounting Hole
| List | Details |
|---|---|
| Number of Holes | 4 M2 Screw Holes |
| Hole Size | 2.2mm |
Usage Example
Circuit Configuration
| Pin | Arduino |
|---|---|
| GND | GND |
| VCC | 5V |
| DIO | D3 |
| CLK | D2 |
Library
TM1637Display.h library is used.
You can easily find and install TM1637 by searching in the library manager.
For more detailed information related to the library, please refer to the 아두이노 라이브러리 document.
TM1637 Key Functions of the Library
| Function | Explanation |
|---|---|
TM1637Display(CLK, DIO, delay)
|
TM1637 object constructor. Sets the CLK and DIO pins. |
setBrightness(uint8_t b, OnOff)
|
Sets the brightness of the display (0x00 ~ 0x0f). |
showNumberDec(int num, bool leading_zero)
|
Displays an integer in decimal. If leading_zero is true, adds a leading 0. |
showNumberHex(uint8_t num, bool leading_zero)
|
Displays a number in hexadecimal. |
clear()
|
Clears the display. |
setSegments(const uint8_t segments[], uint8_t size)
|
Displays custom segments. |
1. Number Display
Displays numbers from 0 to 10, changing at intervals of 0.5 seconds. The displayed number can be easily modified up to 4 digits.
showNumberDec(int num, bool leading_zero)
|
Displays an integer in decimal. If leading_zero is true, adds a leading 0. |
If you modify the leading_zero part of showNumberDec to true, it will display the number 1 in the format 0001.
#include <TM1637Display.h>

#define CLK 2 // Clock Pin
#define DIO 3 // Data Pin

TM1637Display display(CLK, DIO);

void setup() {
    display.setBrightness(0x0f); // Sets the brightness.
}

void loop() {
    for (int i = 0; i <= 10; i++) {
        display.showNumberDec(i, false); // Display Number
        delay(500); // Wait for 0.5 seconds.
    }
}
Execution Result
2. Digital Clock Display
Displays hours and minutes in a 24-hour format.
The showNumberDecEx function is an extended version of the showNumberDec function, used to display a dot in the center.
#include <TM1637Display.h>

#define CLK 2
#define DIO 3

TM1637Display display(CLK, DIO);

void setup() {
    display.setBrightness(0x0f);
}

void loop() {
    int hour = 12;
    int minute = 0;

    for (int i = 0; i < 60; i++) {
        display.showNumberDecEx(hour * 100 + minute, 0b11100000, true); // 시간 표시
        delay(60000); // Wait for 1 Minute.
        minute = (minute + 1) % 60; // Increase minute
        if (minute == 0) hour = (hour + 1) % 24; // Increase hour
    }
}
Execution Result
3. String Output Using SetSegments Function
The 7-segment patterns are organized as follows.
When the characters "GONG" are displayed on a 7-segment display, they appear as follows.
| String | G | F | E | D | C | B | A | Binary | Hexadecimal |
|---|---|---|---|---|---|---|---|---|---|
| G | 0 | 1 | 1 | 1 | 1 | 0 | 1 | 111101 | 3d |
| O | 1 | 0 | 1 | 1 | 1 | 0 | 0 | 1011100 | 5c |
| N | 1 | 0 | 1 | 0 | 1 | 0 | 0 | 1010100 | 54 |
The parts that should be turned on are set to 1, and the parts that should be turned off are set to 0. After finding the binary representation for the desired character, you can express it in hexadecimal and apply it to the array.
The code implementing this is as follows.
#include <TM1637Display.h>

#define CLK 2
#define DIO 3
TM1637Display display(CLK, DIO);

byte data[] = {0x3d, 0x5c, 0x54, 0x3d};

void setup() {
  display.setBrightness(0x0f); // Set maximum brightness
}

void loop() {
  display.setSegments(data);
}
Execution Result
4. Scrolling Effect for Strings
This code displays characters longer than 4 characters by scrolling them to the left.
The characters "GONGZIPSA" are displayed as in the example above, scrolling one space to the left at a time.
#include <TM1637Display.h>

#define CLK 2
#define DIO 3
TM1637Display display(CLK, DIO);

// Given segment pattern
byte data[] = {0x3D, 0x5C, 0x54, 0x3D, 0x49, 0x30, 0x73, 0x6D, 0x77}; // Pattern for each character

void setup() {
    display.setBrightness(0x0f); // Set maximum brightness
}

void loop() {
    // Set string length and display size
    int stringLength = sizeof(data) / sizeof(data[0]);
    int displaySize = 4; // TM1637 can display up to 4 digits.

    // Implementing a scrolling effect for strings.
    for (int i = 0; i < stringLength + displaySize; i++) {
        byte displayData[displaySize] = {0, 0, 0, 0}; // Initialize data to be displayed on the display.

        // Set the character to be displayed based on the current position.
        for (int j = 0; j < displaySize; j++) {
            if (i + j >= 0 && i + j < stringLength) { // In the array range.
                displayData[j] = data[i + j]; // Set the current character.
            }
        }

        display.setSegments(displayData); // Display Segment
        delay(500); // Wait for 0.5 seconds
    }
}
Execution Result
